NB. I have a job or two for you if you care to pop down to Somerset for a few weeks.... Your build quality is fan flippin tastic... Crackin job :thumb: :thumb: :thumb:
You are using an out of date browser. It may not display this or other websites correctly.
You should upgrade or use an alternative browser.
You should upgrade or use an alternative browser.
NB's bunker brewery build
- Thread starter Northern Brewer
- Start date

Help Support The Homebrew Forum:
This site may earn a commission from merchant affiliate
links, including eBay, Amazon, and others.
Northern Brewer
Landlord.
Thanks Frisp!! Who knows, I do make it to those parts occasionally, and I enjoy doing it. Like a hole saw going through stainless, just need to feed me plenty of liquid :

Northern Brewer
Landlord.
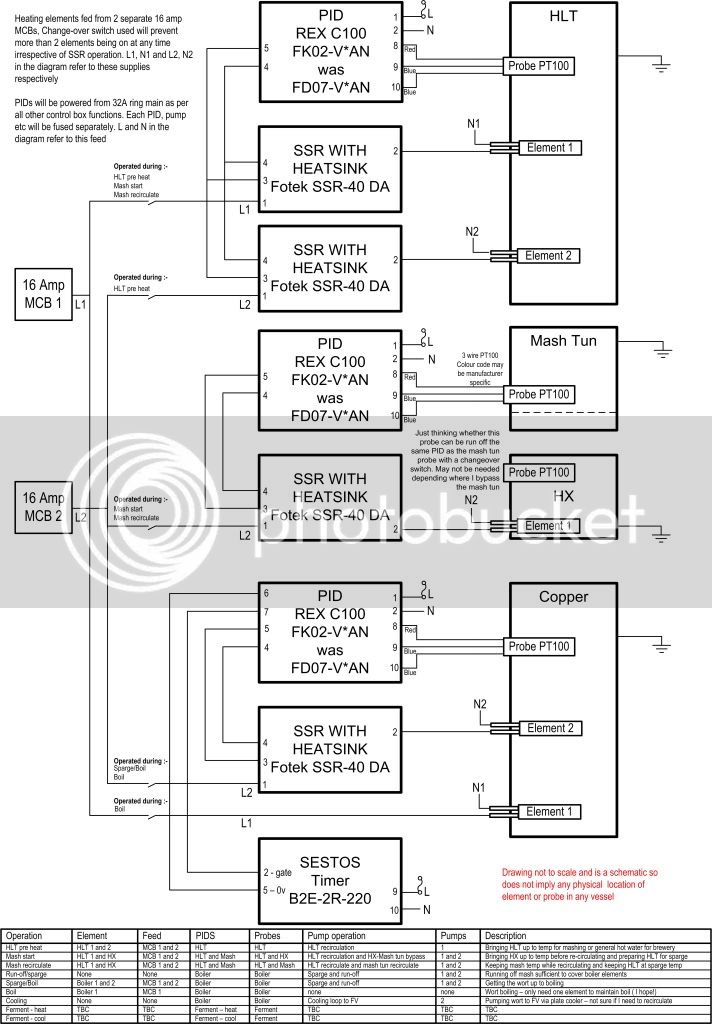
This will be all I get done this week until at least Friday, its the wiring diagram for the PIDs, SSRs, heating elements, probes etc. The 32A changeover switch I got from HK from fleabay looks good and will prevent me trying to put 3 heating elements on at the same time. Click on the file to see the full image. The file size is quite big as you can only upload media files on photobucket but if you choose lower jpg quality the writing doesn't comeout. (edit that didn't work, here's a linkto the file) (double edit - that doesnt work either, you only get a reduced quality version!)

Muddydisco
Landlord.
- Joined
- Feb 26, 2009
- Messages
- 502
- Reaction score
- 1
Two queries
1, your sight glass is it open ended? As when you turn on the pump to recirc the mash it's going to suck air from the path of least resistance being the sight glass?
2, How will you preheat the HX water before mashing as you can't run that element whilst the hlt is running both elements? Or are you waiting for the mash to be in before pregeating the water?
Northern Brewer
Landlord.
muddydisco said:Two queries
1, your sight glass is it open ended? As when you turn on the pump to recirc the mash it's going to suck air from the path of least resistance being the sight glass?
2, How will you preheat the HX water before mashing as you can't run that element whilst the hlt is running both elements? Or are you waiting for the mash to be in before pregeating the water?
Hi MD. I'm glad I'm getting questions- all this is theory, I have never gone beyond a 5 gallon standard mash before, 100Lt system with HERMS is all new :hmm:
The sight glass as a vent idea started out as a reply to one of my queries about a using an underback, I can't find the post at the moment but somebody uses a vent as well as a pump bypass to prevent a stuck/sucked mash and with success, so I thought I would try it. I guess I could always stick a spile in to reduce flow or just block it if it doesn't work.
The idea with the HX pre-heat is as follows, may not work but I'm trying to get all the possible wiring permutations out now so I can make sure the switch I bought can handle it, that was the purpose of the diagram - as well as getting comments from the forum - this really has helped :thumb:
1.) both elements in HLT until reaches strike temp - full liquor tank - just use what is required fro doughing in so should be lots left at circa 75c
2.) during 10 minute break while grain bed settles down and before recirc, top up HLT to desired level for sparge as required. One element in the HLT one element in the HX (only about 3 litres of water).
3.) now on recirc for 50 mins or so, still one element in the HX and one in the HLT. I am guessing that sufficiently insulated that an hour is enough to raise the sparge to temp. Should be enough for HLT to get up to temp given there was some water left from doughing in.
Cheers
NB
Muddydisco
Landlord.
- Joined
- Feb 26, 2009
- Messages
- 502
- Reaction score
- 1
:thumb Ah right i was trying to find if you were using an underback or not. Yes got the electric circuit diagram now and how you planned on switching elements.
Looking good anyway
Looking good anyway

£15.96
£16.99
The Brew Your Own Big Book of Clone Recipes: Featuring 300 Homebrew Recipes from Your Favorite Breweries
Amazon.co.uk

£17.95
£24.95
DIAH DO IT AT HOME Fermenter 30l Fermentation Bucket with Tap, Airlock, Lid, and Bung, Homebrew Wine Making
do-it-at-home

£63.25
Sanitary clamp 1.5" (38mm) OD50.5mm Sanitary Tri-Clamp 90-Degree Pipe With Nipple And Electronic Thermometer, Stainless Steel 304 Home brewing(Without Thermometer)
DAN CHENG XIAN PENG SHI DA SHANG MAO DIAN

£11.95
£14.99
FOR THE LOVE OF HOPS (Brewing Elements): The Practical Guide to Aroma, Bitterness and the Culture of Hops
Amazon.co.uk

£14.25
£18.99
How to Brew: Everything You Need to Know to Brew Great Beer Every Time
Amazon.co.uk

£9.99 (£199.80 / kg)
Lalvin EC-1118 Wine Yeast (10 Pack) - Champagne Yeast - Make Wine Cider Mead Kombucha At Home - 5 g Sachets - Saccharomyces cerevisiae - Sold by CAPYBARA Distributors Inc.
CAPYBARA Distributors Inc. (UK)

£11.81
Digital Temperature Watch Heating Thermometer Home Brewing Tools for Wine Bottle
B&D DIRECT STORE

£8.99 (£158.55 / kg)
Fermaid O Yeast Nutrient - 2 oz (56.7 g) - Make Wine Cider Mead Kombucha at Home - Sold by CAPYBARA Distributors Inc.
CAPYBARA Distributors Inc. (UK)

£38.63 (£0.39 / 100 ml)
Cider Making Kit - Full Starter - 10L/2 Gallon/20 Pints Home brew Beer Ale Lager
247 Homebrew

£11.95
£14.99
Brew it Yourself: Make Your Own Beer, Wine, Cider and Other Concoctions
ST Bookstores

£11.08
Banziaju Wine Making Supplies, 18" Auto Siphon Hose For Water Homebrew Siphon Pump With Tubing And Clamp Clear Wine Siphon For Beer Wine Making Kit
Jian Shi Xian Chao Mei Shang Mao You Xian Gong Si

£7.99
£14.99
Craft Brew: 50 homebrew recipes from the world's best craft breweries
Sarahs Bookshop UK

£11.95
£14.99
WATER COMPREHENSIVE GUIDE (Brewing Elements): A Comprehensive Guide for Brewers
Amazon.co.uk

£6.89 (£344.50 / kg)
£7.10 (£355.00 / kg)
2x Mangrove Jack’s Craft Series Mead Yeast M05 (10g)
do-it-at-home

£6.99
Stevenson Reeves Triple Scale Hydrometer (S1011) For Home Brewing and Winemaking
Medi Exchange
Northern Brewer
Landlord.
Thanks MD, good to get feed back, I feel better now that some of the seasoned practisioners have had a look :thumb:
The underback is definitely parked, only to be revived if other simpler methods don't work for me. Hopefully this will be fine, others don't need one which means I could then use this small pot for something else, a hopback maybe? :hmm: I'm not even going there just yet, going to get the brewery up and tested first.
First thing is a "wet" run, without grain or hops and shorter time periods but full temperatures. Make sure I have taps, hosetails in all the right places so I'll go through the fulll process from HLT to FV. I'm assuming everybody does this with a new build or do you just have a go with grain and risk it :hmm:
Bunker brewery floor now tiled and grouted so this weekend I can put the sink in, plumb in the water and waste and start on the lighting and power cabling. I have the FV, copper and HLT to build and finish off the HX return plus all the electrical control box to build and a conical FV cupboard to design so this will keep me busy for a few more weeks yet.......
Muddydisco
Landlord.
- Joined
- Feb 26, 2009
- Messages
- 502
- Reaction score
- 1
I did a full water test, pumping for the full amounts to make sure I had no slow leaks or overheating pids wires etc. I also did it to work out losses etc , but that will change once hops and grain are in it as well, but it gave a figure for a starting point.
I think the underback may have to be ready to use or seal the top sightglass tube once a mash is it in.
I think the underback may have to be ready to use or seal the top sightglass tube once a mash is it in.
Northern Brewer
Landlord.
I guess I won't know that for definite until I have grain in it. So if need be I'll block the sight tube up and be careful with my pump bypass to make sure I don't suck the bed for the first mash, then work out what to do next - to underback or not to underback etc.
Mark1964
Landlord.
Thats what i pm d you about. You will be using a sight tube open ended to prevent sucking the mash bed ill be using a piece of 15mm pipe with a T fitting on then a bit of vossys pipe straight up i can also use this to stick a probe down or a digital thermometer to check mash temp straight from the mash tun tap. I wouldnt have thought the solar pumps would cause a stuck mash as they only pump max 6 litres a min ive seen one in action and the recirc isnt bad
Mark1964
Landlord.
What design do you have for the bypass valve anyway?
Northern Brewer
Landlord.
Hi Mark - my brain is a bit befuddled as I've been out for a "few" beers with the guys from work last night : :drink: :drunk:
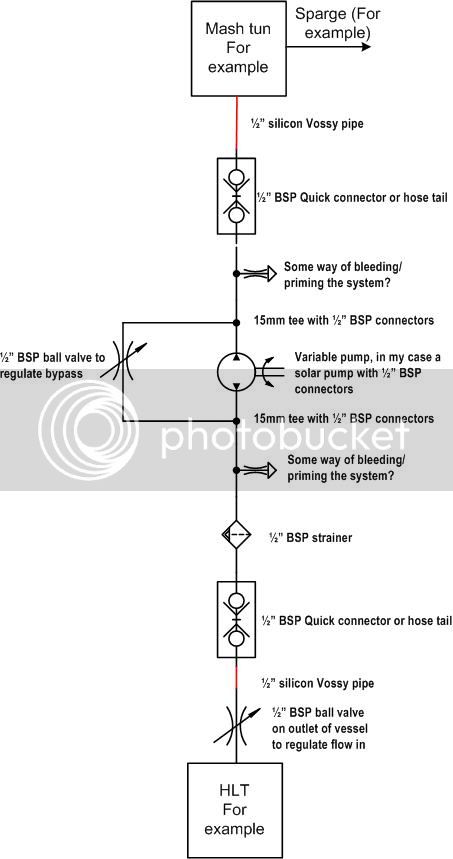
however something like this springs to mind. The bits between the hose tails or quick connectors could be hard plumbed or vossy tube. I haven't really got this far yet so comments welcome.
 :drink: :drunk:
 however something like this springs to mind. The bits between the hose tails or quick connectors could be hard plumbed or vossy tube. I haven't really got this far yet so comments welcome.

Mark1964
Landlord.
Looks ok dont know if ill use ball valves to regulate flow maybe just alter the voltage on the solar pump down a bit. We are going to drill the hole in thermo lid tomorrow our local plumbers dont sock the barrel nipples so if we need one will have to order on line. Had more snow here overnight dont envy your return to Yorkshire :thumb:
BarnsleyBrewer
Active Member
- Joined
- Oct 17, 2008
- Messages
- 30
- Reaction score
- 1
Cracking build with innovative ideas, :clap:
What's your day job, are you some type of engineer ?
BB :drink:
What's your day job, are you some type of engineer ?
BB :drink:
Northern Brewer
Landlord.
mark1964 said:Looks ok dont know if ill use ball valves to regulate flow maybe just alter the voltage on the solar pump down a bit. We are going to drill the hole in thermo lid tomorrow our local plumbers dont sock the barrel nipples so if we need one will have to order on line. Had more snow here overnight dont envy your return to Yorkshire :thumb:
just got back, the parallel nipple is only 25mm long, the tapered parallel nipple is the way to go if the tank connector not long enough
Northern Brewer
Landlord.
BarnsleyBrewer said:Cracking build with innovative ideas, :clap:
What's your day job, are you some type of engineer ?
BB :drink:
Cheers BB!
i'm in IT but have alwaya been fiddling with stuff - currently renovating an old tractor
It is a very interesting build, giving me lots of expensive ideas :) Thanks.
I too am in IT and tinker with things outside, but I tend to be from the bodge it side.
I'm gradually building my brewery, currrently 100lt bergland boiler and HLT, 80lt Mash Thermo mash tun, and just about to go HERMs, so may be borrowing some of your ideas. I was supprised at the power of the heating element in your HX, but having done some quick calculations, I think that is better than the kettle element I was planning to use.
I've been building an Arduino controller with DS18B20 temperature measurement, is there any reason you went with pre-built PIDs instead?
Northern Brewer
Landlord.
Boatman said:I've been building an Arduino controller with DS18B20 temperature measurement, is there any reason you went with pre-built PIDs instead?
Hi Boatman. most of the ideas in the build are stolen from bits of other peoples builds mainly on this but also other forums. same with the PIDS, seemed very easy and at 10 quid each cost effective. I've never heard of the controllers etc. you mention but will take a look when I get my broadband connection back. :geek:
BT are really useless. :x Frozen rain indeed, its the rats nest in the green distribution cabinet just nearby - caught them two weeks ago cutting me off in the cabinet as they provisioned service for somebody else, the guy had been a gas fitter until a couple of weeks before, he had hands like shovels and must have cut six people off while he tried to provide a new phone.
Northern Brewer
Landlord.
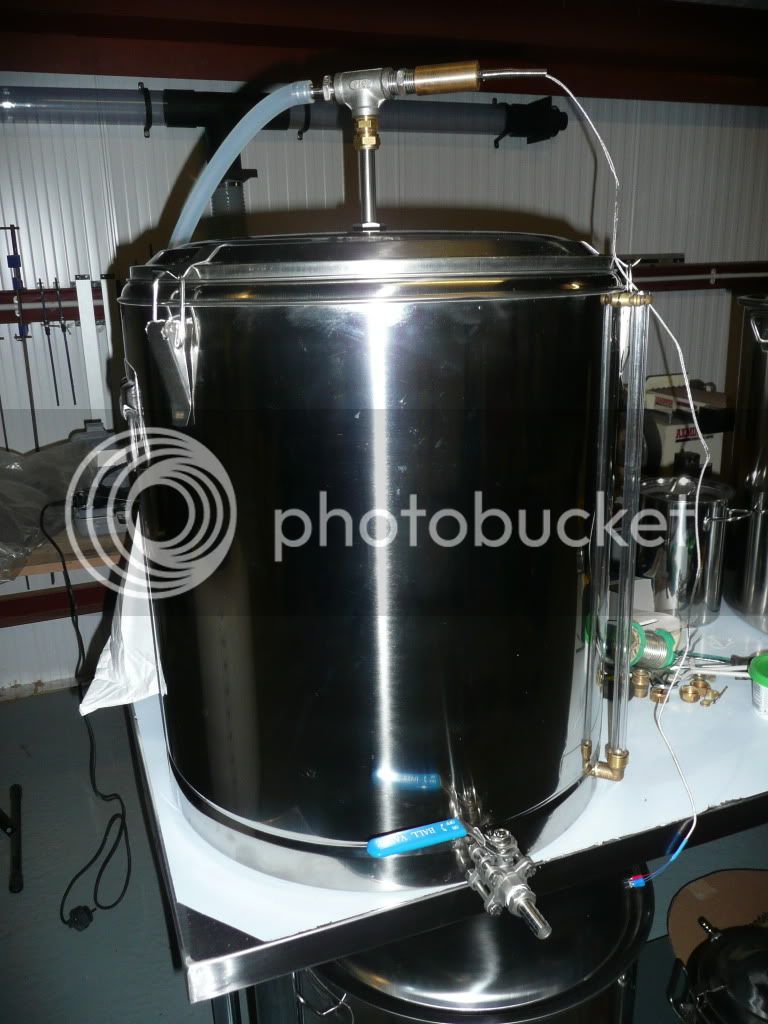
Mobile broadband doing better than expected up in t'frozen north so here's what I did tonight once the kids were in bed.
Firstly I drilled the thermos pot lid for the mash tun, for the record, the current batch of 80L pots are 47.5mm deep in the lid. The BES barrel tapered I/2" BSP barrel nipples work grand. I put a pilot hole through first, then measured it was centred both sides, I then went through the SS skin underneath the lid with a 20mm hole saw and used a 20mm qmax on the top.
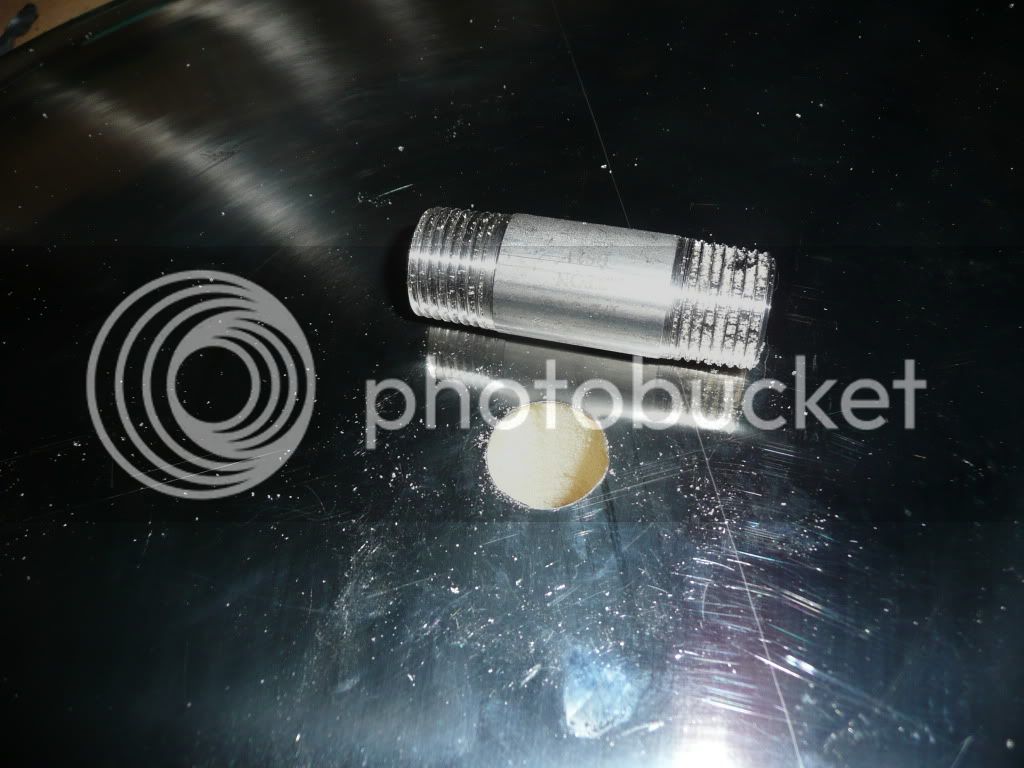
I put the barrel nipple through and used SS 1/2" BSP lock nuts and 20mm washers top and bottom. I then passed the HX return assembly with PT100 probe through it. Needs some taking off the PT100 holder yet and I need to make a clamp so I can clamp the down pipe at any position - or use mole grips until I get around to it :thumb:
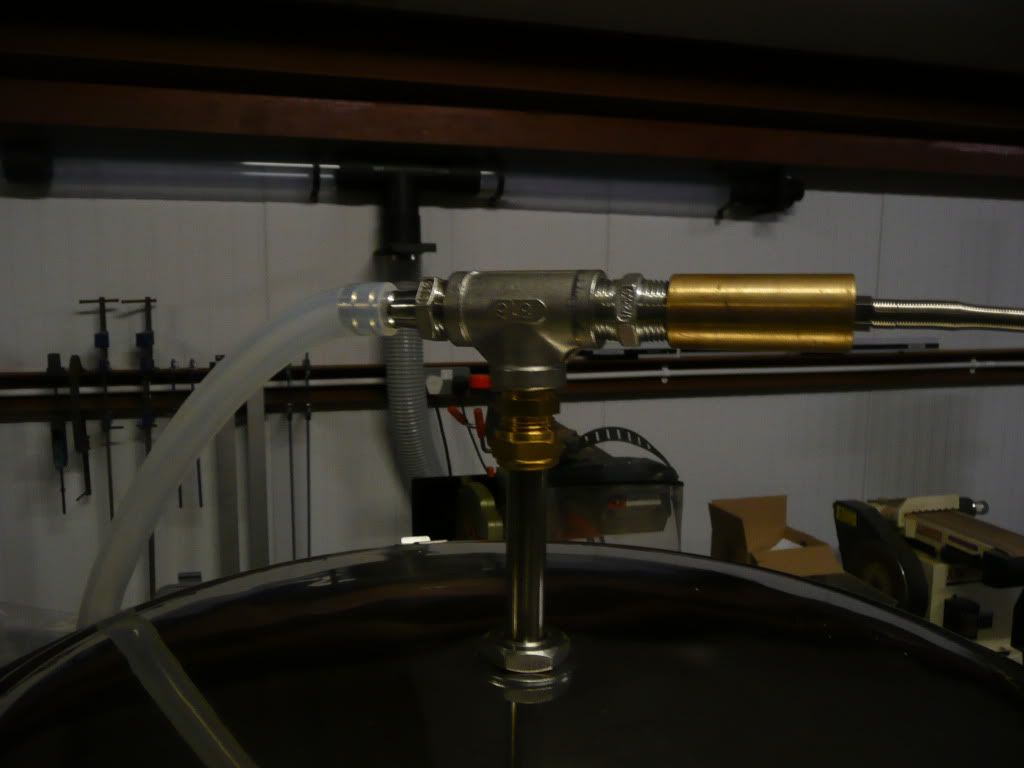
Here's the almost finished article - just need the height clamp and the wort aerator/spreader/sparge doo dah. Sliced my thumb a little on the sharp edge and bleeding everywhere so called it a night, may make clamp tomorrow, or move on to boiler and HLT.
Firstly I drilled the thermos pot lid for the mash tun, for the record, the current batch of 80L pots are 47.5mm deep in the lid. The BES barrel tapered I/2" BSP barrel nipples work grand. I put a pilot hole through first, then measured it was centred both sides, I then went through the SS skin underneath the lid with a 20mm hole saw and used a 20mm qmax on the top.

I put the barrel nipple through and used SS 1/2" BSP lock nuts and 20mm washers top and bottom. I then passed the HX return assembly with PT100 probe through it. Needs some taking off the PT100 holder yet and I need to make a clamp so I can clamp the down pipe at any position - or use mole grips until I get around to it :thumb:

Here's the almost finished article - just need the height clamp and the wort aerator/spreader/sparge doo dah. Sliced my thumb a little on the sharp edge and bleeding everywhere so called it a night, may make clamp tomorrow, or move on to boiler and HLT.

Vossy1
Landlord.
Looking good NB  As an 'aside' I use something very similar as a racking gun to my fv, the only difference being that where the PT100 is, I have a air stone mounted into the T.


Similar threads
- Replies
- 31
- Views
- 4K
- Replies
- 28
- Views
- 3K
- Replies
- 13
- Views
- 2K
Equipment For Sale
All my brewing stuff. 50Lsystem and 40L BIAB plus kegs
- Replies
- 10
- Views
- 2K
- Replies
- 11
- Views
- 991


![BREWING THERMOMETER STICKERS ACCURATELY MONITOR FERMENTING BEER & WINE LIQUID TEMPERATURES 5PCS HOME BREW SPIRITS WINE LCD ADHESIVE [US]](https://m.media-amazon.com/images/I/311DDjo2X3L._SL500_.jpg)


