All Grain Starter Equipment

The Homebrew Forum

Help Support The Homebrew Forum:

This site may earn a commission from merchant affiliate links, including eBay, Amazon, and others.
I decided before I started that this brew would just be get my feet wet and not take the results too seriously, will make some adjustments in equipment and take the lessons learned for the next brew. If that comes out massively different to the intended then it will be time to work out what is going wrong.


This is what I did, took me a few brews to get used to the process and adjust my equipment. I'm now happy with my set up and am now looking at refining my processes and recipes. Also starting to look at water profiles and how to improve the quality of the finished beer. Its all part of the learning process that I really enjoy.
 
its a learning experience if its any consolation, my first ag brew attempt was a comedy of errors with too many cock ups to list, and i dreaded the first sup, however i almost dropped the first pint down in one it wasnt bad at all :)
 
IMG_0534.jpg
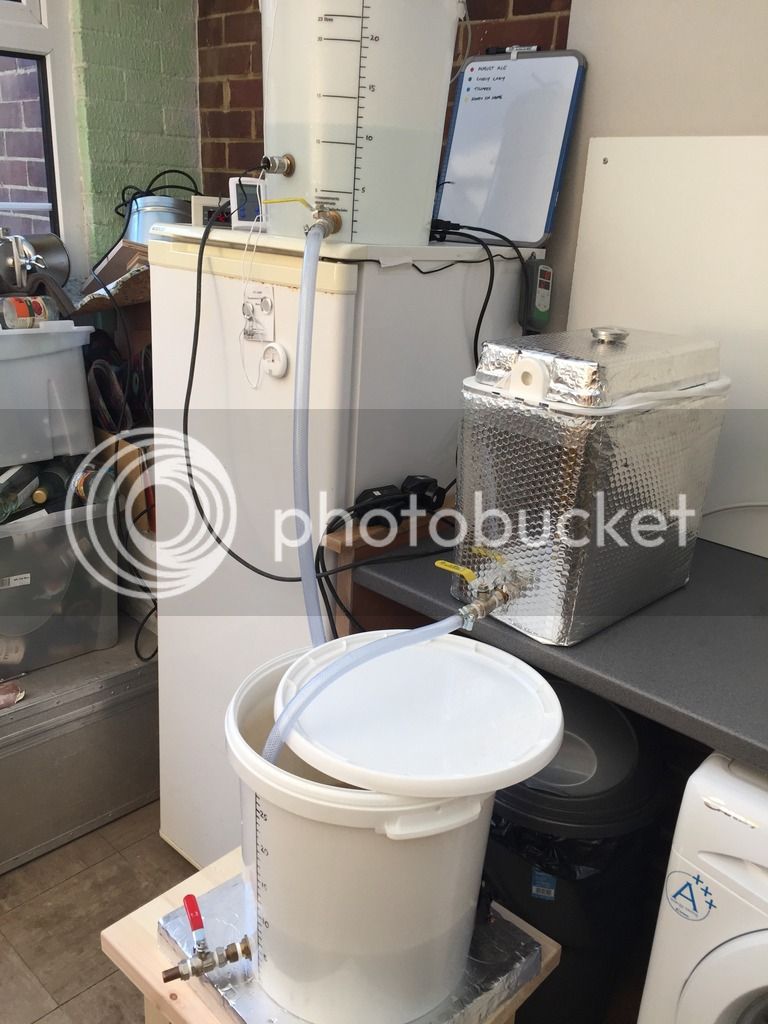
Jas, what is the part of your HLT above and to the left of your tap? Some type of temperature monitoring? If so can you let me know what is involved?
 
It's a thermowell. I am experimenting with temp control on my HLT, but not having a lot of luck so far. I am using a ITC 1000 as the controller, but the thermowell is giving a cooler temp reading than when I put the probe directly in the water. I'm going to try some other things to see what works best as I want to automate the temp on my HLT. A sort of switch it on, set the temp and leave it keep no of set up.
 
It's a thermowell. I am experimenting with temp control on my HLT, but not having a lot of luck so far. I am using a ITC 1000 as the controller, but the thermowell is giving a cooler temp reading than when I put the probe directly in the water. I'm going to try some other things to see what works best as I want to automate the temp on my HLT. A sort of switch it on, set the temp and leave it keep no of set up.


you need to make a good positive contact with the thermowells cap and the tip of the controller probe to get a good reading. bodge a pushrod to secure it in place with blutac and a pencil perhaps ;)

Unless stated otherwise its a safe bet that the actual sensor is positioned at the tip of the probe.

And when venturing into hlt temp control you will find that if left @ target temp even for a short while, the liquor in the hlt will tend to form layers of different temperature, spot on at the position of the probe, warmer above and cooler below which can if unchecked result in a significantly too cool mash in. Good news is its simple to fix, Just give the hlt a good stir to normalise the temperature throughout the whole volume before taking a temp reading you depend on.. some of us have gone a step further and added small solar pumps to recirculate the hlt liquor in order to ensure a consistent temp reading.. but a stir is just as good and a lot less complex and less expensive too
 
Interesting, is that a pump as in, takes the water out and back in? I think I will stick to stirring for now but definitely something to consider for mkII.
 
Cheers Fil

I'll give that a go with the thermowell. I quite like the idea of a pump too, might look in to that as well.

Thanks for the info :thumb:
Let us know how you get on, would like to have this functionality myself but I may as well let you work the kinks out first! :D
 
Just bottled my first batch after leaving it outside for a few days. It was only a small batch but a good entry into things.

IMG_20170123_213418.jpg


Good job I have another 20 litres in the fermenter.

IMG_20170123_213443.jpg


Thanks for the help all, think I have most of the kit sorted now, a few improvements I want to make but I will get there.

IMG_20170123_213656.jpg
 
Made a few improvements to my setup last night, at least I hope they will be improvements.

Wort chiller was directly connected to about 10m of hose, which made it unwieldy and impossible to drain. I would drain it the best I could, put it down and then find a huge puddle 30 seconds later.

IMG_20170126_185302.jpg


IMG_20170126_185648.jpg


Had 1100mm of 15mm copper left over from plumbing my bathroom so decided to make a manifold. I had read that fly sparging and bazooka filters weren't a great mix so decided give this a try. Not quite equally spaced out but it would have made it hard to get the last 'T' piece in for the tap connection. Still need to drill all the holes in it.

I may change this in the future if it seems like it could be beneficial.

IMG_20170126_185732.jpg
 
Looks great. I wouldn't worry about your manifold. The way liquids drain, it's better to be random.
Those quick disconnects work great. I have them on my plate chiller and it makes for quick clean up. They sell a joiner for those connections that allow you to connect the hoses together. I brew in house and by connecting the hoses together you can move the hoses out without spilling any water. Makes the wife happy.
 
Am very impressed with the brewery build, top marks, and the benefit of building it is your famailer with its make up and how it 'should' all work ;) Ony suggestion for a mod i would make would be to bend the chillers legs a bit more so they bend out and down over the pot lip, this is simply to reduce the risk of condensation forming on the cold in pipe and running back down the leg, with it bend down and out of the pot any condensation should drain out of the brew,,

with hozelock style connectors ive found cheaper versions can leak while the branded hozelock and gardinia options tend to be good sealers. if however you have the cheaper type and they do drip, again good ol ptfe can help, but this time less is more, only a couple of taught wraps are needed, too much and it can hamper the locking leaving you vulnerable to a hose break with nominal pressure in the hose pipes.

Always test with a lil yank apart before trusting a connection fixed with ptfe it is after all renowned for being SLIPPY!!
 
Worry ye not about the manifold.

As long as the holes are drilled to a uniform size and with a fairly regular spacing, the tiny bits of grain will naturally move towards whichever hole is flowing fastest and thereby clog the holes, so that everything finally comes out more or less equal.

The secret is to start off the lautering with two x 2 litre jugs. Open up the tap to fill the first jug and then (with the wort still running) pour the product back into the Mash Tun whilst the second jug fills. Keep repeating the operation until the wort starts to run clear.

I start off with the tap from the Mash Tun only opened slightly and then gently increase the opening until it stops clogging up and the pressure drop is being taken across the tubes at the bottom of the Mash Tun instead of the tap.

It normally takes about 10 to 12 litres of recycled wort for it to run clear enough to divert it into the boiler and at this stage I gently close the tap back to a rate of about 1 litre per minute (this being the sparge rate that I will be using) and start sparging.

To distribute the sparge water evenly, I cover the grain with a double folded piece of aluminium foil and then "stab" it dozens of times with a small Philips Screwdriver so that the sparge water is evenly distributed across the grain bed. (I've considered making a more permanent cover but the sloping sides of the Mash Tun make it too difficult.)

Finally, when sparging is finished (i.e. when I have 26 litres of wort in the boiler) I put a plastic board on top of the aluminium foil, place a small anvil on top of the board to squeeze out the remaining wort and tilt the Mash Tun so that I get out as much liquid as possible.

I gather this wort in one of the 2 litre jugs and add it to the boiler as and when required due to boil-off. If these tails from the Mash Tun have an SG of less than 1.014 then, (by my standards) I have had an excellent result!

Enjoy. :thumb:
 
I use the same hose.

How did you get it to stretch over the threads for the male disconnect parts? I have the same 10m drain issue. Haha
 
Worry ye not about the manifold.

As long as the holes are drilled to a uniform size and with a fairly regular spacing, the tiny bits of grain will naturally move towards whichever hole is flowing fastest and thereby clog the holes, so that everything finally comes out more or less equal.

The secret is to start off the lautering with two x 2 litre jugs. Open up the tap to fill the first jug and then (with the wort still running) pour the product back into the Mash Tun whilst the second jug fills. Keep repeating the operation until the wort starts to run clear.

I start off with the tap from the Mash Tun only opened slightly and then gently increase the opening until it stops clogging up and the pressure drop is being taken across the tubes at the bottom of the Mash Tun instead of the tap.

It normally takes about 10 to 12 litres of recycled wort for it to run clear enough to divert it into the boiler and at this stage I gently close the tap back to a rate of about 1 litre per minute (this being the sparge rate that I will be using) and start sparging.

To distribute the sparge water evenly, I cover the grain with a double folded piece of aluminium foil and then "stab" it dozens of times with a small Philips Screwdriver so that the sparge water is evenly distributed across the grain bed. (I've considered making a more permanent cover but the sloping sides of the Mash Tun make it too difficult.)

Finally, when sparging is finished (i.e. when I have 26 litres of wort in the boiler) I put a plastic board on top of the aluminium foil, place a small anvil on top of the board to squeeze out the remaining wort and tilt the Mash Tun so that I get out as much liquid as possible.

I gather this wort in one of the 2 litre jugs and add it to the boiler as and when required due to boil-off. If these tails from the Mash Tun have an SG of less than 1.014 then, (by my standards) I have had an excellent result!

Enjoy. :thumb:

Thanks for the description, lots of stuff I'm not doing that I feel I should be. I will re-read this before my next brew day and try and incorporate some of it.

I use the same hose.

How did you get it to stretch over the threads for the male disconnect parts? I have the same 10m drain issue. Haha

With difficulty and a lot of swearing. Tried a few things (dipping it in boiling water, Vaseline) I eventually put a pair of plyers into the end of the hose and opened them to stretch it out. The hose is quite poor quality so it is hard to push it over the connector without it bending.
 
Manifold is mostly done, definitely took more time than I thought it would punching all the holes before drilling. I went for Dutto's arrangement of holes just to go for something tried and tested.

IMG_20170129_165822.jpg


IMG_20170129_182111.jpg


@Dutto, did you manage to "sand" the inside of the pipe at all? I have had a poke around in there with a long screwdriver to try and dislodge any copper flakes I can.

Just need to give it a bit of a rub down, give the joins a knock the keep everything together and maybe label the joints for reassembly.
 
Another brew day yesterday and the first chance to test the new manifold and connections on the wort chiller.

On the previous brew I had a stuck sparge (fly sparging) with the bazooka filter that came pre-installed in the mash tun and ended up about 7 points under the target gravity with a brew house efficiency around 64%.

This time I sparged until I got 25 litres in the boiler, which is what the recipe suggested and then drained out the rest of the mash tun into a jug. I then topped up a litre or so during the boil which I didn't need to, but couldn't resist, and how have 23 litres in the fermenter where the recipe says it should be 20. Just 2 points off the target OG and efficiency calculated at 78.64% with no sparging issues. A pretty good improvement I think.

Connections on the chiller were also good. I tested it outside during the boil to make sure it was OK and the inlet side kept popping open and spraying water. When I changed the hose directions over there was no such issue though, aside from standing on the outlet hose at one point which caused it to disconnect due to the pressure buildup! I had the connections over a mop bucket just in case, so no major issue there. So much easier and cleaner to tidy up, I just disconnected both hoses and threw the ends back through the window the hose was being fed through, no more wet kitchen floor and easy to empty and coil up later.

Bottled my last batch which was out of the book SWMBO got me for Christmas - Brewfist Caterpiller APA, I now have two problems... I am out of bottles and I need somewhere to store all the ones I have!

IMG_20170205_170508_1.jpg


I have been reading the DIY Beer Crates thread, which I might go for. But the timber per crate is looking to be about £8, which I considering they will mostly sit outside, I'm undecided whether it is cost effective.
 
I just linked here from another thread an realised the wort chiller in particular wasn't the way I would do it now, so I thought I should update.

IMG_20170501_172748.jpg

So I ended up using two tap connectors screwed onto these. To do this I had to solder on some 15mm pipe by way of a reducer, but I already had all the the kit to do that and some left over 15mm copper. This makes the chiller 100% leak free, I found that the male connections I had jammed into the end of the hoses in the previous iteration would pop out slightly and spray water everywhere if the pressure changed too rapidly (mainly if I stepped on a hose while chilling!). Although this could probably be sorted by buying better quality fittings both from the same manufacturer.

IMG_20170516_210234.jpg

IMG_20170529_114232.jpg

First iteration of a sparge arm. Seemed good when testing but got blocked with grain when I tried to vorlauf through it. Using the funnel and hose in the picture below.
IMG_20170529_114210.jpg


IMG_20170827_103639.jpg

IMG_20170827_111431.jpg

Second iteration of a sparge arm. This is better, doesn't get blocked, but still not 100% happy with it as the height isn't adjustable very easily, the silicone hose is too rigid. Planning to try just a silicone hose that is floating ontop of the grain when I make the next upgrade to the system, which will be a HERMS by way of a coil in a cheap kettle controlled by a PID.

IMG_20170521_112940.jpg

PID I built, by far the best upgrade so far, allows me to set the HLT temperature when heating strike water and then have it ready when I have everything else setup. Or keep sparge water at the right temperature. I also use my HLT to sous-vide meat, could never cook a steak another way again!

IMG_20170827_111445.jpg

HLT stand, made for about £8 from some studwork from wickes.

IMG_20170827_111420.jpg

Full setup.
 
Back
Top