All Grain Starter Equipment

The Homebrew Forum

Help Support The Homebrew Forum:

This site may earn a commission from merchant affiliate links, including eBay, Amazon, and others.
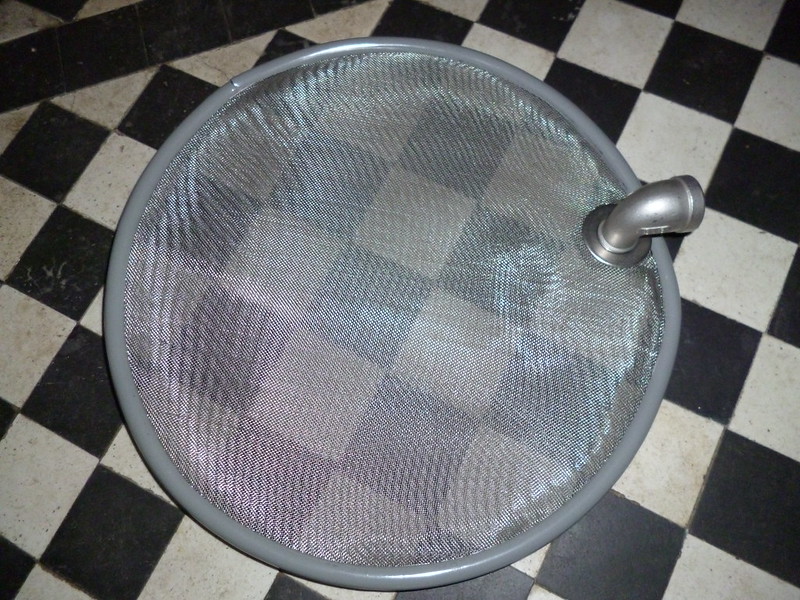
the bazooka filters are used by quite a lot of people without problems, I have never used one so cant really comment, but i doubt you will have any problems as long as you:

a) open the tun drain valve gradually and not quickly to wide open letting the flow build gradually and not suck grain husks all over the filter surface in one with a quick open to full.
a gentle crank open while u count to 10 will create a gentle growing flow ;)

b) avoid heavy wheat grainbills, but if you do need to brew with significant wheat volumes simply batcch sparge and use a net bag to contain the grain it will aid the flow significantly.
a net containing bag may not be so good if you fly sparge as the liquor can run down the side of the bag without draining through the grain..

IF you do have problems you will at least have the extranal valve and connection to a method of fitting a more traditional manifold, though you could also go false bottom ;)


for bog standard kettle elements you need a hole 38-40mm, i would always cut 38mm as its a standard hole saw size and a hole can always be fettled a bit bigger.. while trying to fit in a tad too big hole is a pita.

Never fear this is old well covered teritory ;) the best tools to sealing are
1) rolls of ptfe tape ( yes rolls plural)
2) a ���£shop or similar silicone baking sheet or cake mould with a large flat surface,
3) last bastion, fernox lsx silicone thread sealer, though thats only gonna be needed where ptfe cant be coaxed, and isnt very nice when curing, but when cured is an almost pure silicone passed for use with pottable water and hot water.

#1 please have a nice clean cut hole, if not clean it up so its all smooth.

however it sounds like your bucket wall is probably a bit thinner than the kettle wall the element came from and the screws may be a tad too long, so first add a few spacing washers under the retaining screw heads to tighten up the grip.

if that fails you can bulk up the seal i would try and use ptfe tape where possible, but silicone bakingshhet can be slightly undercut to create soft hugging washer layers silicone sold for home baking is food and heat safe as is ptfe ;)

anything you cant seal with copious wraps of pfte or diy silicone baking sheet washers can be plugged with the LSX thread sealer, nasty until cured, it will cure into almost pure silicone, but unlike kitchen/bathroom silicone sealing products has no antifungal etc ingredient so if left wet/damp and warm watch out for black mould ingress..

fwiw i used lsx to seal the base drain flange on my tun against its bottom skin - 3 years in with dry storage - no probs..
I had another play with things last night, bought some replacement screws and washers and doubled up the washers to give the screws a chances of gripping more, as you said the new bucket is definitely thinner plastic than the kettle the element came from. After refitting the 2 elements it was the same story, OK initially but came back 10 minutes later to a bit of a leak from both elements. At this point I decided even if I got them to seal just using the provided parts I wouldn't be confident in it staying that way, so I broke out the PTFE tape. I gave the rubber gaskets 5 wraps or so and reattached them, put everything back together and left it for 20 minutes, no leaks. Left it overnight with water in and all good, so I think PTFE tape is the way forward. It has also stopped the elements from rotating so freely, they feel a lot more sturdy. Do you think there could be any further issues when everything heats up?

With regards to the bazooka filter, would it be any good for filtering a boil kettle instead? I was thinking I could move it over and make a manifold as I already have a lot of copper elbows in 15mm and 22m from doing my bathroom so could probably get a sparge arm and manifold made out of 1 length of pipe.

Got two ball valves/tank connectors/hose barbs on the way, hoping they come today and I can install them tonight. Planning on doing my first brew day on Saturday. :eek:
 
Sounds like your sorted element wise, A hot test sounds like its on the cards next ;) If you need an extra 'stiff' spacing washer for the elements, there is another ptfe trick that could help that i picked up from a US site..

diy everlasting gaskets:
cut a card template of the washer/gasket you need, then shave a mm or two off the inner and outer edge.

then start wrapping with ptfe through the centre looping round a wrap akin to a racing bikes handle bar tape .

wrap around enough times until it bulks up the amount you shaved off the edges, and it has pillowed up somewhat over the flat sides.

for smaller pieces with a small centre hole you can transfer the tape onto a smaller 'bobbin' ive used a drinking straw chopped down to act as a bobbin to pass through the centre of M20 washes etc..

under compression of a joint the pillowed out pfte will compress and form a much stiffer gasket, and with heat the tape will shrink a bit sealing in the centre card template. Its a distillers trick and them guys are way more anal about building materials than any brewer ;)

RE kettle hop filters, without having used one my own attitude towards bazooka filters for a kettle is that they are not best suited to minimising dead space. But thats just me,

Ive shifted to using a hop spider, it contains all the hop debris, Nice big robust SS versions can be bought from UK sources for circa £40, slightly smaller Chinese versions can be sourced for £12-15 but may arrive crumpled.. i got mine here after retiring my diy copper loop and grain bag version.. http://www.bridgewaterbrewing.co.uk/hop-spiders.html
Afaik the best (least problems with) hop filters are 'garth style' a large surface area mesh envelope, a cheap version can be made from 2 x SS splatter guards pinched together with a length of split beerline, pull the handle and rim from one guard carefully opening one rim with a screwdriver without damaging the mesh. Leave the rim on the 2nd guard to act as a rim for the beerline to grip onto.

12326000334_d1872b5acf_c.jpg


Or you could simply bag the hops in a hop sock which simplifies things a lot removing the need for a hop filter..

As usual what seems like the best way forward to you is probably the best way to start ;)

Have a grand day on Saturday, dont let any hicups stop the progress, the beer gods generally smile down on first brews and regardless of any cockups along the way will probably provide you with the most memorable brews in your career

And get some pics posted of the spanking new brew kit ;)
 
Have a grand day on Saturday, dont let any hicups stop the progress, the beer gods generally smile down on first brews and regardless of any cockups along the way will probably provide you with the most memorable brews in your career

And get some pics posted of the spanking new brew kit ;)
Will do, I can't wait. I will post up some pictures once it is all assembled.
 
Boiler and "mostly finished" wort chiller, hosepipe and connectors to fit tonight.
IMG_20170105_203952.jpg


Internals of the boiler, I put the elements and tap all on one side to allow the wort chiller to fit on the other side without resting on top of any of them (it doesn't, honest, it's just the angle of the picture) which I think might cause leaks from pressure over time. Only thing I'm wondering is whether it might take longer to get things boiling with them both being on one side.
IMG_20170105_204007.jpg


It works!
IMG_20170105_204318.jpg


Heating up
IMG_20170105_204952.jpg


And we're there. As you can see...
IMG_20170105_205810.jpg


After just one boil the kettle element is already quite lime scaled (I have scratched a bit of the limescale off for reference). Is there anything I can do to stop this? For the actual kettle we always use jug filtered water but I have read that isn't good for brewing?
IMG_20170106_071108.jpg


I have the other bucket already fitted with elements and left overnight with no leaks, so just the hole to drill and tap to fit. I have put the elements in the same configuration but it won't be heating as high for the HLT, will probably put the tap on the other side to the elements.
 
I prefer the perforated pipe system.

I open the tap wide and recirculate 10 litres of wort using two jugs so that the mashed grains act as their own filter medium. After recirculation the wort runs more or less clear no matter how much "flour" there was in the malted grain (which is what I think clogs up the Bazooka Filters).

PS

If you ever need to seal something cut the washer out of one of these.

https://www.amazon.co.uk/dp/B001CWDC7I/?tag=skimlinks_replacement-20

I bought one for pennies from my local hardware shop and it has provided multiple washers and seals; including the one on my plastic boiler! :thumb:

Mash Tun.jpg
 
Last edited by a moderator:
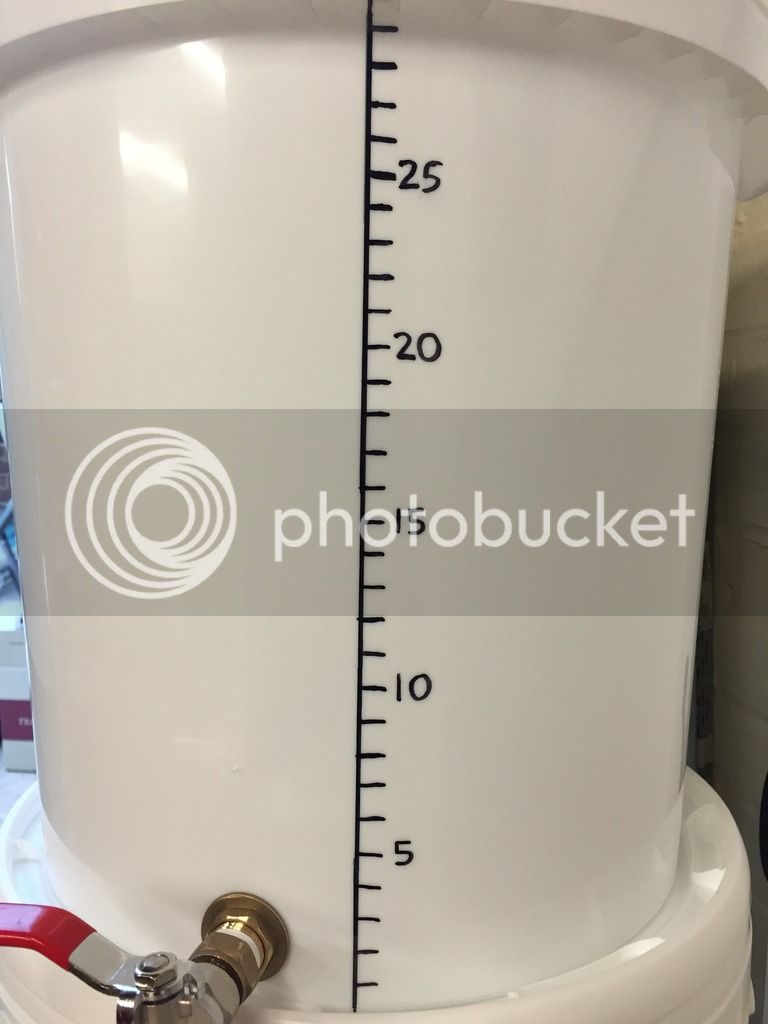
Looking really great :thumb: I have both elements on one side for the same reasons as you and it doesn't seem to affect the boil. You might want to draw some graduations on the side so you know how much you have in there and can measure your loses etc. I just filled mine up with a litre of water at a time and made a mark on the outside using a Sharpie.

IMG_9567.jpg


As for the scale on the element, I don't know what you can do to stop it? I get some scale (not as bad as yours) I just clean it with VWP and a tooth brush straight after I have finished with it and it keeps it quite clean.

Good luck with your first brew :thumb:
 
Looking really great :thumb: I have both elements on one side for the same reasons as you and it doesn't seem to affect the boil. You might want to draw some graduations on the side so you know how much you have in there and can measure your loses etc. I just filled mine up with a litre of water at a time and made a mark on the outside using a Sharpie.

IMG_9567.jpg
Did you include the dead space in your scale? I guess it doesn't matter much for the HLT as you would be working from the top down and probably not emptying it completely but for the boiler I thought it might make sense to exclude whatever stays in the boiler after opening the tap from the measurement?
 
No I didn't include the dead space in the scale, just started from the bottom. I know how much dead space there is and just use that in my calculations.
 
No I didn't include the dead space in the scale, just started from the bottom. I know how much dead space there is and just use that in my calculations.
Fair enough.

Another question. Should I be doing anything with the water from my tap before I use it? Water profile is here if it helps.
 
I can't help with the water profile. I just use ordinary tap water and have done for the last 10 brews. I wanted to get my equipment set up and get used to brewing before adjusting water. That is my next task, to tweak and adjust different aspects of my brewing, including water. The general idea is that if your tap water tastes ok, then it is ok for brewing. Some people use bottled water from the supermarket, Tesco's Ashbeck is quite popular I think. Personally, I would get used to the brewing process before tweaking water profiles.
 
I can't help with the water profile. I just use ordinary tap water and have done for the last 10 brews. I wanted to get my equipment set up and get used to brewing before adjusting water. That is my next task, to tweak and adjust different aspects of my brewing, including water. The general idea is that if your tap water tastes ok, then it is ok for brewing. Some people use bottled water from the supermarket, Tesco's Ashbeck is quite popular I think. Personally, I would get used to the brewing process before tweaking water profiles.
My thoughts exactly. I am trying to stick the mentality of just giving it a go and adjusting from there but I also want something drinkable at the end of the first batch and the more I read the more there is to worry about! :)

Not sure what I am going to do about fermenting temperature. I live in a Victorian house that gets quite cold and I remember when I was brewing the kit it was hard to keep it at the right temperature. I guess I can work that out next week though.

Nearly brew time! :party:
 
I would be surprised if you ended up with something undrinkable. My first go at AG brewing was ok. At the time I thought it was amazing, but now I have got the hang of it, my brews have improved and I realize my first couple of goes were average, but still quite nice.

Its important to maintain fermentation temps to prevent off flavors or stalled/slow fermentation. I use an old fridge with a tube heater and an Inkbird controller, this works very well. Some people use a trug of water and an aquarium heater. Others use heat mats or heat belts. Depends on space and funds I guess? Plenty of threads on here about that :thumb:
That's fine with me, just looking for something to drink while I brew the next batch!

Yeah I've seen both the aforementioned fermentation temperature control methods. The fridge will have to wait for the next house when we have a garage but I think the trug/fishtank heater might be the way forward. Will try without for a few days and reassess.

Everything all made now except for a sparge gadget. Bought a 75p roasting tray from Wilkos on the way home I am going to drill lots of holes in tomorrow morning.

Did have a bit of trouble with the wort chiller leaking from where the hose connects to it. Anyone any tips there? Using PTFE and jubilee clips.

Thanks for all the help Jas.
 
............


Everything all made now except for a sparge gadget. Bought a 75p roasting tray from Wilkos on the way home I am going to drill lots of holes in tomorrow morning.

Did have a bit of trouble with the wort chiller leaking from where the hose connects to it. Anyone any tips there? Using PTFE and jubilee clips.

..........

I lay a double sheet of aluminium foil over the grain, puncture it with a fine Philips screwdriver and then throw it away after use. Cheaper than 75p for sure!

The secret of trying to get a garden hose to seal on an undersized pipe is to either use a small length of plastic tubing that bridges the gap or build up the diameter of the smaller pipe with insulating tape; followed in both cases by a Jubilee clip of the right size.

Enjoy! :thumb:
 
Did have a bit of trouble with the wort chiller leaking from where the hose connects to it. Anyone any tips there? Using PTFE and jubilee clips.

Thanks for all the help Jas.

Your welcome, I asked the same questions on here 8 months ago...... :whistle:

For the chiller, I warmed up the hose with a hot air gun so it was quite pliable before fitting 2 clips to each pipe. Not had any leaks since.
 
Brew 1 is in the fermenter.

Relatively few hiccups, everything went pretty smoothly but definitely improvements to be made and lessons learned. I really enjoyed it though and I am already planning what to brew next.

One of the major lessons learned was that the temperature at the surface of the HLT is quite different to lower down, i.e. where the tap is! I calculated strike temperature using a calculator and when I came to start I thought I was actually a few degrees over what I was aiming for (measuring with a digital thermometer like this one which reached about 6" into the water) but when I took the temperature of the mash I was at 61c when I was aiming for somewhere between 62c and 67c. I have bought a 12" thermometer for next time.

Massively off on the OG, was aiming for 1.062 and came out at 1.038! No real idea of what happened there, I kept the mash at 63c for an hour by adding additional water which is within what the kit says but maybe a little low? Also it was quite a small batch (final volume was 8 litres), which seemed a bit pathetic in the equipment I have, not sure if that matters? Aside from that I have read bad things about efficiency when fly sparging with a bazooka filter, but I am probably over thinking things there.

So the brew is in the fermenter and has been for 24hrs now. I don't have a airlock so I'm not sure whether it is fermenting, what should I be looking for? The surface of the wort started off with a lot of froth which has now completely disappeared, so I'm not confident anything is happening. Can someone advise? I have more yeast I could use...
 
Last edited by a moderator:
Congrats

Always give the hlt a good stir before taking a temp reading you rely on ;)

63c is a tad low for the mash 66-67C is my target mash temp i tend for 67 at the start and keep fingers crossed it drops no more than 66 after 90 mins .. (strike @ 71-72C and fine tune with a jug of cold water and off the boil kettle if needed)

next time give batch sparging a go.. its a lot less hassle and while its aparently less efficient I generally hit targets and have a respectable BHE I will admit to adding an extra handful of MO to the grain bill as a token batch sparge addition ;)

all in all however a successful brewday (1.038 should ferment out well enough) a few lessons learnt too next brewday will be a lot more successful.. onwards n upwards..

i bet you when you pour yourself a glass of this brew you will enjoy it ;)
 
Thanks Fil. I will aim for a higher mash temperature next time. So what do we think about whether my current batch is fermentating or not?
 
Thanks Fil. I will aim for a higher mash temperature next time. So what do we think about whether my current batch is fermentating or not?

Probably fine.. your mash wasnt the most successful but did convert some sugars so there should be food in there for the yeast, lids/airlocks are at best only an indicator of yeast activity, and bucket lid seal are notorious for letting co2 escape unnoticed.. watch the sediment build up, initially it should be simply granular trub (break material and some hop debris from the kettle) but will soon start to show a finer creamier layer which will be yeast and a good indicator of fermentation. And after a few days take a sample for a gravity and taste test, you should see both a drop in gravity and perhaps noticeably less sweetness in its taste.

check out the iodine test for checking for a complete and successful mash,
the mash should convert the accesable starch into sugars, iodine will turn black in contact with starch, so taking a sample of grain from the tun and dropping iodine on it will tell you if there is any black that there is starch still needing conversion but if the iodine remains red/brown, the mash is complete ..
I think we are OK, I came down this morning and there is now a foamy layer that wasn't there yesterday.

I actually bought some iodine and tested a sample after an hour of mashing, it turned red so I carried on.

I decided before I started that this brew would just be get my feet wet and not take the results too seriously, will make some adjustments in equipment and take the lessons learned for the next brew. If that comes out massively different to the intended then it will be time to work out what is going wrong.
 
Back
Top