All Grain Starter Equipment

The Homebrew Forum

Help Support The Homebrew Forum:

This site may earn a commission from merchant affiliate links, including eBay, Amazon, and others.

blawford

Well-Known Member
Joined
Dec 28, 2016
Messages
166
Reaction score
26
Location
NULL
Hi,

Last Christmas I got a Coopers kit as a present and although I enjoyed doing it the beer it produced wasn't anything very exciting.

This year I got the ingredients for an all grain brew and 'permission' from my fiancée to start piecing together the required equipment to start AG brewing.

I have been reading a lot of forums and articles over the last couple of days but there are still a few things I would like help clarifying. I think I am going to have to buy things a bit at a time and although I want to keep costs down a bit at this stage I don't want regret any of my purchases in 5 brews time.

So, questions:

  1. For my first brew day (or couple), can I make do with a single vessel as a combined HLT and boiler? How would this work in terms of the process?
  2. I would like to be able to brew 5 gallon batches, what size HLT/boiler would I need?
  3. My plan is to convert a fermenting bucket into a boiler, for 5 gallon batches would 1 element be enough to get it to a rolling boil? If so the plan would probably be to add another later.
  4. As part of the kit I have, can I repurpose the fermenter into something useful going forward? It doesn't have an airlock so I think it might be better off as something else other than a fermenter?
  5. Last time I had an issue with keeping the fermenter warm enough, what is the best solution for this?
I will probably have more questions and I'm sure you have probably answered them many times before, so apologies and thanks in advance.
 
http://www.thehomebrewcompany.co.uk...iler-chiller-mashing-bag-mash-kit-p-2426.html
With
http://www.thehomebrewcompany.co.uk/hop-strainer-p-83.html

Or

http://www.geterbrewed.com/basic-biab-starter-kit-kit-brewers-upgrade/

Is what lots of us use, 9 months use for me and I think I'll only upgrade when it gives up as it fits my requirements for small footprint etc.

I use a wickes builder's truget and aquarium heater to maintain temperature, i don't generally have to worry about things getting too hot.
 
Hi and welcome to the forum.

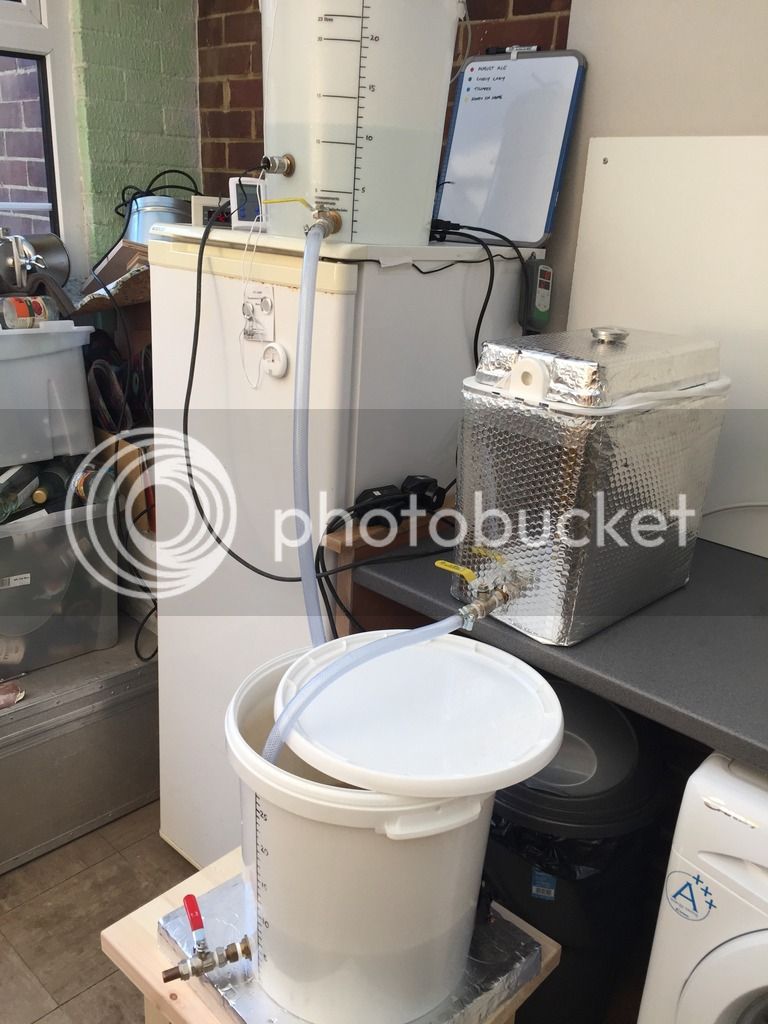
There are a lot of different ways of setting up an AG system. If you want to do it on a budget then some DIY is involved, but it is quite easy. My set up is as follows and I have completed 10 AG brews with it.

I bought these plastic buckets from ebay http://www.ebay.co.uk/itm/3-x-32-L-...duty-bucket-/222145994026?hash=item33b8eedd2a 22 quid for 3 32litre buckets is really cheap and I use 1 as a boiler, 1 as an HLT and the last one as a storage bin for my grain.

I then fitted two elements from the value kettles you can get from Tesco or Wilkos. I got mine from Wilkos and they were 5 quid each. So the HLT and the Boiler have two elements each. For the boiler, I use both to get to a rolling boil and then switch one off to maintain the rolling boil. I also fitted a lever tap (that you would find on your water system) one of these http://www.screwfix.com/p/lever-ball-valve-15mm/67744 for 5 quid along with a tank connector like this http://www.screwfix.com/p/pegler-px35-flanged-tank-connector-15mm/6146g although I got mine from ebay. In answer to your first question, yes you can use just one vessel as your boiler and HLT. You need to take the wort from your mash tun and put it in to a different vessel (fermenter) whilst you are sparging so you can use the boiler to heat your sparge water. I make 5 gallon batches and my 32 litre boiler is only just big enough, but I have not had a boil over yet, just need to keep an eye on it as it comes to a rolling boil :thumb: You can get away with just one element in the boiler/HLT, but it takes ages to get up to temperature, for the sake of an extra 5 quid I think its worth putting two in there.

With regard to your last question, there are lots of different ways of maintain fermentation temps. I have a fridge that has an Inkbird temp controller and a tube heater and that works perfectly. Others use heat mats and heat belts and get good control of the temps.

This is my set up at the moment, it works well and I have not had the elements fail yet as some others have this problem (I remove all the internal safety switches that prevent boiling dry etc which might help longevity?)

IMG_0534.jpg


Hope this helps a bit

Jas

Thanks a lot for the reply. What you have done is exactly the route I was looking at, so I hope you don't mind me picking your brain a bit further. I don't mind a bit of DIY having recently renovated my bathroom including plumbing from scratch, which seems like a skill that will transfer well here.

I went for the buckets you linked to on eBay, seemed like a bargain. I have just been notified they have been dispatched and will be delivered tomorrow, really can't complain at that!

For the elements have you just kept the original wiring or have you wired them up using any additional components?

For your mash tun, what size picnic cooler is that and how it is at retaining heat? Do you have a false bottom or manifold in there? What about in your boiler, to stop hop debris getting into the fermenter?

Hopefully I can start constructing tomorrow, I have a Screwfix and Wilkos within walking distance!

Thanks again.
 
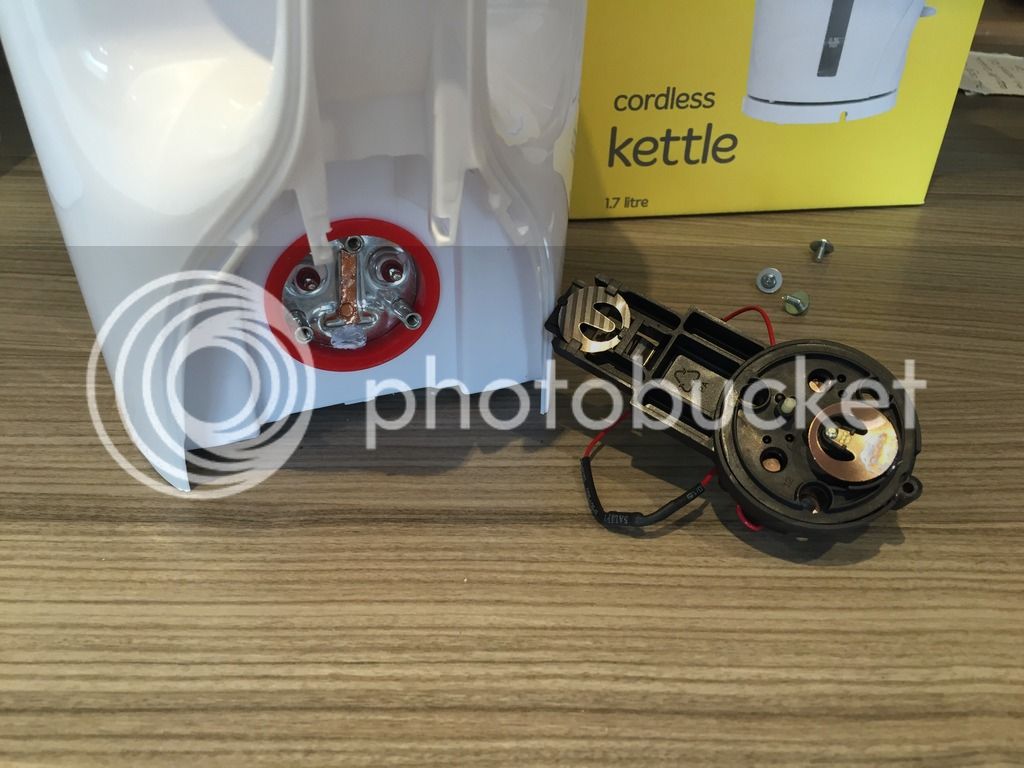
The value wilko kettles (and Tesco I think?) don't need any wiring doing to them. When you take them out of the kettle they look like this

IMG_9554.jpg


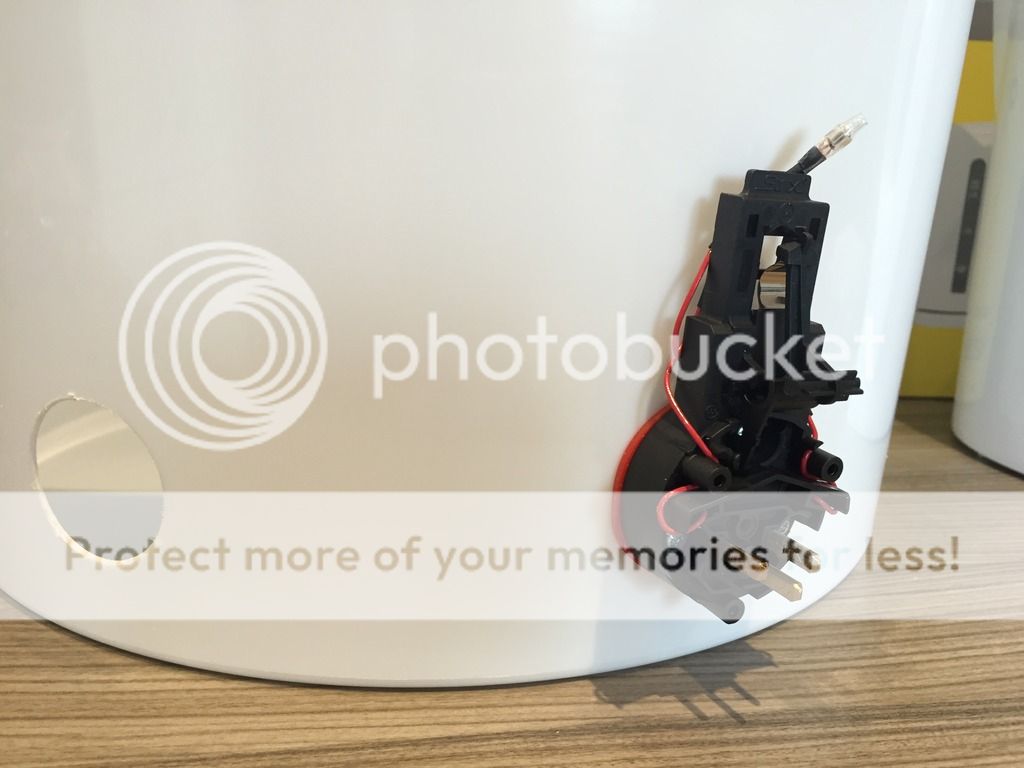
I removed the metal discs as these are the bits that turn off the elements when boiling. I think it was a 38mm hole that was needed (might of been 40mm?) I just used a Forstner bit and ran it in reverse with a bit of timber behind it. This created a clean hole for the red gasket to sit in. You can see here that the element is screwed to the black plastic switch. This has 3 prongs on it that you can fit a kettle lead to, so no wiring is needed at all. Just need to be aware that it is theoretically possible to touch the electrical contacts, although it would be quite difficult to do.

IMG_9557.jpg


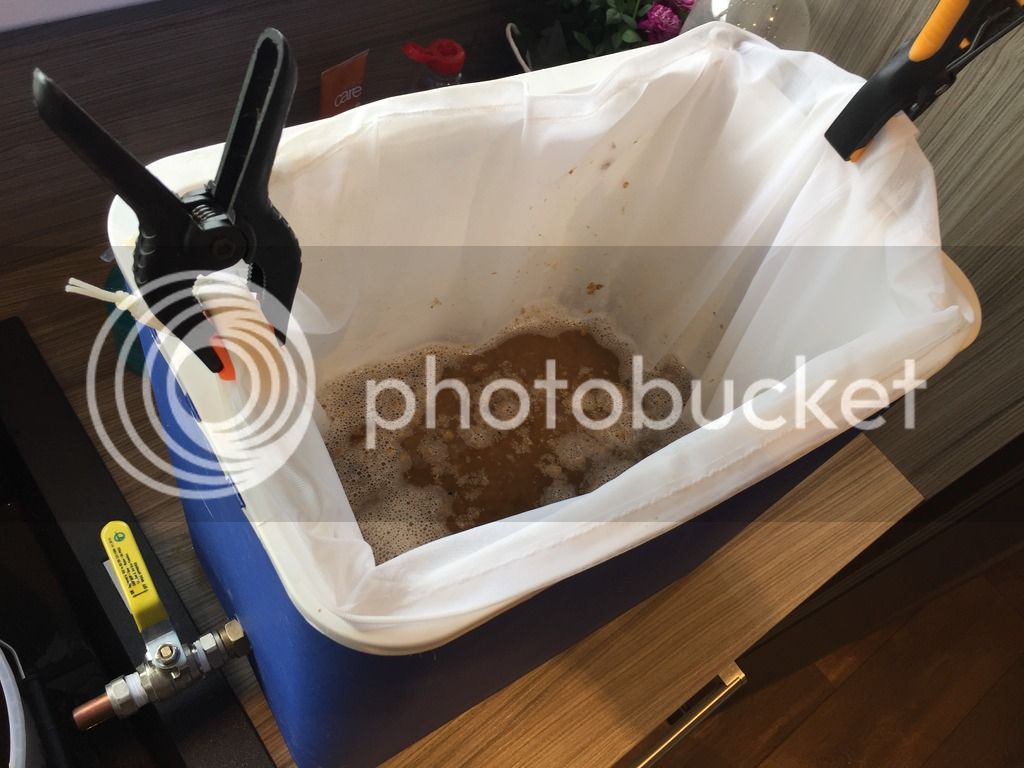
The Mash Tun is made from a 24 litre cheap cool box from Tesco. I will be making another and will get one that is at least 30 litres as I am limited to approx. 5.5 kg grain bill in this one. Again, I have adapted it to make it fit for purpose. They come with the thinnest piece of polystyrene between the two skins of the box which is woefully inadequate. So I filled the cavity with more thin pieces of polystyrene (laminate flooring underlay I had left over) and then covered the outside with two layers of foil bubble wrap from ebay. I put 50mm of Celotex roofing insulation (offcut from a recent project) in the lid as this had no insulation at all. It works really well and doesn't lose any heat over a 1 hour mash. I have fitted an analogue thermometer in the lid so can monitor the mash temps without opening the lid. I am going to build another larger one so I can brew higher ABV beers. I don't have a bazooka or false bottom in the mash tun. I use a bag, the same as the BIAB guys use. I use some clips to hold it open when doughing in and this works well. The clean up is easy as I just lift the bag out at the end and empty in to my composter. This picture shows what it looks like. This was my first brew, before I added the bubble wrap on the outside. I use 4 clips now as this holds it open easier on a larger brew (this was a small 1 gallon brew)

IMG_9411.jpg


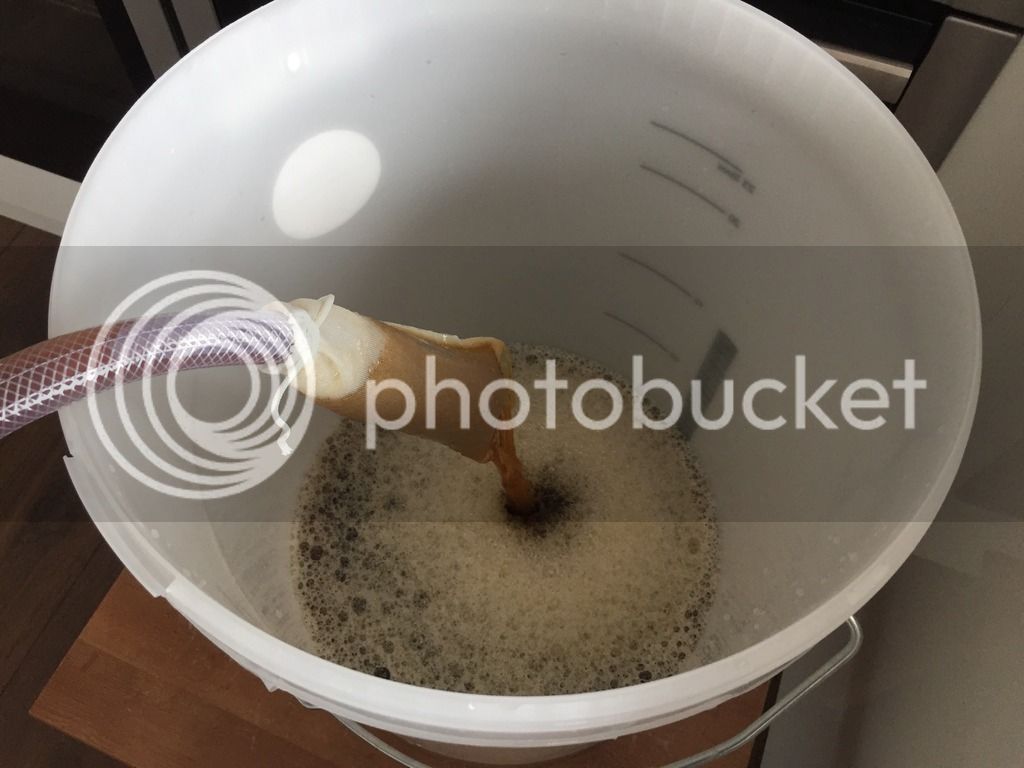
When I'm transferring from the boiler to the fermenter I don't use a false bottom or bazooka. I use a hop sock on the end of a piece of tubing like this, although a lot of people don't bother and let it drop out during fermentation. It works ok, sometimes there is a lot of break material and it fills up so I have to empty it part way through.

IMG_9472.jpg


Good luck and enjoy the build. I enjoy making stuff as much as making beer, and it saves a lot of money. I will probably get a stainless pot and fit elements to that in the future, just because I like shiny stuff. But there is nothing wrong with the plastic stuff so far. (I have two spare value kettles in the cupboard just in case of any failures)

Jas
 
Yeah, it works really well, never a stuck mash as I just put my large spoon between the bag and the outlet or just lift the bag :thumb:
 
welcome to brewing, there are as many ways to brew as there are brewers, but we all do basically the same thing mash the grain to produce and dissolve sugars for the yeast to ferment after a reducing boil with hops.

but yes a big boil vessel and bag is all you need to get going..

a basic biab brew is the best way to decide just what extra equipment if any would improve the brewday experience for you, some of us love a tinker and can invent reasons to use equipment we may not actually need ;) but can still impact the brewday..

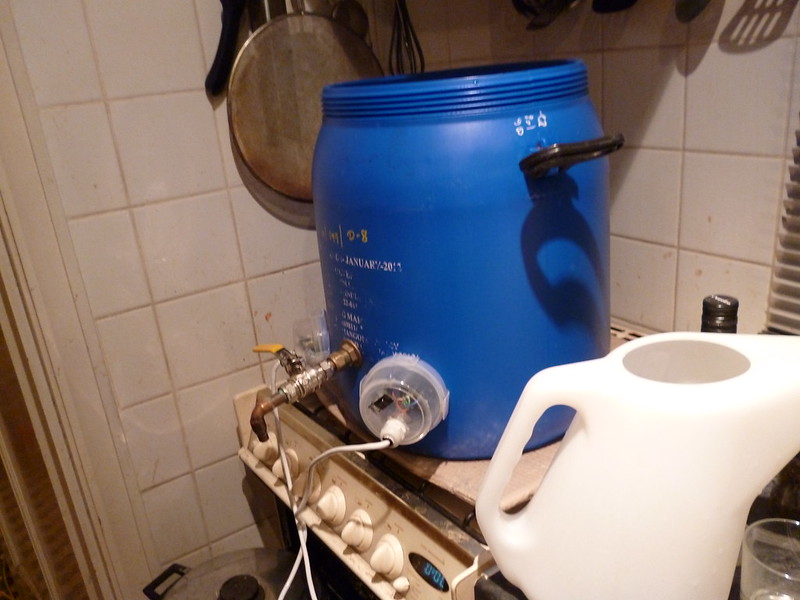
my #1 tip would be to source a Big vessel for your hlt/kettle, while some brew very successfully in pots n buckets circa 25-30l in volume I would suggest looking at circa 40l+ vessels, a rolling boil can require a 4-5cm+ height of pot wall above the still liquid level to contain the boil, any less and you run the risk of hot sticky splash overs which are a pita to chase during the boil at best, and at worst can scald and make a hell of a mess.. imho the best budget donor kettle vessel is the good ol ex mango chutney blue barrel, made from thick hdpe @ circa 45-50l in volume will contain a 5 gallon brew very comfortably.. they can be freecycled from the back of indian restaurants, and were available on ebay for £11 delivered iirc, and while the hdpe does soften with boil temps cutting the lid centre out lets you use the lid rim as a screw on re enforcement to keep the mouth open and circular..

PP is a plastic that will retain more rigidity at boil temps and the copper ketttle online brewshop sell 67l PP buckets suitable for boiler and hlt use, iirc they also cut any element/tap holes required foc too..

Big SS stock pots can be sourced fairly cheaply too, but do require more tools and work to cut clean tap/element holes.

A stove top brew of upto 5l is a grand way to loose your ag cherry without the hassle of a huge heavy hot wet grain bag to deal with and as a preperation run for a full sized brew..

PS the garage, patio, or lawn are probably better venues than the kitchen for a first full sized brewday, trust me on that one.. you can boil off as much as 5l of steam during the boil, which may not go down too well, even though you may find the aroma of hops bittering malty wort at 105C+ intoxicating, other family members may not be so inclined.. And get the practice down to pat before you spend 6 hours or so occupying the kitchen so you can show control and calm not #1 brewday panic ;) ..
 
Where I'm going in my thoughts on what to buy for an AG set up in the garage are at the top of the tree, a grainfather (or alternative similar thing), then a stainless steel boiler with a concealed element, or a stockpot on a gas ring run from a bottle of gas or plug in electric ring, or go down the route of a DIY kit like above.

I think what I will ultimately go with will be the one that gves the easiest brew day and best results, I guess thats the grainfather, right?
 
I've been using the HBC single-vessel system @wfr42 suggested since April and I'm happy with it. I heat the sparge water on the stove. Whichever route you take, AG will be the best beer you've brewed. Perhaps not the first one, it wasn't for me, but soon. Good luck!
 
welcome to brewing, there are as many ways to brew as there are brewers, but we all do basically the same thing mash the grain to produce and dissolve sugars for the yeast to ferment after a reducing boil with hops.

but yes a big boil vessel and bag is all you need to get going..

a basic biab brew is the best way to decide just what extra equipment if any would improve the brewday experience for you, some of us love a tinker and can invent reasons to use equipment we may not actually need ;) but can still impact the brewday..

my #1 tip would be to source a Big vessel for your hlt/kettle, while some brew very successfully in pots n buckets circa 25-30l in volume I would suggest looking at circa 40l+ vessels, a rolling boil can require a 4-5cm+ height of pot wall above the still liquid level to contain the boil, any less and you run the risk of hot sticky splash overs which are a pita to chase during the boil at best, and at worst can scald and make a hell of a mess.. imho the best budget donor kettle vessel is the good ol ex mango chutney blue barrel, made from thick hdpe @ circa 45-50l in volume will contain a 5 gallon brew very comfortably.. they can be freecycled from the back of indian restaurants, and were available on ebay for �£11 delivered iirc, and while the hdpe does soften with boil temps cutting the lid centre out lets you use the lid rim as a screw on re enforcement to keep the mouth open and circular..

PP is a plastic that will retain more rigidity at boil temps and the copper ketttle online brewshop sell 67l PP buckets suitable for boiler and hlt use, iirc they also cut any element/tap holes required foc too..

Big SS stock pots can be sourced fairly cheaply too, but do require more tools and work to cut clean tap/element holes.

A stove top brew of upto 5l is a grand way to loose your ag cherry without the hassle of a huge heavy hot wet grain bag to deal with and as a preperation run for a full sized brew..

PS the garage, patio, or lawn are probably better venues than the kitchen for a first full sized brewday, trust me on that one.. you can boil off as much as 5l of steam during the boil, which may not go down too well, even though you may find the aroma of hops bittering malty wort at 105C+ intoxicating, other family members may not be so inclined.. And get the practice down to pat before you spend 6 hours or so occupying the kitchen so you can show control and calm not #1 brewday panic ;) ..

Thanks for the reply, some good advice there that I will definitely heed. I have already purchased a 33ltr bucket for my boiler so I will give that a go for now and maybe swap it out in the future if I find it a bit small, although I'm not sure how many 5 gallon batches I will end up doing, might be mostly smaller batches.
 
Dissection complete'ish (still need to remove a few of the discs on the elements) and my buckets arrived today too. Just getting a list together for a trip to the homebrew shop tomorrow, will post it here in a bit and hopefully someone will tell me what I have missed...

IMG_20161230_173053.jpg
 
I didn't remove the lower disc, I bent it back and removed the little plastic rod that goes in to the plastic body behind it. I believe this is the switch that turns off the element if it's run dry, or got too hot. I think not removing this switch is what some people might have had problems with in the past when they have had element failures. Some people have had the elements only last a few brews but mine have done 10 brews so far without any problems.
 
+1 yank the lil white push rod the 'ping ring' will depress if it changes state.

the 'ping ring' is afaik a bi-metallic disc that changes its shape with temperature, when it deforms or pings with heat it then depresses the lil white push rod which in turn breaks the load circuit.

Some elements i used iirc tesco budget were a dream to hack, but an asda variant to the beast of my recollection that i also bought contained a brass jigsaw of tiny independent bits of metal that needed to sit in specific place to connect the socket prongs to the element poles. I ended up soldering em all together after a number of frustrating reassembly failures..

i used £shop didy snaplock lid food containers to 'shroud' the electrics and splash proof them, i simply cut a element sized hole in the box lids and sandwiched that between the element rear plate and outer wall of the barrel allowing me to simply click n seal the box bottom with a switch and cable gland fitted to seal and switch on/off the mains feed for the element. Other folk have made simple round tubular shrouds to protect the electrics from lengths of dead/empty silicone sealant tubes.
I also reused the budget kettle element power leads crimping and dab soldering the factory fitted connectors after reshaping with pliers to pinch the 'socket prongs')

8439247299_62f5a7128c_c.jpg
I also needed to shave the thicker edge off the seal grommet as without trimming off, the barrel wall + box lid + grommet width was too deep a depth for the connecting screws to engage,, i could have sourced longer screws but i had a razor blade to trim the gasket at hand ;)
 
Some elements i used iirc tesco budget were a dream to hack, but an asda variant to the beast of my recollection that i also bought contained a brass jigsaw of tiny independent bits of metal that needed to sit in specific place to connect the socket prongs to the element poles. I ended up soldering em all together after a number of frustrating reassembly failures..

The main thing I found with them is that the screws that hold the element to the electronics are terrible quality! The first two came off so easily I didn't realise this at first and then I stripped the third one without any effort at all. Now I need to find a replacement screw, or ideally 12 replacements as I don't really feel like I have tightened any of them up completely.

i used ���£shop didy snaplock lid food containers to 'shroud' the electrics and splash proof them, i simply cut a element sized hole in the box lids and sandwiched that between the element rear plate and outer wall of the barrel allowing me to simply click n seal the box bottom with a switch and cable gland fitted to seal and switch on/off the mains feed for the element. Other folk have made simple round tubular shrouds to protect the electrics from lengths of dead/empty silicone sealant tubes.
I also reused the budget kettle element power leads crimping and dab soldering the factory fitted connectors after reshaping with pliers to pinch the 'socket prongs')
Yeah I was toying with the idea of something similar, although I bought 4 kettle leads so there aren't too many exposed wires.
 
So, a bit of an update on progress. I have been to the homebrew shop and ended up buying a ready made Igloo mash tun, I was originally planning to buy just the Igloo cooler but got talked into the finished product by my girlfriend as a time/effort saving tactic, as I had spent the morning trying to cut holes in the plastic buckets with improper tools! I say she talked me into it, she talked me into a cheaper one and I talked her into the Igloo :lol:. The mash tun came with a 12" bazooka filter, I have been reading this isn't the best choice for a mash tun? Can someone reassure me?

I then went out and bought a cheap holesaw and made some better looking holes for the kettle elements. I fitted 2 elements to one of the buckets and filled with water. No leaks after 5 minutes but after leaving it for 20mins I came back to a bit of a puddle coming from one of them. I didn't have time to take them off to investigate further... Might end up being an easy one but anyone any tips for making them seal? I also don't like the fact that you can so easily rotate the elements, I straightened up the one that ended up leaking just before I left it, which might have been what started it leaking? Any tips for that?

Got a couple of stainless taps, hose tails and tank connectors being delivered tomorrow and the plan for this evening is to head to the local DIY for the bits for an immersion chiller and some replacement screws for the kettle elements, having stripped one on removal.
 
the bazooka filters are used by quite a lot of people without problems, I have never used one so cant really comment, but i doubt you will have any problems as long as you:

a) open the tun drain valve gradually and not quickly to wide open letting the flow build gradually and not suck grain husks all over the filter surface in one with a quick open to full.
a gentle crank open while u count to 10 will create a gentle growing flow ;)

b) avoid heavy wheat grainbills, but if you do need to brew with significant wheat volumes simply batcch sparge and use a net bag to contain the grain it will aid the flow significantly.
a net containing bag may not be so good if you fly sparge as the liquor can run down the side of the bag without draining through the grain..

IF you do have problems you will at least have the extranal valve and connection to a method of fitting a more traditional manifold, though you could also go false bottom ;)


for bog standard kettle elements you need a hole 38-40mm, i would always cut 38mm as its a standard hole saw size and a hole can always be fettled a bit bigger.. while trying to fit in a tad too big hole is a pita.

Never fear this is old well covered teritory ;) the best tools to sealing are
1) rolls of ptfe tape ( yes rolls plural)
2) a £shop or similar silicone baking sheet or cake mould with a large flat surface,
3) last bastion, fernox lsx silicone thread sealer, though thats only gonna be needed where ptfe cant be coaxed, and isnt very nice when curing, but when cured is an almost pure silicone passed for use with pottable water and hot water.

#1 please have a nice clean cut hole, if not clean it up so its all smooth.

however it sounds like your bucket wall is probably a bit thinner than the kettle wall the element came from and the screws may be a tad too long, so first add a few spacing washers under the retaining screw heads to tighten up the grip.

if that fails you can bulk up the seal i would try and use ptfe tape where possible, but silicone bakingshhet can be slightly undercut to create soft hugging washer layers silicone sold for home baking is food and heat safe as is ptfe ;)

anything you cant seal with copious wraps of pfte or diy silicone baking sheet washers can be plugged with the LSX thread sealer, nasty until cured, it will cure into almost pure silicone, but unlike kitchen/bathroom silicone sealing products has no antifungal etc ingredient so if left wet/damp and warm watch out for black mould ingress..

fwiw i used lsx to seal the base drain flange on my tun against its bottom skin - 3 years in with dry storage - no probs..
 
Back
Top