strange-steve
Quantum Brewer
- Joined
- Apr 8, 2014
- Messages
- 6,027
- Reaction score
- 5,805
You won't regret it, it's a great piece of kitThanks for this, my GF arrives tomorrow I be using the guide for sure.


You won't regret it, it's a great piece of kitThanks for this, my GF arrives tomorrow I be using the guide for sure.

Thanks for this Steve, I did my first brew on my new GF yesterday and this was a massive help...
Only a couple of self inflicted minor hiccups.
1. I managed to undo the check valve taking the sparge arm off in the middle of the mash, the close up picture of this saved me a lot of messing about.
2. I also managed to pull the telescopic pipe up too far and got unfiltered wort in the kettle so I ended up with cloudy wort but that will clear up.
3. The sparge was a bit slow and I had to poke it around a bit, so I'll get some rice hulls next time I put an order in.
Thanks again for the great guide!
Cheers Steve!Leave the basket sitting in place to drain until the wort gets up near boiling point, but be sure to remove it before it actually starts boiling. This is a surefire way of having a boil over. By the time the wort gets to mid 90s the basket should be well drained, so set it aside for now and turn your attention back to the GF.
Be sure to keep the lid off from now until the end of the boil. As the wort comes to the boil it'll begin to foam up. Stir this back in to prevent boil overs, it'll settle down after a few minutes.
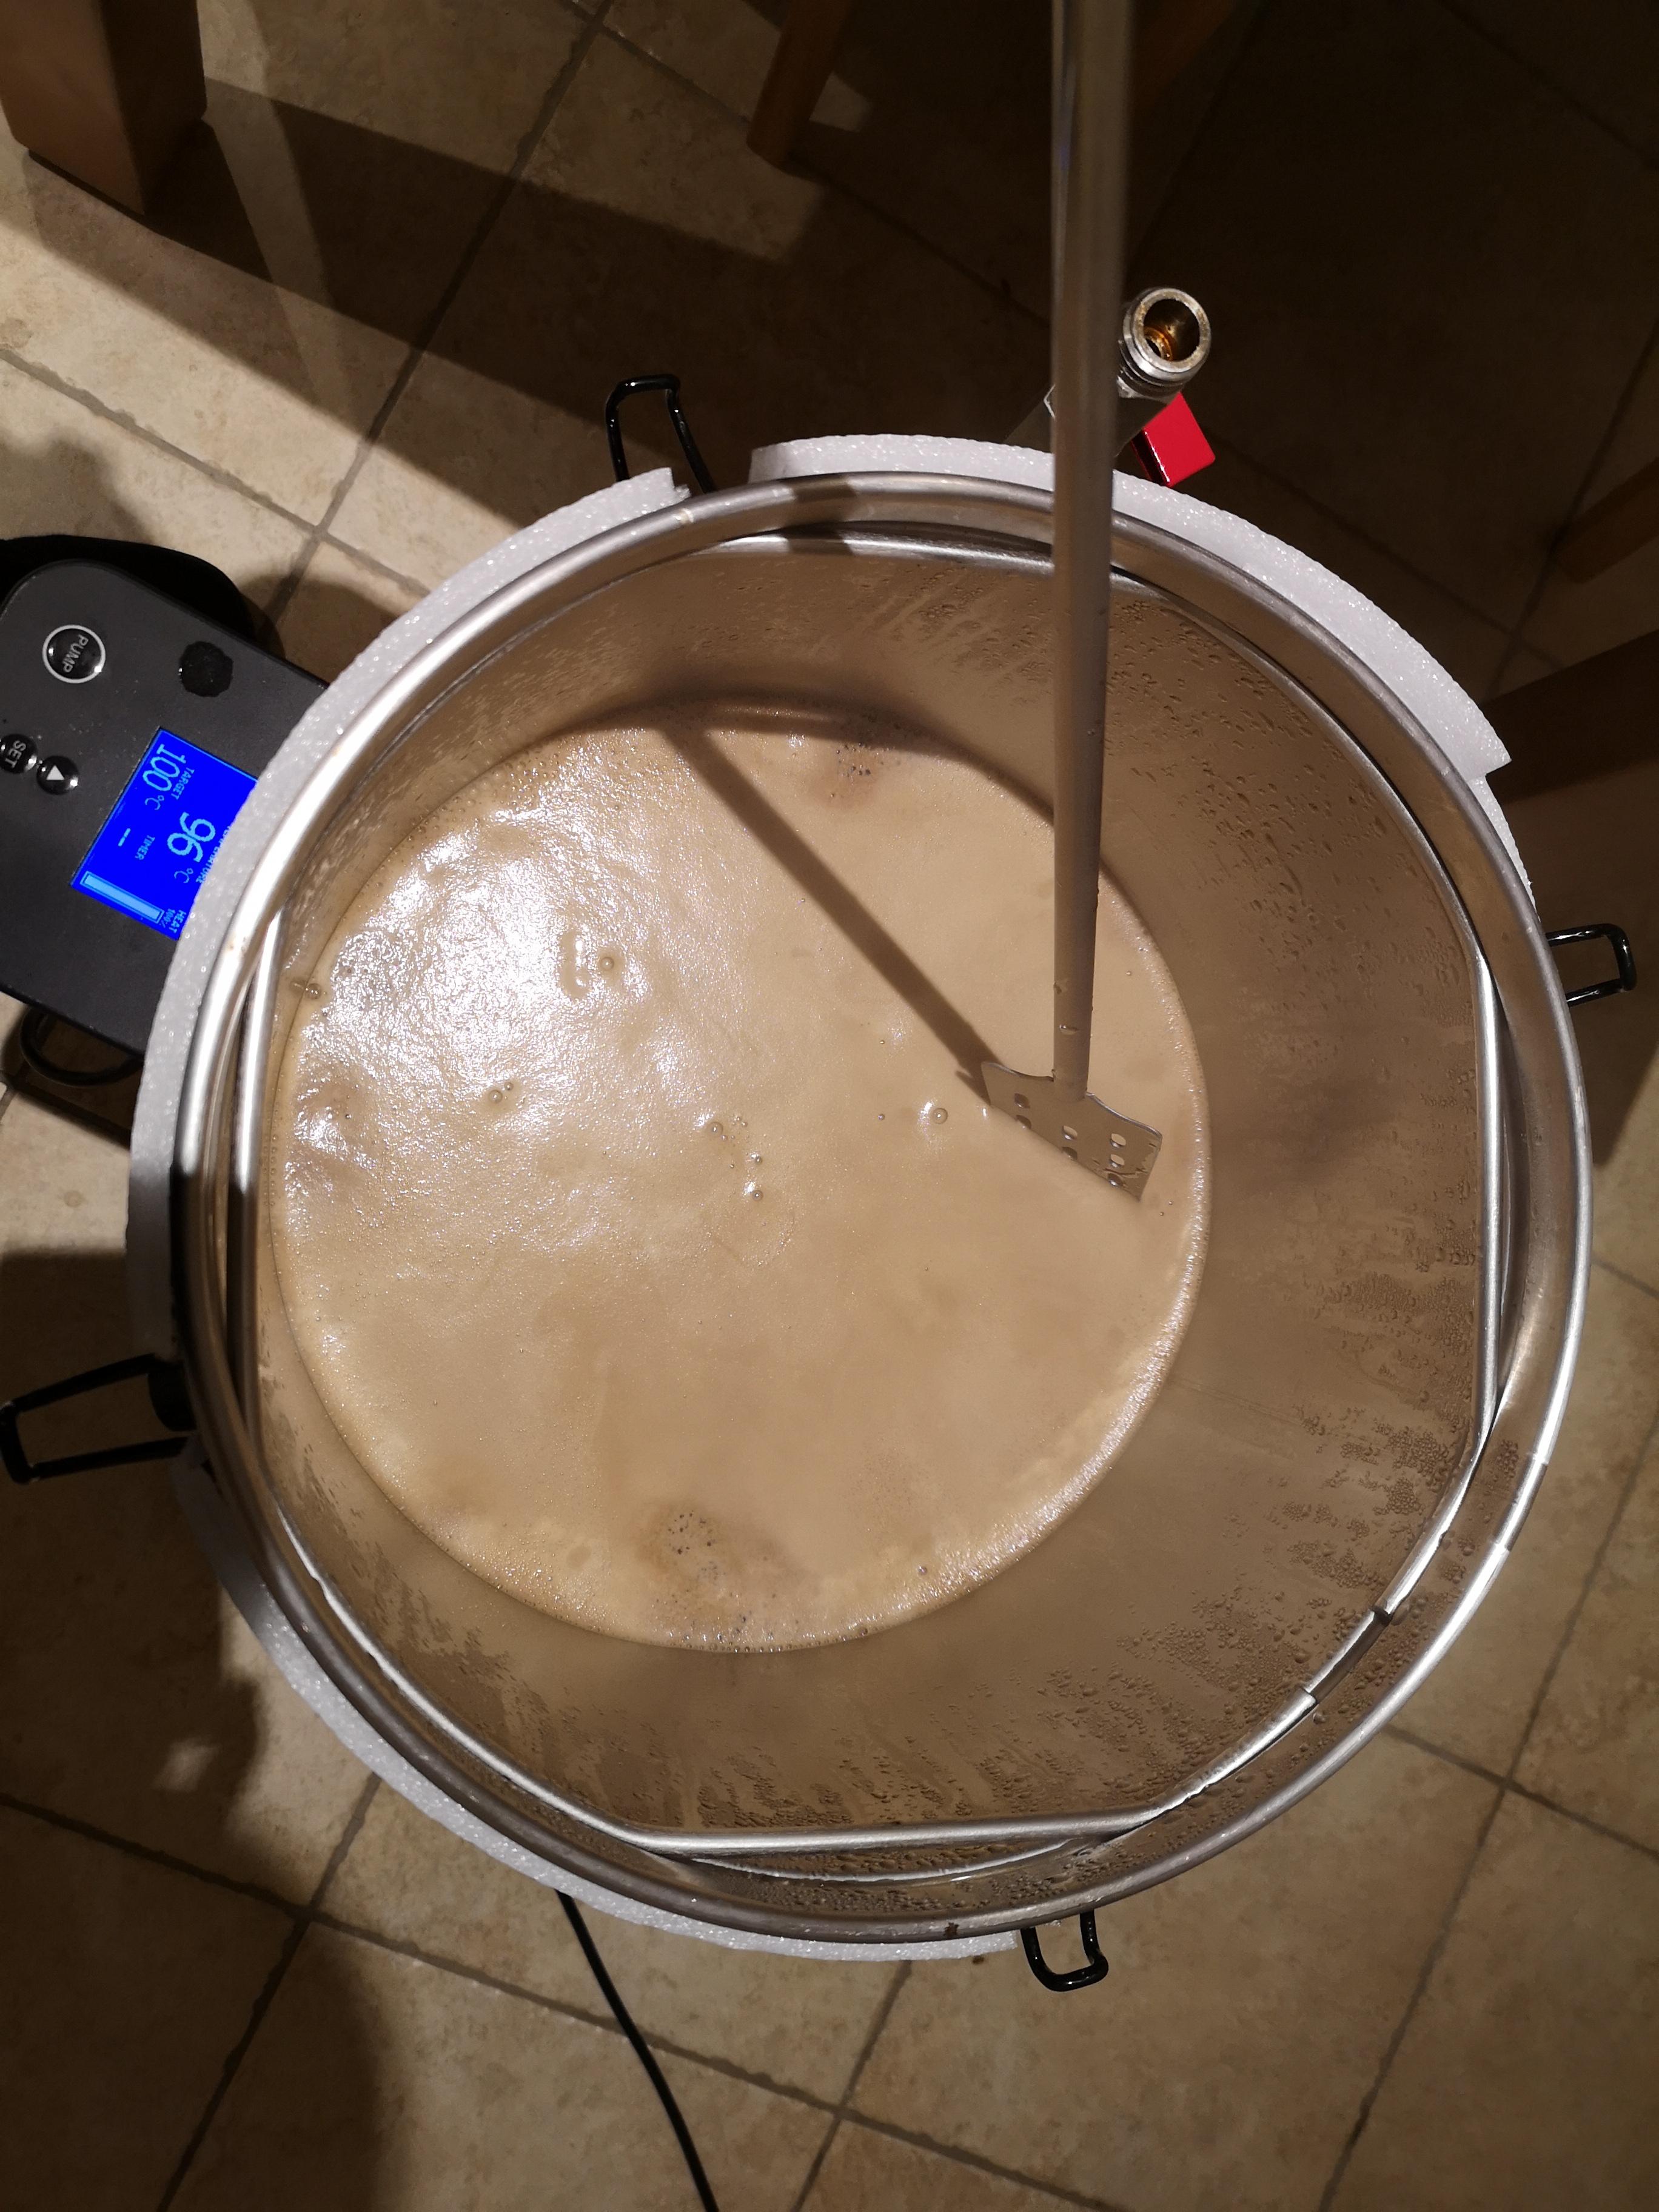
As soon as you have a nice rolling boil, start a timer with your boil time and add the hops as per your recipe.
Every 15 mins or so during the boil, take your paddle and gently scrape the bottom of the boiler to prevent proteins scorching on the bottom.
Now is a good time to dispose of the used grain and clean the grain basket, plates, pipe work and overflow inlet. I do this outside because it can be a bit messy. Dismantle all the various parts and rinse under a tap. Use a non-scratch scouring sponge to remove any stubborn residue.
Once these bits are clean and dry, they can be put aside for storage, you're done with them for today.
Towards the end of the boil you want to start thinking about sanitising the FV. I do this by giving it a rinse out with boiling water from the kettle, then a good spray with starsan. When that's done I put the lid on and set it aside till I need it.
If you're planning on rehydrating dry yeast, now is also a good time to boil some water so that it has time to cool before using it.
About 10 mins before the end of the boil you can sanitise the wort chiller. To do this, set it on a chair beside the GF, connect the wort-in hose to the recirculation pipe and dangle the wort-out hose into the top of the GF. Don't worry about connecting the water in just yet.
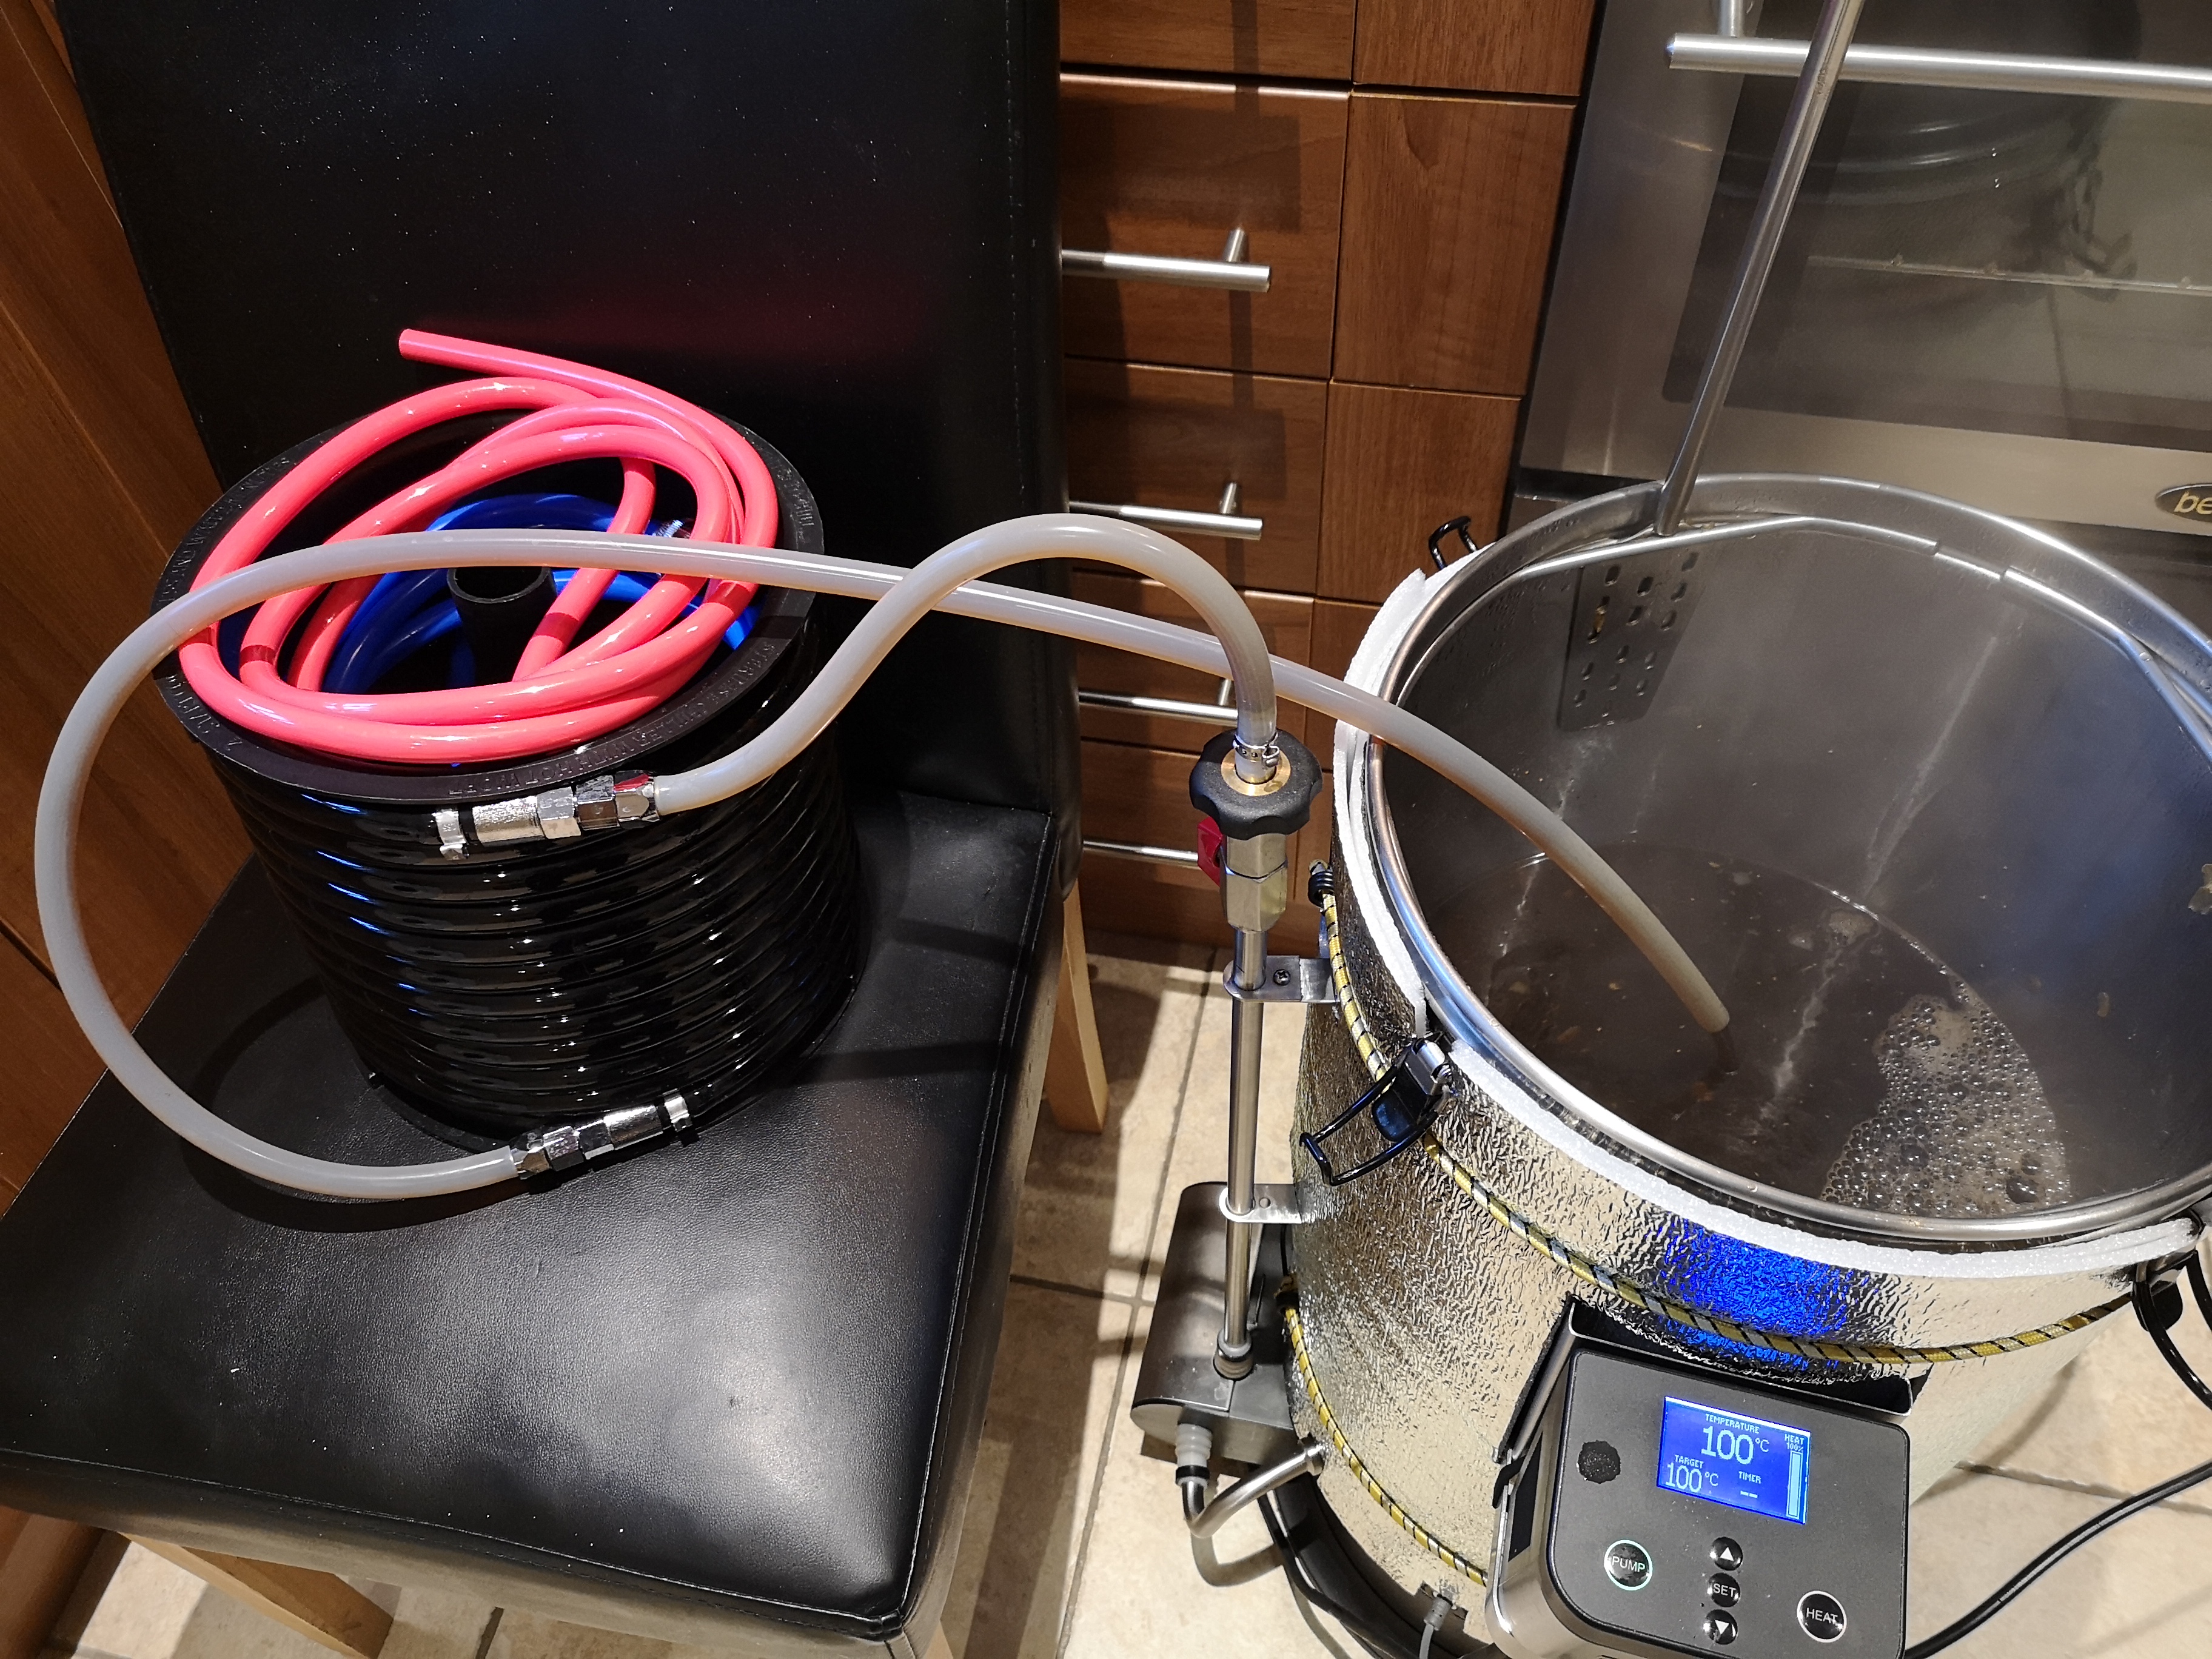
Next, with the ball valve open, hit the pump button and the hot wort will begin to flow through the chiller, sanitising it. Stop the boil timer while this is happening, because the temperature will drop a few degrees. Circulate the wort through the chiller for about 5 mins or so.
When that's done, stop the pump and let the wort drain out of the chiller hose. When the temperature gets back up to boiling restart the boil timer. You can now connect the water-in hose (the blue one) to your water supply but don't turn it on yet. Position the water-out hose (the red one) so that it can drain safely. The wort chiller is now sanitised and ready to use.
Whenever your boil time is complete, switch off the heat then grab your paddle and give the wort a good stir for a couple of minutes to get a decent whirlpool going. Place the lid on the GF and let it settle for 5 mins. Doing this will help the wort flow a little easier without clogging the filter up during the next step.
While waiting, now is a good time to rehydrate your dry yeast if you're doing so.
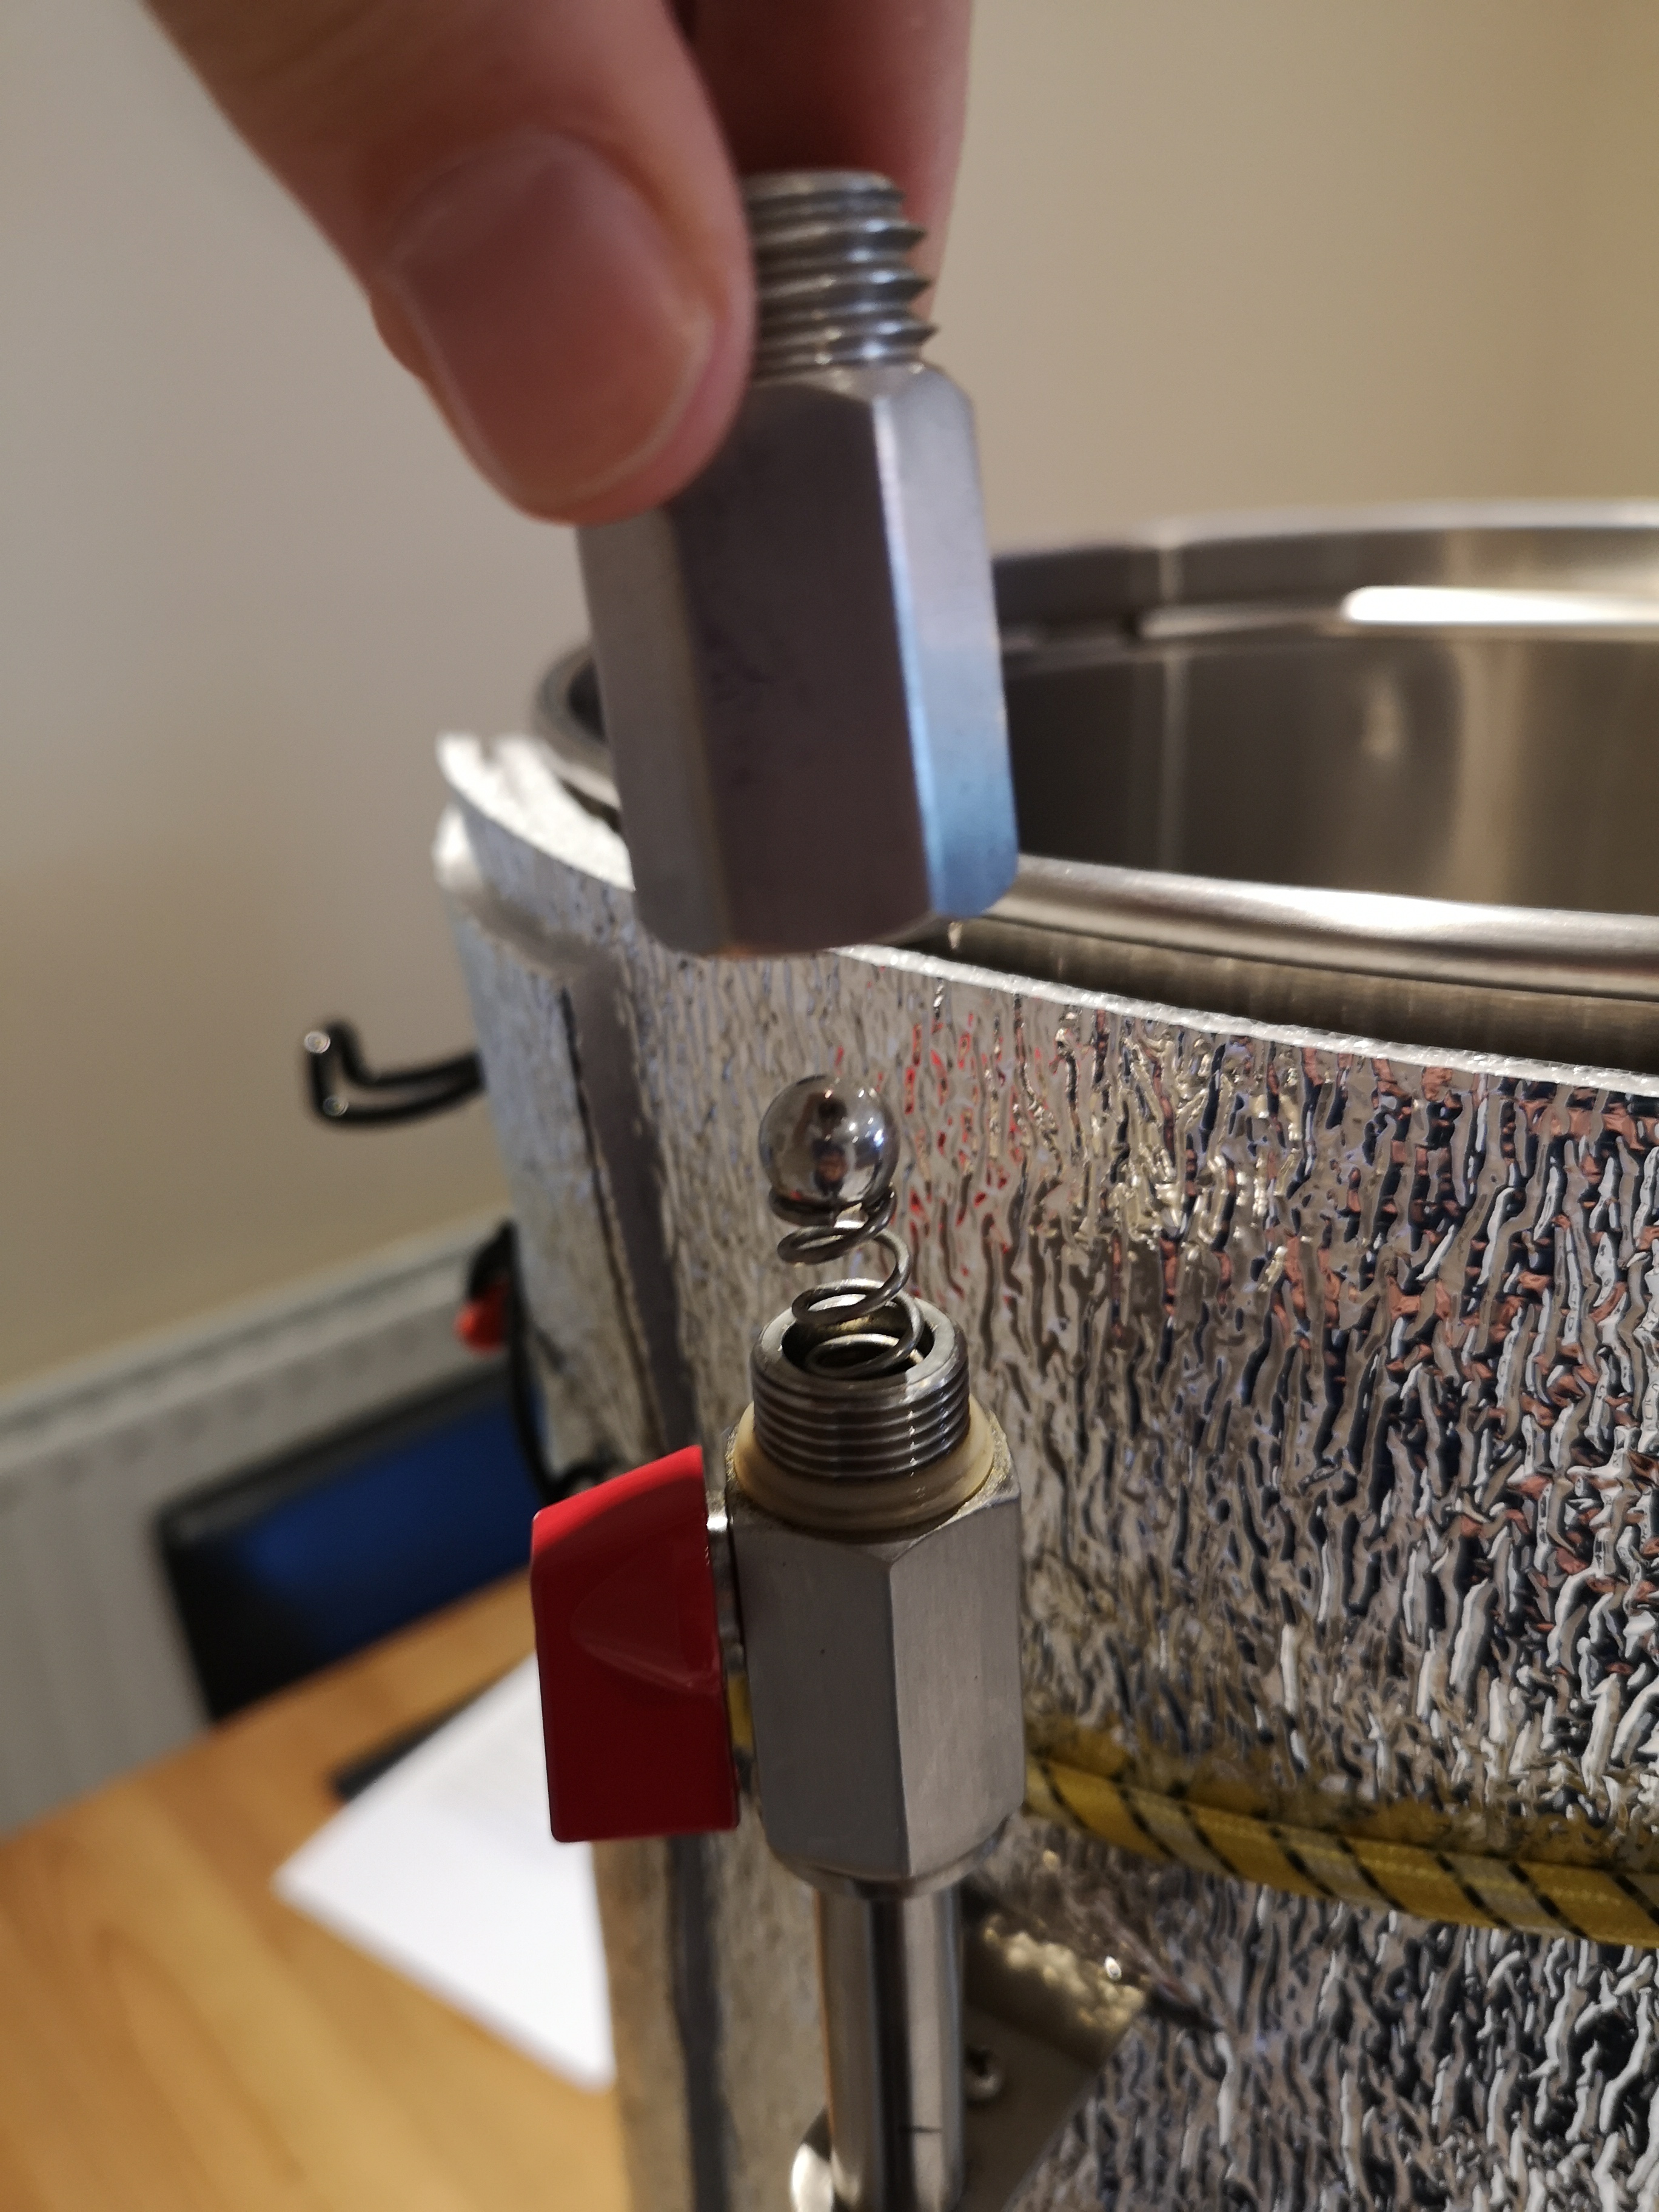
At this point, I use another common little trick which is to remove the ball and spring from the check valve. The reason for this is that I've found the spring can get clogged up with hop material during the transfer, but for your first brew you may well want to skip this step because I know many people have no issue with this.
The check valve is the bit attached directly on top of the ball valve. Inside is a ball and spring which is a safety feature to prevent you from pumping hot wort all over your open-toed sandals, because the check valve will only open if the recirc arm or chiller is attached.
That means if you remove the ball and spring ensure that the ball valve is off and/or the recirc arm/chiller is attached before you switch on the pump!
So if you want to remove it, this is how. With the pump switched off (duh), grab the ball valve with one hand and with the other hand twist the check valve anticlockwise. It shouldn't be so tight that you can't loosen it by hand. Remove it carefully so that the spring doesn't fly away. Take out the ball and spring, put them somewhere safe, and replace the now empty check valve. Hand tight is good enough.
Now you're ready to begin chilling and transferring to the FV. Begin by turning on the water, and if you have a spare FV handy, you can collect the hot water coming out the other side for cleaning later. Then with the wort-out hose in the top of the FV switch on the pump. Grab your thermometer and check the temperature of the wort flowing out of the hose. Adjust the flow rate with the ball valve until it's as close as possible to your pitching temperature. I actually like to aim for a degree or 2 lower.
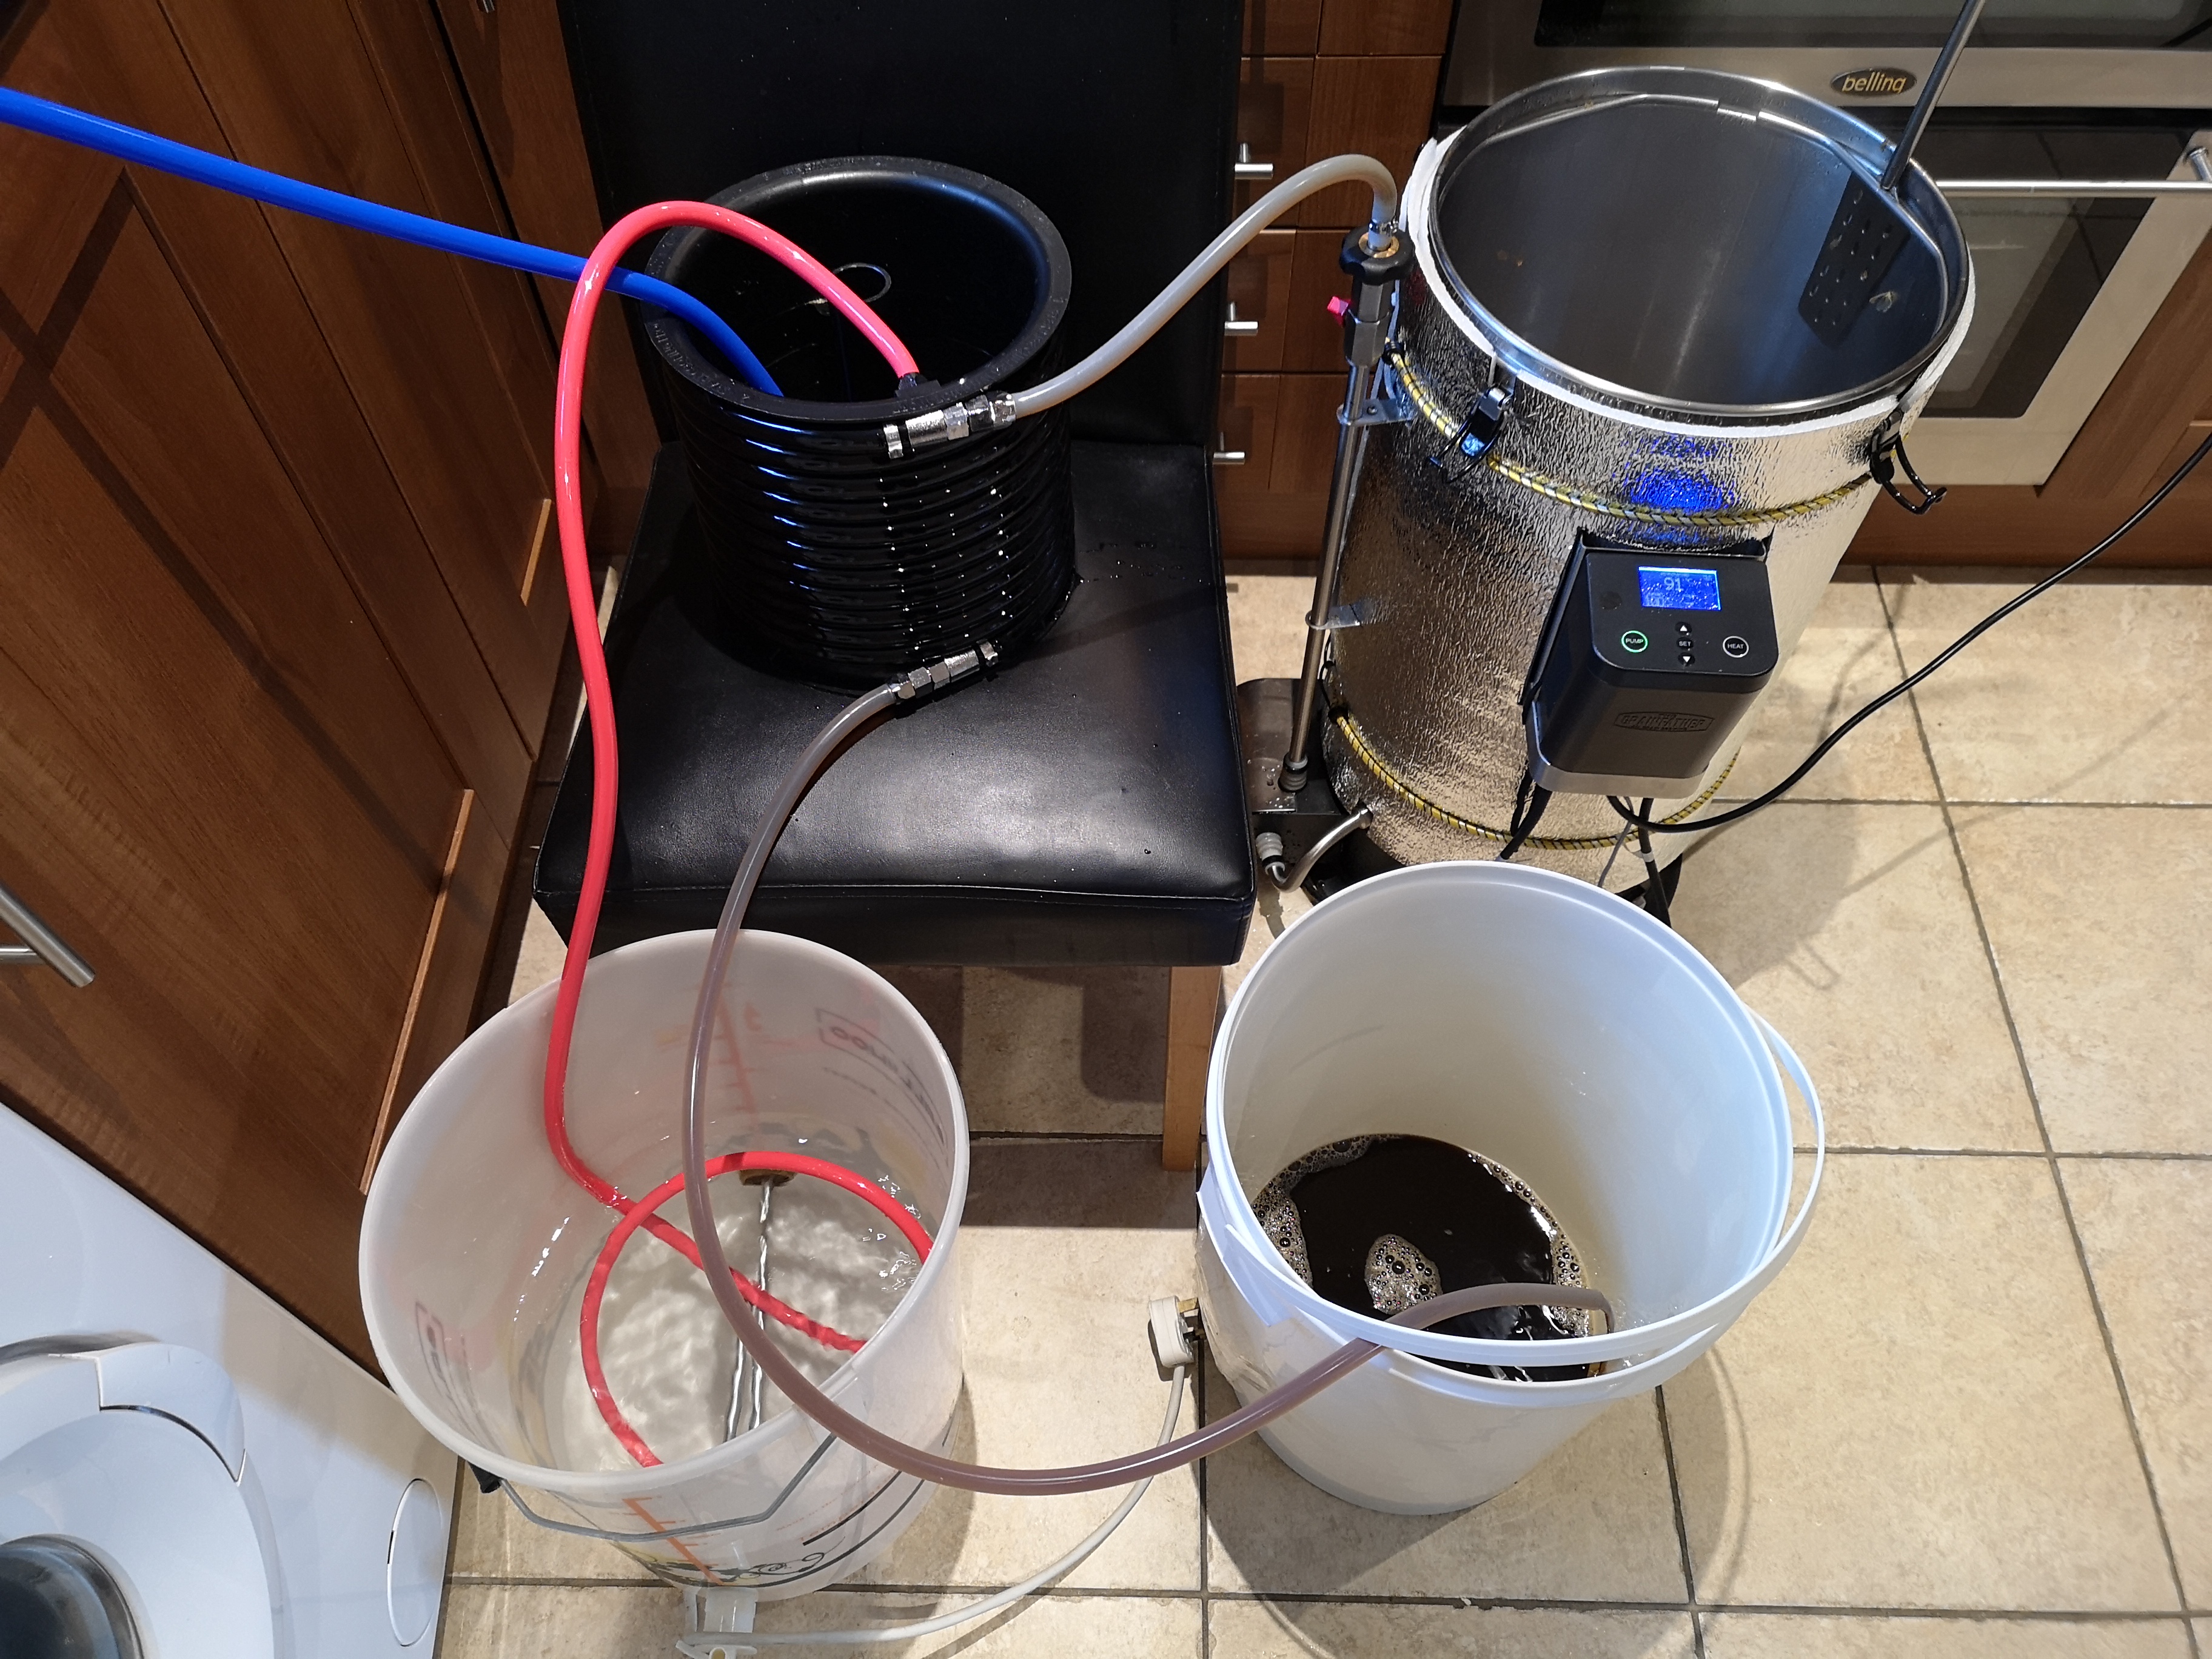
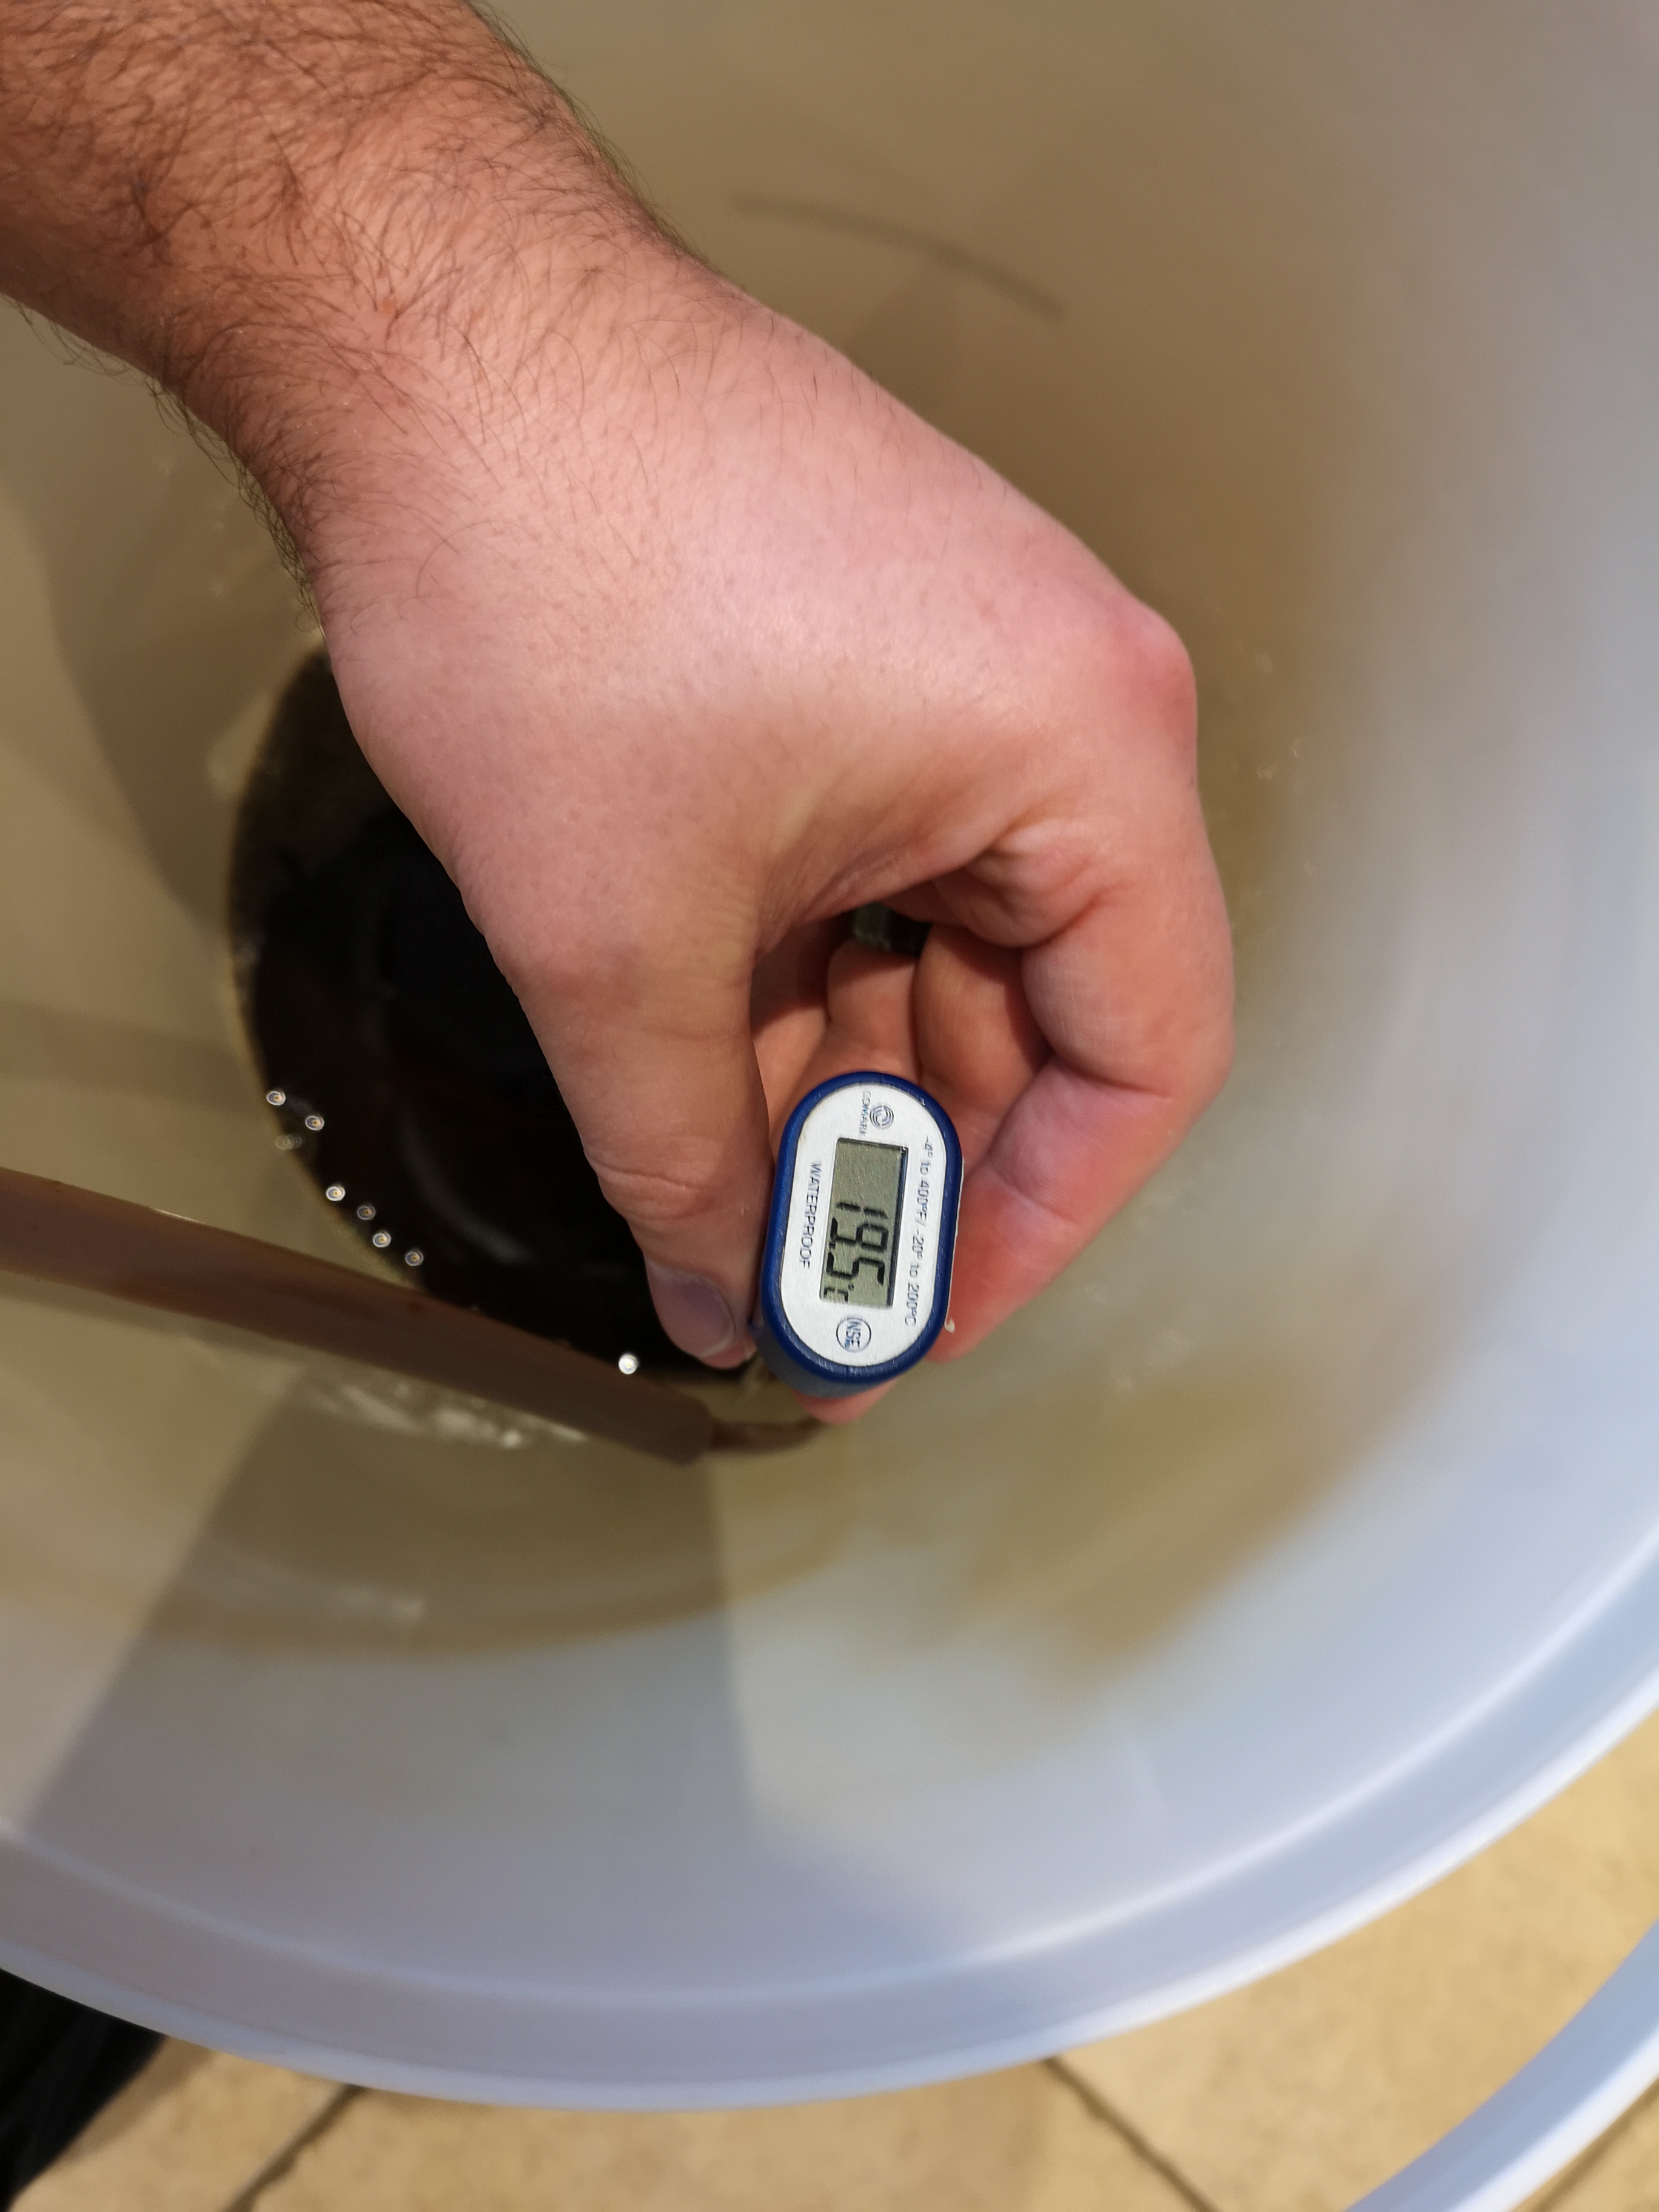
During the transfer you may see the flow rate slow down as the filter gets caked with bits of hop. That's no big deal and you can adjust the ball valve to compensate. However if the flow gets very slow, even with the valve fully open, you can use your paddle to carefully scrape the filter. Be careful not to knock the filter off though. If this doesn't help, you might need to remove the ball and spring from the check valve as discussed above.
At the end of the transfer, I like to tip the GF towards the filter to get the last of the wort pumped out but be sure to switch off the pump before it runs dry, this isn't good for it.
Now the transfer is complete, check the temperature of the wort with a sanitised thermometer and if it's good, pitch your yeast, aerate and take an OG reading.
Now you can clean the GF. Start by tipping out the hop debris/trub into your bin/compost heap/prefered disposal method. Then pour a little warm water into the GF and use a sponge to clean off the worst of the residue. Tip out the water and repeat if necessary.
Then add 15L or so of water (the waste water from the chiller is ideal for this) to the GF, set the temperature to 60° and when it gets to temperature add 2 tablespoons of the GF cleaner. Attach the chiller and start the pump to recirculate the cleaner through it. There will probably be some wort in the chiller which will come out initially so dump this down the drain before putting the out tube into the GF.
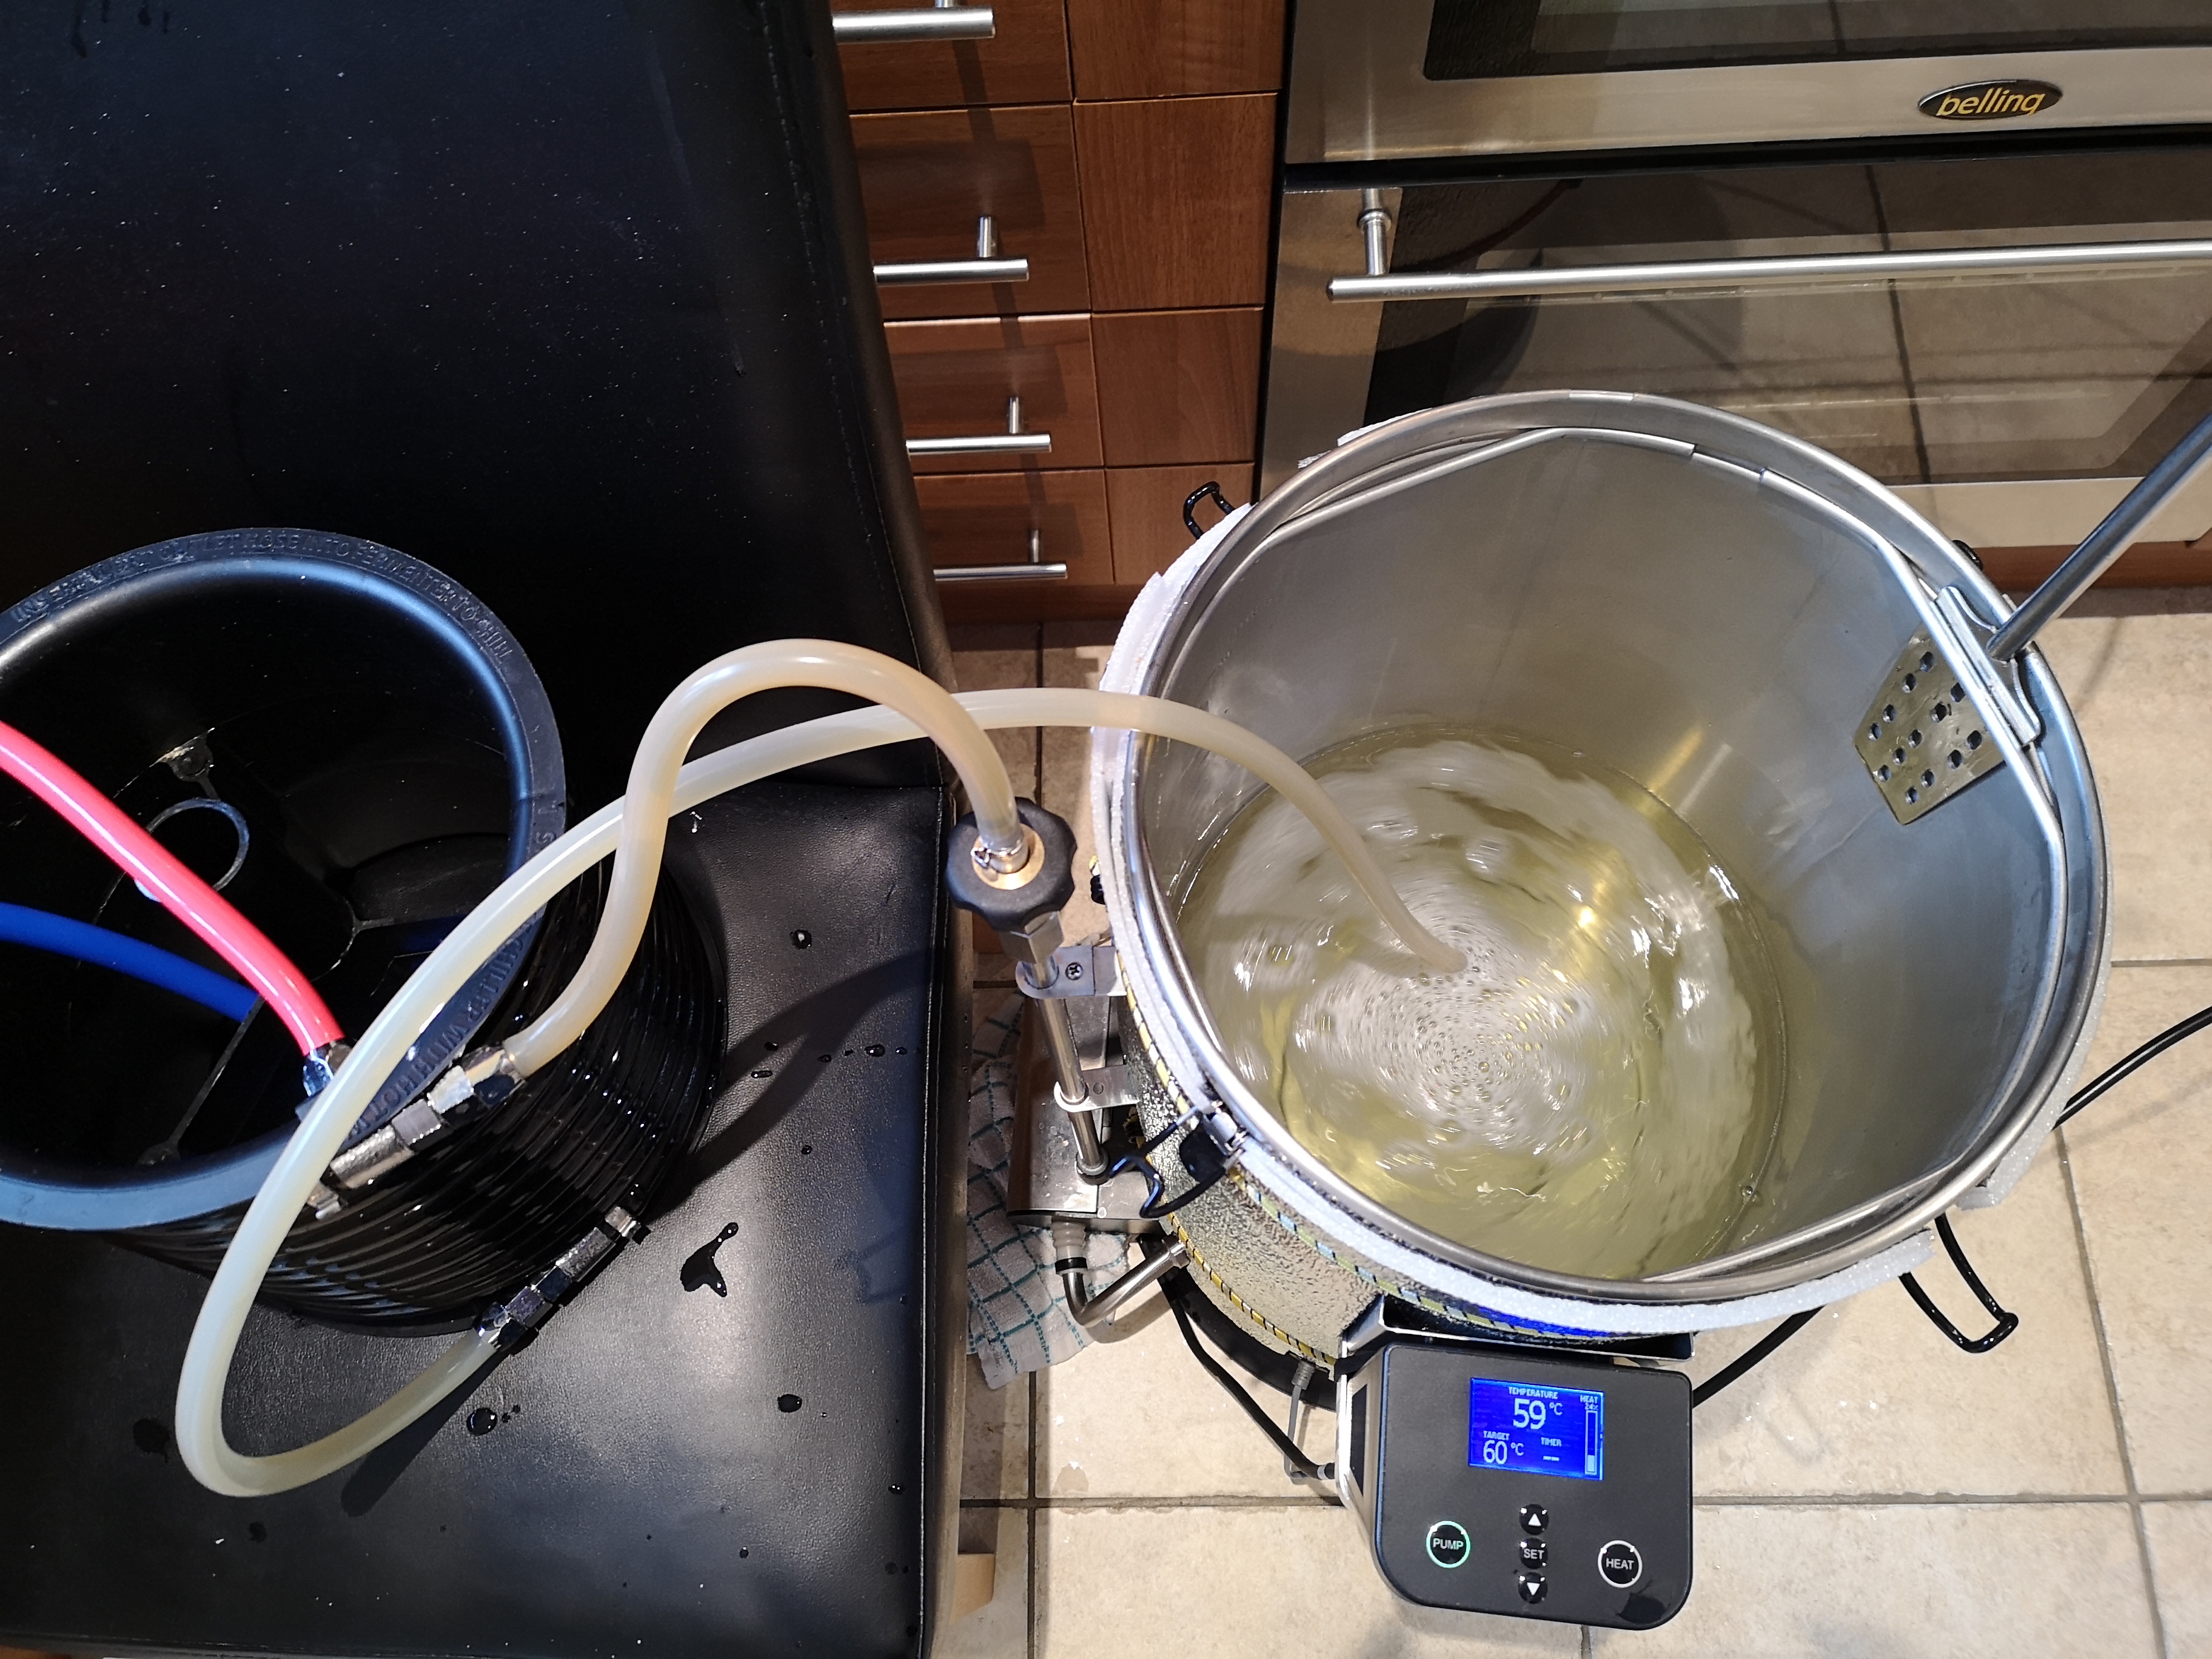
Leave for 15 mins then swap the chiller for the recirc arm and leave for another 15 mins. Next you can discard the cleaning fluid by pumping or tipping it out. At this point I add some fresh water to rinse, again circulating through the chiller and the recirc arm for a couple of minutes. Again dump this water out, dry the inside with a clean cloth or tea towel, place all the various bits and pieces back inside and you're done!
Congratulations, you've just completed your first Grainfather brew, time to start preparing for the next one
Which is the water:grist ratio you normally use for mashing? I've got the impression that the GF tends to have problems with the temperature control if will use thick mashes!


great guide, will defiantly be following it
Hi all, did my first ever AG brew yesterday using a G30 and this excellent post as a reference along with advice hints and tips from another member on here, ecirpian. Whilst it mostly went very well, the false bottom I purchased tilted and I ended up with the filter being knocked off (SS jubilee clip inbound) I have read this is a common problem but haven’t found a solution, has anyone come up with a solution to keep the FB in place?Leave the basket sitting in place to drain until the wort gets up near boiling point, but be sure to remove it before it actually starts boiling. This is a surefire way of having a boil over. By the time the wort gets to mid 90s the basket should be well drained, so set it aside for now and turn your attention back to the GF.
Be sure to keep the lid off from now until the end of the boil. As the wort comes to the boil it'll begin to foam up. Stir this back in to prevent boil overs, it'll settle down after a few minutes.

As soon as you have a nice rolling boil, start a timer with your boil time and add the hops as per your recipe.
Every 15 mins or so during the boil, take your paddle and gently scrape the bottom of the boiler to prevent proteins scorching on the bottom.
Now is a good time to dispose of the used grain and clean the grain basket, plates, pipe work and overflow inlet. I do this outside because it can be a bit messy. Dismantle all the various parts and rinse under a tap. Use a non-scratch scouring sponge to remove any stubborn residue.
Once these bits are clean and dry, they can be put aside for storage, you're done with them for today.
Towards the end of the boil you want to start thinking about sanitising the FV. I do this by giving it a rinse out with boiling water from the kettle, then a good spray with starsan. When that's done I put the lid on and set it aside till I need it.
If you're planning on rehydrating dry yeast, now is also a good time to boil some water so that it has time to cool before using it.
About 10 mins before the end of the boil you can sanitise the wort chiller. To do this, set it on a chair beside the GF, connect the wort-in hose to the recirculation pipe and dangle the wort-out hose into the top of the GF. Don't worry about connecting the water in just yet.

Next, with the ball valve open, hit the pump button and the hot wort will begin to flow through the chiller, sanitising it. Stop the boil timer while this is happening, because the temperature will drop a few degrees. Circulate the wort through the chiller for about 5 mins or so.
When that's done, stop the pump and let the wort drain out of the chiller hose. When the temperature gets back up to boiling restart the boil timer. You can now connect the water-in hose (the blue one) to your water supply but don't turn it on yet. Position the water-out hose (the red one) so that it can drain safely. The wort chiller is now sanitised and ready to use.
Whenever your boil time is complete, switch off the heat then grab your paddle and give the wort a good stir for a couple of minutes to get a decent whirlpool going. Place the lid on the GF and let it settle for 5 mins. Doing this will help the wort flow a little easier without clogging the filter up during the next step.
While waiting, now is a good time to rehydrate your dry yeast if you're doing so.
At this point, I use another common little trick which is to remove the ball and spring from the check valve. The reason for this is that I've found the spring can get clogged up with hop material during the transfer, but for your first brew you may well want to skip this step because I know many people have no issue with this.
The check valve is the bit attached directly on top of the ball valve. Inside is a ball and spring which is a safety feature to prevent you from pumping hot wort all over your open-toed sandals, because the check valve will only open if the recirc arm or chiller is attached.
That means if you remove the ball and spring ensure that the ball valve is off and/or the recirc arm/chiller is attached before you switch on the pump!
So if you want to remove it, this is how. With the pump switched off (duh), grab the ball valve with one hand and with the other hand twist the check valve anticlockwise. It shouldn't be so tight that you can't loosen it by hand. Remove it carefully so that the spring doesn't fly away. Take out the ball and spring, put them somewhere safe, and replace the now empty check valve. Hand tight is good enough.

Now you're ready to begin chilling and transferring to the FV. Begin by turning on the water, and if you have a spare FV handy, you can collect the hot water coming out the other side for cleaning later. Then with the wort-out hose in the top of the FV switch on the pump. Grab your thermometer and check the temperature of the wort flowing out of the hose. Adjust the flow rate with the ball valve until it's as close as possible to your pitching temperature. I actually like to aim for a degree or 2 lower.


During the transfer you may see the flow rate slow down as the filter gets caked with bits of hop. That's no big deal and you can adjust the ball valve to compensate. However if the flow gets very slow, even with the valve fully open, you can use your paddle to carefully scrape the filter. Be careful not to knock the filter off though. If this doesn't help, you might need to remove the ball and spring from the check valve as discussed above.
At the end of the transfer, I like to tip the GF towards the filter to get the last of the wort pumped out but be sure to switch off the pump before it runs dry, this isn't good for it.
Now the transfer is complete, check the temperature of the wort with a sanitised thermometer and if it's good, pitch your yeast, aerate and take an OG reading.
Now you can clean the GF. Start by tipping out the hop debris/trub into your bin/compost heap/prefered disposal method. Then pour a little warm water into the GF and use a sponge to clean off the worst of the residue. Tip out the water and repeat if necessary.
Then add 15L or so of water (the waste water from the chiller is ideal for this) to the GF, set the temperature to 60° and when it gets to temperature add 2 tablespoons of the GF cleaner. Attach the chiller and start the pump to recirculate the cleaner through it. There will probably be some wort in the chiller which will come out initially so dump this down the drain before putting the out tube into the GF.

Leave for 15 mins then swap the chiller for the recirc arm and leave for another 15 mins. Next you can discard the cleaning fluid by pumping or tipping it out. At this point I add some fresh water to rinse, again circulating through the chiller and the recirc arm for a couple of minutes. Again dump this water out, dry the inside with a clean cloth or tea towel, place all the various bits and pieces back inside and you're done!
Congratulations, you've just completed your first Grainfather brew, time to start preparing for the next one
Enter your email address to join: