Modifying a buffalo boiler

The Homebrew Forum

Help Support The Homebrew Forum:

This site may earn a commission from merchant affiliate links, including eBay, Amazon, and others.
I wonder if i should put a hole in the lid for the recirc pipe to go through or if its even worth the hassle? Not sure what the advantage for me would be as its stable mashing already. What fittings would work best? I could use silicone tube on the inside to return under the mash but it might go everywhere when i take the lid off and will make adjusting the height impossible.
Still need a plate on top of the grain. As i have no way of cutting the sheet i bought going to buy one of these to lay on top of the mash. A splatter guard from Ikea. Looks like it will fit perfectly inside the bag so i can squash the grain down a bit and improve efficency. Should also improve sparging.


Going back to the lid question. As you know, I drilled my ACE lid for the return. I only lift the lid slightly to check on the flow whilst adjusting the mini tap, the rest of the mash the lid stays on. So having it go through the lid really isn't an issue. If I do need to remove the lid, there's enough slack on the silicone tubing to just lift it up and remove it with the return still in place. Once the parts come, I'm about to use a 20mm q-max cutter to add a larger hole to the lid, with a bulkhead type fitting and a T piece for the return when mashing, so that the wort is returned more centrally and higher up than when using the "jet" return. Mashing with the lid on means I lose less heat during the mash, which means the element comes on a lot less frequently, meaning less chance for scorching on the element. I have it insulated too, as Fil suggests, mine is with a yoga mat wrapped in the foil bubble wrap insulation stuff. Just because I can apply heat during the mash, doesn't mean I want to do it a lot. lol

So now you have a contrasting opinion, just to fulfil the "10 brewers, 11 opinions" paradigm. lol
 
Last edited:
It would look neater going through the lid. As I am using a PID not so worried about scorching although if boil in it after mashing I clean the Bottom:-)
I managed to autotune the PID first time around and it's mostly within 0.2c. Also found the wider pot makes recirculation much easier. Only problem I have had is after mashing in with the pump still on. It compacted the grain over the silicone pipe an squashed it. I wedged a paddle in there and it ran out again. Such an easier experience than I used to have on my old system.
 
Yeah, I went through the lid rather than the side for 2 reasons:-

1) No need to fit a tap in order to stop anything coming out when the pump isn't attached, where if I went through the side wall there'd be wort splashing out during the boil if I didn't fit a tap to isolate it.

2) You can separate the 2 parts of the lid whilst drilling or cutting, where to go through the side wall you have to go through the 2 layers at the same time.

Like you, I rinse the boiler out between mashing and boiling, and it helps tons. I still get a bit of gunk stuck on over the hidden elements (ever since that fateful wheat beer brew day....) but it doesn't scorch, just trub sticking on. The biggest problem I have now is that with just the 1600 watt element I just about get a rolling boil, with the 1600 watt element AND the 900 watt element I get a mental bonkers insane boil.... I'd really love to have some power control so I could use both but with a tiny bit less heat. As it is I've just been using both, with a 75 minute boil instead of a 90, and topping up more in the FV, and have found this gives me the clearest wort.

I've been lucky with the grain though, so far no noticeable compacting, and the false bottom keeps the bag of grain off the bottom. I just wish it was bigger, so I had more room at the top during the boil. Apparently, 7 inches is still very close when you're going full power... lol ;)

We could do with somebody doing a purpose made mash tun/boiler that's about 40 litres instead of 30 eh? lol I suspect that my wife would start giving me the dead eye if I were to buy a boiler just to do the boil in..... :confused: But heh, she's come to agree that the pump has made massive improvements and was well worth the money. :thumb1:

Once I do the planned modifications again on mine, I'll be putting the pics up. Might give you some ideas of how to go through the lid on yours, maybe even come up with an improvement on my plans. :thumb: I've been finding it much easier to tweak and improve when I have it in front of me, it's easier to visualise how to improve it.

Just a thought, could you perhaps feed the silicone pipe through some SS braid perhaps? Might help the pipe to retain integrity when under pressure maybe?
 
Yeah, I went through the lid rather than the side for 2 reasons:-


2) You can separate the 2 parts of the lid whilst drilling or cutting, where to go through the side wall you have to go through the 2 layers at the same time.


Just a thought, could you perhaps feed the silicone pipe through some SS braid perhaps? Might help the pipe to retain integrity when under pressure maybe?

Hi Ade. The buffalo boiler is not double skinned so it should be fairly easy to cut out holes.
The splatter guard is working well apart from its not quite large enough. Hopefully the pressure cooker gasket should help when it arrives. Have thought about making a hole in the top but last brew i changed tactics a bit. Instead of recirculating the sparge water i used the hoses to rinse all the grains through the splatter guard. Got decent efficiency doing this so going to keep it intact as losing heat is not an issue
I have not had any more problems with a squashed pipe as long as i remember to turn the pump off but a bit of braid would be a good idea.
I would also like to replace the pot with an on/off switch although not sure if its worth the effort. My pump stoppe working again but luckily right at the very end of sparging.
Even though the boiler is really only on full power when step mashing i still get a decent amount of crud on the heater . A voltage controller attached directly to the boiler would be good as half the power would be enough. Or some way of restricting the maximum PID output. Perhaps not worth the hassle as i will be boiling in a larger pot soon enough. Even with a 40l boiler its not easy to end up with 28l in the FV.

121.JPG

122.JPG
 
'Ow do!
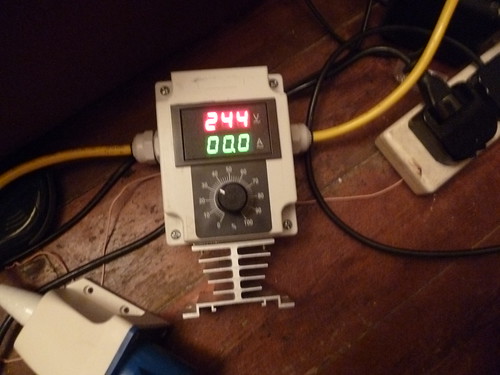
I've mounted a voltage regulator in a project box, added a cooling fan, and wired it to a mains socket fitted on top of the box. No hacking at the boiler needed.
 
Good idea. I may have to do that as well. What do you think is more suitable the 10kw or 5kw? The 5kw has a heatsink around it but the 10kw should stay cooler (or maybe not). Perhaps i should look for a different model.
5kW is enough with several kilowatts of headroom to spare. Even given the Chinese propensity for specification inflation that's going to be fine.
 
Hi!
Yes, the 5kW will be more than enough - if you are mounting it in a box, I recommend some ventilation holes and a fan - a 240V fan will be less hassle. This one is from our Oriental buddies, but is a good price.

Being able to wire that straight up to the mains sounds good. I wonder what RPM they are? Might be good for a heavy duty stir plate. I wonder what size voltage controller would be needed for that?
 
check out resistance controlled SSRs, all you need is an electric guitar volume knob aka 500kohm linear potentiometer to hook up across the 2 control terminals of a SSR, a heatsink, and box with a £10 AMP/VOLT meter and you have a simple power controller with a measured power display allowing you to re-create heat profiles accurately between brews..

mine ;)
12777965574_ed04fe6728.jpg

(yes i had the voltage meter hooked upto the input and not output whoops..)


bits
https://www.ebay.co.uk/itm/Solid-St...758681&hash=item41b01f7287:g:PGQAAOSwHoFXqJYL

https://www.ebay.co.uk/itm/1-5-10-2...hash=item2a23c4d12c:m:mSeUFwhBM2w8PnYD2qmXXSA

https://www.ebay.co.uk/itm/Blue-LCD...862775?hash=item2edcdb6a77:g:554AAOSw5cNYePW5

(just examples not sellers i can recommend..)
 
This is the inside of the boiler showing the thermostat. Looks very easy to replace with a VC but then not sure what to do with the green and red LED's. Also would have to fit an on/off switch would be handy as i keep forgetting to switch it back on.
204.JPG
 
Finally got around to cutting the holes. Thanks to @Bigcol49 for the loan of the tools. It was easier than I expected with the pilot hole being the most difficult due to the crap drill bit. Leaked a fee times as I forgot the tape then needed to add some extra washers. All good now so very happy with it and will confidently drill holes in a bigger pot.
DSC_0380.JPG


I went positioned the thermometer 12cm above the tap in case I do a small mash and for a more accurate reading.
DSC_0379.JPG
 
A few more mods. I ditched the thermowell as it was reading a few degrees out. I have the probe going directly in now and the reading matches what i am getting from putting a digital into the middle. Also found another hosetail to prevent the pipe squashing from the weight of the grain. I managed to mash 9kg of grain in 30l with this unit and ended up with 50l in the FV. I split the wort and boiled half in the ace boiler i use for the sparge water.
067.JPG

069.JPG
 
After many brews i have come to the conclusion i need a different bag. The problem is it does not drain fast enough to keep the flow going. Bubbles keep getting formed in the pipe and underneath the bag. When i turn the pump off often lots of air comes out disturbing the grain bed. Considering how good the pump is the wort is no where near as bright as it should be.
I did a Rye beer recently and decided to try without a bag. Unfortunately it set like concrete even with oat husks and i abandoned recirculating and could not mash out. After boiling the cloudiest wort in a long time i ended up scraping the bottom of the boiler with a knife and wire wool. The wort did not taste burnt but it could develop and have to be thrown away.
So i am looking for a bag with larger holes if anyone has any suggestions. I haver looked at baskets but not sure if they would be big enough.
On the plus side the temp control is working perfectly but i am thinking the flow could still be improved if i modify the tap. Its being restricted by the PID sensor.
 
If your using Rye or wheat or the like, try doing a Beta-Glucan rest (also known as an acid rest) step at 40-45 degrees C for about 15 minutes before you do your main step. I did a wheat beer recently with a LOT of flaked wheat, did a Beta-Glucan rest though and NO gummyness at all.

I was using this bag, but I've switched now as it's incredibly floppy and flimsy. Was a nightmare to use as tended to want to float and swirl whilst doughing in and stirring the mash. On the plus side, it does have a very open structure. lol The rice hulls did bad things to it though. Now it's a hop boiling bag.

Regarding your tap, the hose barb is probably restricting flow more than the sensor. Have you considered switching to either quick disconnects or camlocks to mount your pump?
 

Latest posts

Back
Top