Bread baking

The Homebrew Forum

Help Support The Homebrew Forum:

This site may earn a commission from merchant affiliate links, including eBay, Amazon, and others.
I made some lovely mini loaves last week. I got some small bread tins off ebay. A "normal" 800g split into 4 nicely.

Base off the side of the bag of flour:

350g Strong White
150g Barleycorn flour - got it in Mr T.
7g yeast
300ml of warm water
10ml of oil

Used my BM to kneed and then split to the mini tins. Left for a hour to rise then baked @ 230 for 20min

Lovley taste and some strange shapes from rising over the tins.

If I make somemore this week I will take some pics.
 
Made a white loaf today containing ...

............... marmite and cheese :thumb:

just had home made lamb meatballs and a tomato sauce mopped up with the bread :!: :!: :!: really good :party:
 
This week I have just been making the bloomer from PH's series on at the mo.
One just out of the oven a short time ago, be ready for sampling shortly :thumb:
 
hairybiker said:
This week I have just been making the bloomer from PH's series on at the mo.
One just out of the oven a short time ago, be ready for sampling shortly :thumb:

I made that and it was cracking... :thumb: even though we prefer granary loaves

The garlic baquettes are worth the effort as well ( although mine looked more like ciabatta )
 
woke up this morning to the smell of fresh dough half risen and waiting to be put into their mini loaf trays.
Continental breakfast. fresh bread jams and strong fresh coffee....hmmm
 
Thanks to all involved in this topic. Although I haven't paid it any attention until now, I'm just trying to get up to speed and bookmark a couple of recipes.

My mother is in her eighties and getting quite frail now. She rarely cooks nowadays apart from occasionally grilling a steak or chop and boiling some veggies to mush, and she never bakes anymore.

Until last Friday she had a Kenwood Chef, which has probably only been used a couple of times in the last 5 years, and not at all in the last 2. Now I've nicked it.

We do have a (cheaper, non-Panny) breadmaker which has been used a few times with mixed results and then left to gather dust, but the weekend before last I made my first ever attempt at baking bread from scratch and kneading by hand, and produced an acceptable bloomer. Last weekend I tried again but used the dough hook in the Kenwood. Give me power tools any day.

I also made a sponge cake and a fruit cake, thought they were pretty good, brought some into work yesterday and they passed with flying colours, but I now have my female workmates putting in orders for regular supplies.
 
Moley said:
Until last Friday she had a Kenwood Chef, which has probably only been used a couple of times in the last 5 years, and not at all in the last 2. Now I've nicked it.

We do have a (cheaper, non-Panny) breadmaker which has been used a few times with mixed results and then left to gather dust, but the weekend before last I made my first ever attempt at baking bread from scratch and kneading by hand, and produced an acceptable bloomer. Last weekend I tried again but used the dough hook in the Kenwood. Give me power tools any day.

I tend to agree, I use a Kenwood Patissiere ( think a small cheaper Chef ) with dough hook and then a small bit of kneading by hand at the end.

Here's my recipe if its of any help...

350g Strong White
150g Wholemeal Plain
handful of porridge oats
30g Olive Oil
8g Salt
8g Fast Action Yeast
240ml warm water

Chuck it all in the mixer ( start with salt and yeast on diff sides of bowl)
Add up to another 70ml of water to get the consistency ( I find this is dependant on what flour you use, but I end up using most of the extra water )
Mix on low speed for 10 mins in the mixer
Knead in oil for a couple of mins

Put into bowl and leave to at least double in size ( around an hour )
Knock back and shape into a bloomer
Place on baking paper, leave until around doubled in size ( 45 mins to an hour )
slash, flour, spray with water and bake for 25 mins at 220c, then 10-15 mins at 190c

The Paul Hollywood series is worth a watch as well, I have adapted a few of my breads based on his recipes and I would say all were positive. :thumb:
 
Since getting my mum's old "broken" breadmaker last year I've barely bought a loaf. Takes minutes and always pleased with the results. SWMBO always struggles and her loafs tend to be on the small, weirdly shaped side....much to my (secret) amusement :rofl:
 
Just made my first loaf, bi dense, not enough proving? How long can I prove for?
 
CoxyBoy123 said:
Just made my first loaf, bi dense, not enough proving? How long can I prove for?


Until it doubles in size is the general rule, though with sourdough this doesn't always happen.

Kneading is also important to helping bread rise as it strengthens up the dough. I knead for 20 minutes vigorously by hand.
 
You need to use strong flour and knead it well. I make two large loaves at a time using 50% wholemeal, 15% rye and 35% white. I knead it by hand for 10 minutes. I then leave the dough overnight in its bowl. In the morning I put into tins and bake it. Rises beautifully and springs in the oven. I use a very hot over preheated to 300C then lower the temperature to 240C once the loaves are in. After 10 minutes lower to 220C for another 30 minutes. Last 5 minutes the loaves go on the shelf out of the tin to help ensure the bottoms are cooked.
 
just made a white today, followed recipe on flour packet ( was to hand).... my bread normally rises nicely, but today it sort of crept sideways, tripled in size nicely, but didnt rise more than an inch and a half, tastes really nice,half gone already, plenty holey, so lots of air pockets, just flatish... guessing too much water... any thoughts?
 
It's nice to see such an enthusiastic baking community on here. I'm glad I'm not the only one who sees the correlation between brewing and baking.

I got into baking thanks to a Jamie Oliver cookbook I bought to help me get away from the traditional student diet when I was at uni. My first attempt was awful - I didn't realise that the yeast I was using needed activating.

Since then I've tried various methods and I'm currently working through one of Peter Reinhart's books (Crust and Crumb I think it's called but it's in the kitchen and I'm not). He's very keen on long, slow fermentation for pretty much any loaf. Most recipes involve overnight "retarding" in the fridge and, in some cases, multiple retardings. His french loaf recipe is great. It takes three days to build but there are really only two bursts of activity being the kneading and baking. The other steps are generally a couple of minutes here and there.

I've not quite built up to trying Reinhart's approach to sourdoughs but I do use Hugh Fernley-Wittingstalls sourdough recipe (combined with some of the oven techniques from Reinhart) and have been getting great results this time round. I think in the past I've always used the started before it was really ready and have been put off by the results and let the culture die. This time it's going so well that I'm concerned about the fact that I'm going away for a few days so I need to remember to feed and refrigerate the starter before I go.

My current recipe is really simple but still needs a days prep before baking. My sourdough has been built up using just wholemeal bread flour and water. It's now been alive for about a month and is really starting to develop great flavour.

The recipe -

Stage 1 - The sponge

About 100ml of starter
250g bread flour (I use a 50:50 mix of white and wholemeal)
275ml water

Mix together well in a large bowl, cover and leave for about 8 - 12 hours. I tend to start at about 8pm and leave it over night.

Stage 2 - The dough

300g bread flour
1tbs olive oil
10g salt

Add ingredients to the sponge and combine. The consistency at this point is very important. The dough needs to be slightly wet. I find this hard to judge until I start kneading so tend to er on the side of caution and add a little more water. It's much easier to add extra flour once kneading than it is to add water. Turn out the dough and knead for about 15 minutes. Put the dough into a lightly oiled bowl (though low calorie sprays are handy for this), oil the dough, cover and leave to raise for about 8 hours.

Stage 3 - Shaping

Gently knock back the dough (if you are too rough you'll lose the wonderful irregular crumb found in sourdoughs) and shape into a boule or whatever shape you want. Place into a heavily floured proving basket (or in my case fruit bowl with clean tea towel) and leave to raise for a further 3 hours.

Stage 4 - Baking

30 minutes before you want to bake the loaf preheat the oven to ~250C (my oven only goes up to 235 and works fine) with either a baking stone or up turned baking tray on the middle shelf and a roasting tray or similar on the bottom.

Turn the loaf out onto a baking sheet (no lip! you need to slide the loaf onto the baking stone) with lightly floured baking paper and score the top in your desired pattern with a sharp knife (a double sided razor blade on a wooden coffee stirrer works well).

Pour a cup of boiling water into the roasting tin and use a spray bottle full of water to greate a good mist in the oven. Leave a couple of minutes (close the door!) and then slide the loaf onto the stone/tray. Mist the oven again with the spray bottle another 2 times at 2 minute intervals. Leave for 10 minutes after the final spray then reduce the oven temp to 200C. After another 10 minutes turn the loaf 180 degrees as most ovens don't cook evenly. Bake for a further 15 minutes. Check the loaf for the traditional hollow sound. If it's not ready bake for a further 5 minutes - repeat until done. Once ready turn the oven off and leave the loaf in the cooling oven for 10 minutes. Remove the loaf and place on a cooling rack for at least 30 minutes.


Obviously the baking is the most complicated stage but I truly believe that it's all necessary to get the best flavour, crust and crumb from the loaf.

A few pictures of the process (only the stage I've got on the go at the moment I'm afraid)

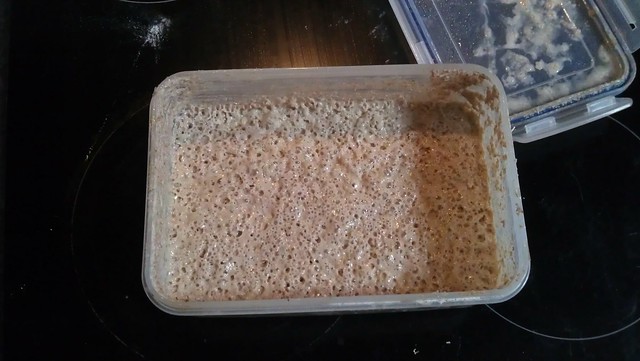
The starter after good feed last night (100g flour and enough water to keep consistency)
8725792716_4668003330_z.jpg


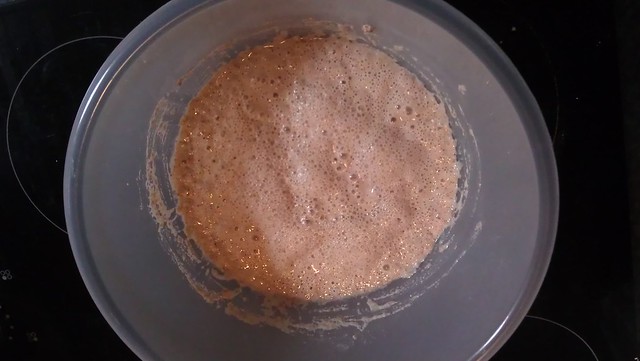
The sponge after being left overnight
8725792266_5f3b69faaa_z.jpg


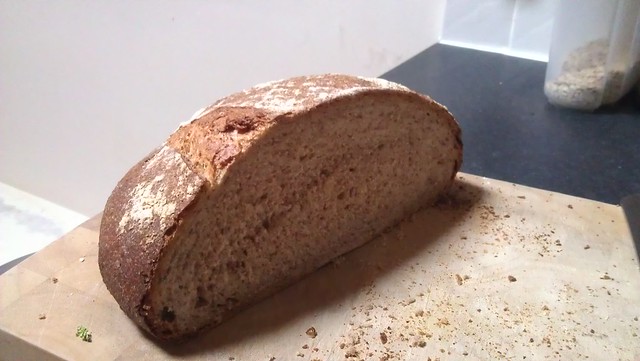
Last night's bake - the ridge in the crumb is due some cack handed slicing
8725791932_82de094d07_z.jpg
 
Nice looking bread I wish I could get my sour dough white to rise as much. I get good crumb but it tends to spread side ways once it is on the baking stone.

My starter has been refreshed 3 times now ready to mix tonight and then ferment for 15 hrs ready to bake when we come back from sons footie match.
 
I have a spelt sourdough starter in the fridge. I've only used it once and that was months ago, so I've no idea whether it will be any good if I try to revive it. Perhaps I should remove it to make more room for beer.

Has anyone reused beer yeast to make bread? I'd be worried that yeast extracted from the wort might be too bitter.
 
graysalchemy said:
Nice looking bread I wish I could get my sour dough white to rise as much. I get good crumb but it tends to spread side ways once it is on the baking stone.

Your shaping technique may be at fault. Mine isn't great and a boule is the only thing I can turn out with any consistency. Whatever shape your going for the aim is to get a nice tight membrane on the loaf to help is keep it's shape. There are some decent videos on youtube on shaping.

http://www.youtube.com/watch?v=RgqPli_sLLM
 
At the moment I only do tin loaves and rolls. I will have a go at baguettes and other shapes some time, but beer brewing gets in the way at the moment.
 
Back
Top