Sight glass disaster

The Homebrew Forum

Help Support The Homebrew Forum:

This site may earn a commission from merchant affiliate links, including eBay, Amazon, and others.

serum

Landlord.
Joined
Oct 11, 2013
Messages
591
Reaction score
141
Location
London
I got my yeast starter going and have been looking forward to having a go at my first AG brew having just made a shiny new boiler and noticed the sight glass was leaking when I filled it to check the dead space.

I tightened it up a bit and noticed the rubber seal didn't look quite right and it seems the actual see through tube was made of something incredibly flimsy and just snapped clean off.

I've now got a hole and no sight glass and no way to do the brew unless I think of something quick.
 
U could plug the gap with something temporarily?

I'll have to try to get something from B&Q to save this brew. I'll be gutted if I can't because aside from the cost of the sight glass I'll lose the yeast starter I've made. I was really looking forward to doing this.
 
U will be fine mate. Dont worry! Some food grade silicon will work as a worst case scenario temporary fix
 
£shop or similar i got a silicone baking sheer 1mm thick off ebay

to plug a hole slip the silicone over and use anything to bung it up like a pencil or whatever is an appropriate size for the hole, if u have any pics of the problem u may get more constructive tips at a fix, if sourcing a replacement tube look at polycarbonate above perspex as its less prone to shattering after heating.

but a bit of transparent hose secured with hoseclips over what fittings u have in place may do the job for you.

I'll get a proper replacement and try to bung the hole for now I think. If I can get a nut and bolt and something to seal around it with I should be able to have a crack at it without the sight glass.
 
I've managed to plug the hole now with a big nut and bolt and seal so I think I'm just going to go ahead and have a go at the brew. I couldn't get any iodine either but I figure a lot will probably go wrong so I'll just have a bash and see what happens and do it better next time.
 
Hiya M8!
Sorry to read about your sight glass disaster. Had the same issue with my HLT. Tried acrylic tube in compression fittings. The bottom olive cracked it before it sealed :(. Replaced it with polycarbonate - the olive seals it before it cracks :-). I suppose, when trial and error is all you have available, you have to expect some errors. So long as you get there in the end...

Cheers,
Chris
 
My temporary bolt fix worked and I got my brew on, learning a hell of a lot in the process!

I've got a replacement sight glass coming and have ordered some better seals to fit on it. I used those dowty seals for my tap and thermometer and they work really well so I've grabbed some smaller ones that should fit the sight glass kit when the new one turns up.

I'm going to have a go at a sparge arm soon Chris probably following your design as that was one bit that really didn't go well. The boiler worked great though and didn't fry my house so I'm happy with how it went all in all. I was expecting more to go wrong!
 
It's that trial and error thing again! I think sparging is one of the trickiest things to get right. I'm on my 2nd sparge-arm, 'cos I put too many holes in the first :(. That meant I had to reduce the rate of flow from the HLT, so the sparge liquor just kinda drizzled out of it. That in turn meant standing over the MT to frequently move the sparge arm, to ensure there was a reasonably even distribution over the grain bed. Bit of a PITA, really.

I made a replacement of the same 'design' (using the term liberally!). I employed the 'less is more' principle, and put less than half the number of (1mm) holes than its predecessor had. After first use, I put half a dozen more in. It now sparges at about the litre a minute rate I wanted, with a reasonably even distribution over the grains.

A coolbox MT lends itself pretty well to a single length of copper pipe as a sparge arm. What are you using for a MT?

Cheers,
Chris
 
Can anyone link me to a decent thread describing a sparge arm build please? I have been meaning to build one for ages but simply haven't had the time. Have been using a roasting tin with holes drilled in it for a while and have had enough of that!
 
It's that trial and error thing again! I think sparging is one of the trickiest things to get right. I'm on my 2nd sparge-arm, 'cos I put too many holes in the first :(. That meant I had to reduce the rate of flow from the HLT, so the sparge liquor just kinda drizzled out of it. That in turn meant standing over the MT to frequently move the sparge arm, to ensure there was a reasonably even distribution over the grain bed. Bit of a PITA, really.

I made a replacement of the same 'design' (using the term liberally!). I employed the 'less is more' principle, and put less than half the number of (1mm) holes than its predecessor had. After first use, I put half a dozen more in. It now sparges at about the litre a minute rate I wanted, with a reasonably even distribution over the grains.

A coolbox MT lends itself pretty well to a single length of copper pipe as a sparge arm. What are you using for a MT?

Cheers,
Chris

I've got one of those long thin Coleman cool boxes so I might potentially need quite a long arm to cover the surface area. I can see myself having problems getting the flow right with that. How many holes did you have in yours in all? If I shoot for the same amount it should work just fine.

I tried foil with holes in over the box at first and it collapsed so I took a 5l bottle and stabbed a load of holes in the lid and used it as a watering can. It wasn't very good but it was all I could rustle up at the time. I ended up draining far too much water out early on and had to move the MT which disturbed the bed.

I found the grain bed was very uneven which made it hard to keep the liquor from hitting the grains.

For now I'll probably knock something up that I have to use manually until I can make something decent.
 
The replacement sight glass is now installed. I used some 1/4 BSP dowty seals rather than the single seal that came with the sight glass and I've got a perfect seal now so I'm back in business.

Can't wait to get another brew on, I just need some spare time now. I might try get some bits for a sparge arm this weekend if I can.
 
Hi

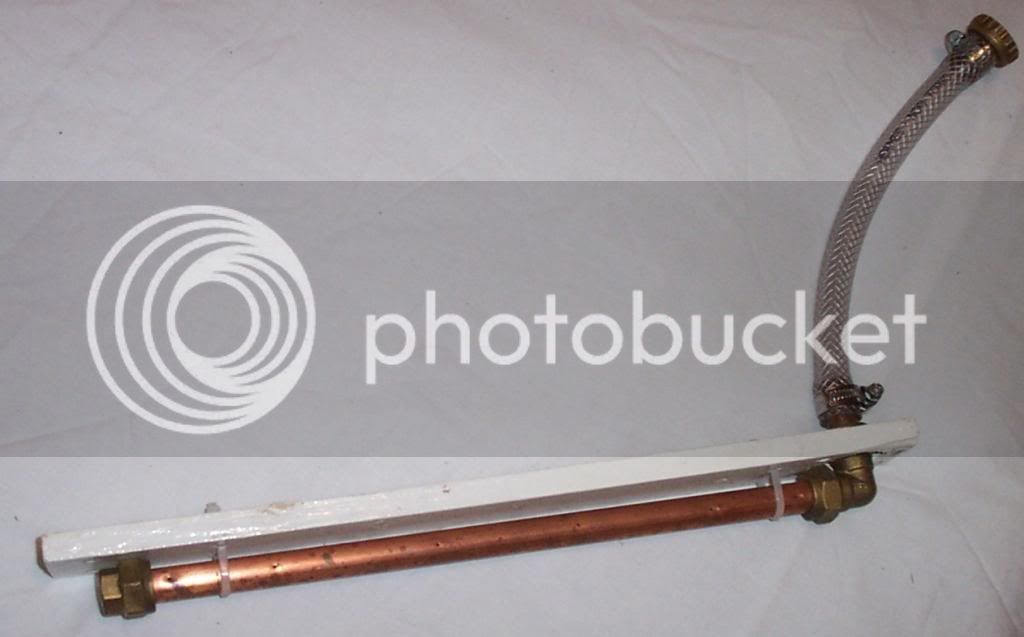
Here's my sparge arm - simple (crude, even!) but effective :-)


It has a length of 15mm copper pipe, cut to fit my MT, with a compression stop one end, and elbow at the other. The piece of timber rests on the edges of the MT, and the arm is secured to it by cable ties. A stub of copper pipe has a length of plastic pipe hose clipped over it, and a Wilko hosetail to female thread connects to the HLT - British engineering at it's finest!

The pipe has 23 x 1mm holes, which works for me - a steady litre a minute. They're in 3 approximate rows, left, right and centre, (call it 3, 6 and 9 o'clock) which disperses the mash liquor pretty evenly over the grain bed. I started with 18, found that too slow, so added more. The initial (too slow) use guided me where to put extra holes.

So that would be my suggest - start off with fewer than you think you might need. It's easier to add more than to take surplus ones away!

Engineers might sneer at my simple effort, but the proof of the pudding... I believe that sparging is the major determinant of efficiency, but, as we know, done wrong can lead to astringency. Beer Engine calculated efficiency for my last brew at 92%, and I've never had an astringency problem :pray:

Cheers,
Chris

Great stuff. I figured the same amount of holes in a longer bit of metal will put out just as much water as I need while getting an even spread. Off to B&Q I go!

I'm aiming to have another go over the next bank holiday.
 
When I'm banging-on about efficiency, I should clarify the use of my grain trap - a metre of net curtain from dahn the market. It's used together with a grain filter, and is very useful for avoiding stuck mashes.

After I've doughed-in, the loose ends are thrown inside the MT before the top goes on. On completion, the ends are left over the top of the grain bed for sparging. It helps to diffuse the sparge liquor, preventing rivulets forming in the grain.

After sparging, it makes it easy to clean out the MT, 'cos it just lifts out with all the grains. Simples! :)

Cheers,
Chris
 

Latest posts

Back
Top