My initial AG Brewery design!

The Homebrew Forum

Help Support The Homebrew Forum:

This site may earn a commission from merchant affiliate links, including eBay, Amazon, and others.

periolus

Landlord.
Joined
Aug 2, 2010
Messages
517
Reaction score
11
Location
Bristol
Well - here are my initial thoughts:

Slide1-1.jpg


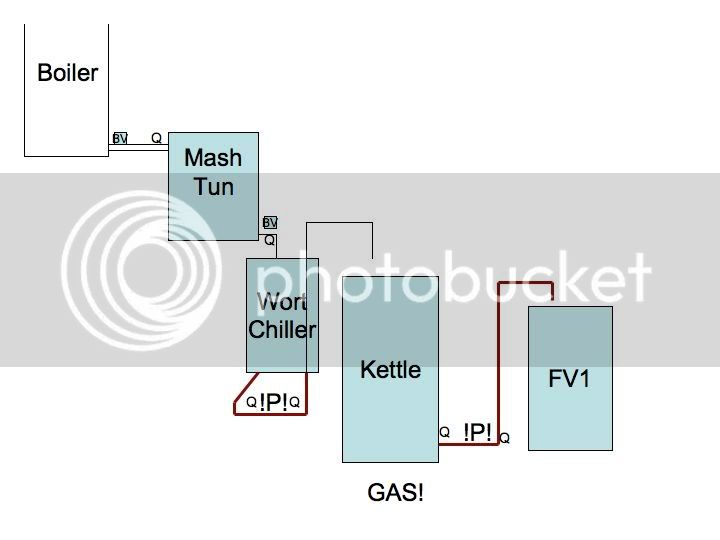
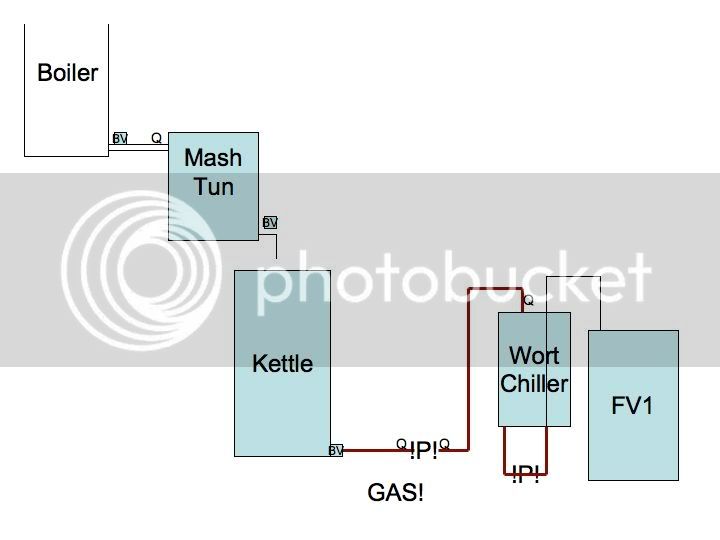
BOILER: The water runs from a ball valve into the top of the Mash Tun, through the wall of the box.

MASH TUN: There is a Quick Disconnect (labelled Q) at each end so that the Mash Tun can be removed from the system and cleaned. On the inside will be a another QD so that a T-piece with two small shower heads can be placed on and used as a sparging arm during sparging.

The wort flows into.......

WORT CHILLER: This is going to be a 23L keg with top sawn off at the top of the vertical ribbing, so it is open. This will have the copper coil inside which emerges at a Cam disconnect -> hose barb on the outside. The red lines are silione hose running through a pump and back into the chiller via a hose barb -> cam disconnect. Both will have thumb taps to seal the vessel for disconnection. On the inside, copper pipe continues up interweaving through the coils to give it extra strength before emerging and providing an open pipe outlet to fill the kettle.

Therefore the Wort Chiller can be disconnected from the silicone hose and mash tun and washed independently if needed.

KETTLE: Gas-fired with a ball valve exit running via hose to a pump. From here, more hosing will be used to fill the FV.

What do you reckon?
 
B***OCKS! I've uploaded the wrong picture! I corrected it and saved it incorrectly on the website!

I'll correct in a minute!
 
Right!

Slide1-2.jpg


This is it - BOILER and MASH TUN as before, with Q denoting quick release. Also the quick release inside at the top to allow addition of a sparging T-piece and shower heads.

RED LINES are silicone hose, !P! is a pump etc.

Make sense?
 
Are you going to have two pumps or one and is it going to be on one level or on three levels as in the diagram
 
It's going to be on three levels - is that daft? I just didn't want loads and loads of pumps. I thought I might need two pumps - UNLESS I don't need the second pump to maintain the pressure to get the wort into the FV after going through the chiller. Could I get away with just the first pump?
 
God what a schoolboy error with the first picture :oops: The wort chiller is immersion type BTW, with a copper coil and then a copper pipe rising back through to form the outlet to the FV
 
I use one solar pump, have the HLT, tun and copper at bench level and use Vossy's tubing.

I pump from the HLT to the tun for the mash.
Drain tun to a bucket on the floor whilst pumping from the hlt to sparge. I lift the bucket when its got about 15litres and empty in to the copper, I collect about 32litres for a 25ltr brew length.
Drain copper to FV on the floor
 
Hi periolus
Good luck with the build. I was wondering just how big the set up will be :? If you are using an immersion chiller, could you not get a four level set up and avoid using a pump at all. You do need quite a bit of height I know even for a small set up.
In my early days I did consider making a "lifting device" to raise the boiler after brewing, so that it could be gravity fed to the FV ;) I was designing an 18gallon system, but went the whole hog, instead with pump and HERMS.
AG set ups don't have to be complicated. This was my first set up, produced a lot of good beer, but not something to be copied. ;) :lol:
:shock:
4542978956_1971886263_b.jpg

:shock:
I have got my act together a bit since then. ;)
 
My problem is the height, as the garage roof is supported by a metal frame that is 2.1m from the floor:

70L boiler (45 cm)
Mash Tun (47.5 cm)
Chiller (35 cm)
Kettle (45 cm)

This gives 172.5cm, but then you need a little clearance in between each as well potentially. I'll keep working on it!
 
Actually, if the piping went from the kettle through the pump and in through the existing hole for the tap in the keg I am using for the wort chiller, the coil could just wind up to the open top and then along a final straight piece to the outlet to the FV.

Would the first pump shown between the kettle and the wort chiller be able to drive the wort up a coil inside something about 3/4 the size of a 23L barrel? That would be a MUCH better solution and would avoid two holes being drilled int the base of the barrel and plugged with complex plumbing!

Wotfink?
 
Why not use an immersion chiller in the kettle and run a hose to it

yes, as Sean said and I am pretty sure your chiller will not work properly anyway unless you are feeding it with cold water and draining it. :) I think the set up you have in mind has some vague connection to a counter flow cooler I think :?
 
This was supposed to be an immersion device, so the keg would be filled with cold water and some ice. This would cool the copper coil as the wort travelled through it. I didn't make that clear before. Would that not work?
 
Complicated this brewery design lark, isn't it :D

I am a bit crap at this sort of thing, but it's a great way to learn about it from other people and I am really enjoying it - thanks for all the advice so far :thumb:

So - an immersion cooler in the kettle you say - so that is just pumping cold water through the coil whilst the wort is still in the kettle, yes?

Alternatively, a CF chiller with the coil running through hose-pipe in the position it is now would be effective - is that right?
 
Yes I think you are getting a plan together, its all part of the fun, for me and there are many ways of achieving the rusult :D
Its not for me to knock your ideas or tell you how to do it, but personally I think messing around with a cooler and ice as you suggest is not the way to go ;)
An immersion cooler is simple, quite effective and not to hard to make :)
Counter flow system is not to hard to make but needs a pumped flow to be effective and is more challenging to keep clean, sanitize :)
Personally, I use both, but not at the same time. :? :lol:
 
As S said many ways to get the same result :thumb:

For myself though I'd keep it simple for the first few brews, its hard graft at times and a steep learning curve.

Good luck with the build periolus :thumb:
 
I'll keep thinking on it. Having looked at what is required for making a counterflow chiller with the coil inside some hose, I think I could make one of those. It's just having the pumped supply from the outside tap. It's only for a few minutes though, at the end of the day. Is an immersion chiller effective enough? It just seems counter-intuitive having the water running through the copper - it just feels wrong. The wort should be in there - surely! AAARGH! Maybe I have OCD or something. I'll check.....34 times....and then write it in a journal.

I guess I also want a design that I can keep in place if I choose to expand. I will start with small brews, but I will have a 70L boiler and 48L Mash Tun from the outset so I have capacity already in the system.

Hmmmmm. Decisions. Decisions. Decisions.
 
Hi Periolus,

Yes you've got the counterflow idea the wrong way round. If you search, someone's done a nice post on how they made theirs but basically, the wort goes through the 10m of 10mm copper and the hosepipe is a water 'jacket' fed with tap water flowing in the opposite direction to the beer.

Have a read through the post under my signature (start at the beginning). I use a counterflow I made myself. Top tip, heat the hosepipe up with hot water first and use washing up liquid as lube.

The immersion chiller is far easier to make and TBH just as effective. They are easily sanitised by dropping in the boil for the last few minutes and the advantage is, the cold break proteins remain in the copper, rather than in the FV, using your hop bed as a filter. Lots of people use them. (Top tip for this, if you use 10mm copper, get a bending coil for about £5 to slip over it to prevent it kinking while you bend)

Pumps, I use one piddly 12V 'solar' pump which is fine. My brewery is on 3 levels but could easily be on 2 levels if I wished. The only gravity drop is between HLT and Mash tun for the sparge. It's just a matter of being clever with plumbing and ball valves. (I mainly nicked my designs from other folks pictures I'd seen on here anyway :oops: ). Keep thinking, reading and stealing ideas. :thumb:
 
Back
Top