iSpindel - digital WiFi hydrometer

The Homebrew Forum

Help Support The Homebrew Forum:

This site may earn a commission from merchant affiliate links, including eBay, Amazon, and others.

anders

Active Member
Supporting Member
Joined
Dec 2, 2015
Messages
60
Reaction score
33
Location
NULL
This came up in another thread and blawford asked information about this. Rather than continue discussion in that thread I thought I'd create a new one.


All the information is available here - https://github.com/universam1/iSpindel

Items needed
  • container (petling/Jumbo test tube)
  • Wemos D1 Mini (WiFi controller)
  • GY-521 (3 axis accelerometer/gyroscope)
  • TP4056 (charger module)
  • 18650 3.7v battery
  • Resistors (1 each of 4.7K, 470 & 220K)
  • DS18B20 temperature sensor

Also need a tray to hold it all, this was all the excuses I needed to get a 3D printer.
Most parts above are well worth getting from somewhere like AliExpress as UK stock prices are a bit stupid, e.g. £4.99 for a single GY-521 from UK or £9 for 10 from China (maybe work out a group buy or something?)

The petling containers are hard to come by. You can get them from geocaching websites from US or Germany but I decided to go for readily available Jumbo test tubes for kids.

You'll also need some prototyping board and a soldering iron. I ended up getting PCBs printed to save a lot of hassle here, cost was about £12 for 10 boards.

Will update this later with more photos and more information about my configuration.

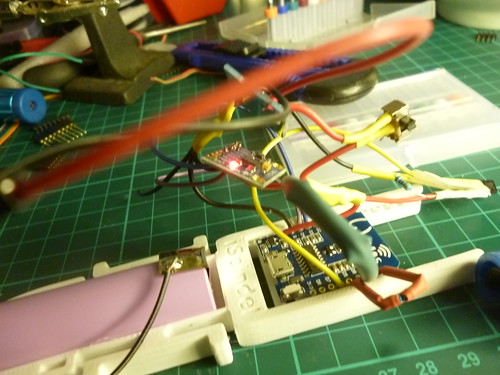
IMG_20170608_203510.jpg


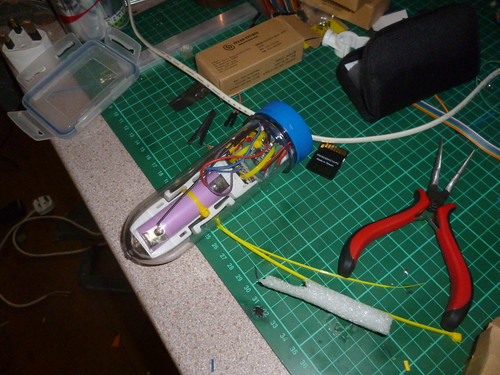
IMG_20170608_203554.jpg
 
Thanks for the post, looks like a interesting project. Have you tested it out yet? What is the accuracy like?

Got a few too many other projects on the go at the moment but this might be something I make in the future.
 
Now that's impressive :clap:
Can you add more info regarding the actual assembly/set up?
 
Have you tested it out yet? What is the accuracy like?

Not quite yet, waiting on the gyro's turning up then I can properly assemble one and will try it out in a brew. People seem to think it's as accurate as the cheap homebrew glass hydrometers but I'll reserve judgement until I can see for myself.

All Gobbledygook to me even if I understand the what the final thing will be,like the Tilt hydrometer

Same concept, difference here is that I don't need to go stand next to the brew with my phone to connect via bluetooth. This will automatically dump readings into a database at scheduled intervals that I can check whenever I want, wherever I am.

Now that's impressive :clap:
Can you add more info regarding the actual assembly/set up?

Beyond putting the physical components together? The chap that put this all together, Universam1 (github username) has developed the software that you flash onto the wemos wifi device.
When you first switch the device on, it creates a wifi hotspot that you can connect to using your phone, laptop, whatever. It then gives you a configuration page where you can tell it what to do with the readings, easiest probably being the Ubidots.com account. I've got it posting JSON data to a php file that parses it and dumps the readings directly into a MySQL database.

Think its beyond most folks diy skills especially if you need a 3D printer,cheaper to buy one
Loads of people have 3D printers now, lots will be willing to help out with printing the required bits and posting them out. I'll no doubt have quite a few spare parts that I might be willing to part with, either in kit form or assembled. Wouldn't expect anything more than covering costs of parts.
 
Now if you could get the probe to talk to this;

http://smartpid.com/

or even talk to the guy who designed it?,,,,,

and then control a Buffalo 3kw Ind Hob. I could be very interested!!! (and some others on here)

There again they hated the grain thresher, but you end up here if it's any good:thumb:
http://www.engineeringhalloffame.org/profile-meikle.html
:grin:

Well, that's part of my other project. The two will combine into the same front-end.

Also building a raspberry pi brew controller that will control boil and fermentation. Could use the temp reading from the hydro to trigger the heater or chiller elements. The controller itself will have capacity for 5 temperature probes, will be recording things like temperature inside the fermentation chamber, ambient shed temperature, outside temperature. Plenty of data to play with :thumb:

Would need to source higher-rated relays for 3kW as these I have are only rated to 10A.

Might be getting slightly obsessed with the 3D printer...

IMG_20170618_065024.jpg


IMG_20170618_111349.jpg


IMG_20170618_125128.jpg


IMG_20170618_125146.jpg
 
I was with you until this part:
I've got it posting JSON data to a php file that parses it and dumps the readings directly into a MySQL database.
Let me go google some of those acronyms :?
 
You dont NEED 3d printed bits, any sheet material can be whittled into shape with patience ;) i was planning on using a few layers of 3mm marine ply glued together as i could cut those with a stanley knife and SS ruler till a friendly 3d printer owner donated a few sleds..

All the 3d printed bit does is hold the components in a static position so any movement registered relates to the shifting centre of gravity due to specific gravity changes in the brew and not the components shifting position.. Hot glue is a more permanent solution.

the soldering/fabrication is well documented with photo's in the github repository documents folder, tho you may need to scan a few documents to find everything you need.
and soldering skills dont take very long to acquire, an evening spent with a throw away circuit board adding and removing components is all the priming most folk need (avoid lead free solder tho.. ) there is one daunting aspect which is the removal of small surface mounted components.. However you can practice this on a suitable throw away circuit board. And there is a workround involving using a wemos d1 battery shield instead of the tp4056 battery charging board.. but that will involve a bit more homework and googling..

Programming with the Ispindle sketch is detailed step by step, install the arduino ide app, downlaod and save the code fies, and open them to transfer to your usb connected build. The only code changes needed are the SSID and password of your wifi network and the ID keys for the unibots website which your have step by step details to obtain these too..


My #1 attempt is very ad-hoc. wired with short lengths of prototyping wire soldered to the onboard solderpads secured in pace with insulating foam sandwiched between pcbs and cable ties..
32872072083_1ab5a900cd.jpg

33615763252_55a7f79600.jpg


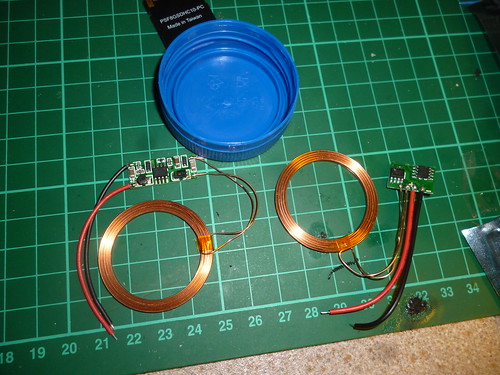
for #2 and #3 im considering adding a wireless charging coil in the cap, as well as a neater pcb build.
33074398394_e7d8bd09da.jpg


I will however keep the temp probe on the end of 3" or so of wire as this allows the probe to sit below the liquid level and perhaps read a better brew temp without as much heat interference from the board and electronics, especially if leds are not removed.


@Anders.. lookin good there.. im wondering have you come across brewpiless?? https://github.com/vitotai/BrewPiLess.. im sure im jumping to the wrong conclusion, but if yur considering switching hi amp elements with the 4 x relay board, be mindful not to employ pid or pwm control, otherwise yiu might be better off looking at SSRs, however they can get quite hot when under pid or pwm control which results in rapid switching and need heatsinks preferably mounted thru the containing wall with an external heatsink minimising the need for internal fans..


pour a sample or 2 and sit back one evening and browse the ispindle document folder before dismissing it :) with the brewpiless interface i am finally considering retiring my trusty old atc 800+ brewfridge controller ;)
 
Crikey you've even got some of that green cutty up board we have in the lab in work! Does your other half condone such activities....?
Well over my head...I've only just managed to get the TV on the wall for my son and plumb his xbox in.....get this....I needed a right angle hdmi connector! !
 
@Anders.. lookin good there.. im wondering have you come across brewpiless?? https://github.com/vitotai/BrewPiLess.. im sure im jumping to the wrong conclusion, but if yur considering switching hi amp elements with the 4 x relay board, be mindful not to employ pid or pwm control, otherwise yiu might be better off looking at SSRs, however they can get quite hot when under pid or pwm control which results in rapid switching and need heatsinks preferably mounted thru the containing wall with an external heatsink minimising the need for internal fans..

Hi Fil,

It'll only be switching the elements during the boil, will be monitoring temperatures of the relays closely during this, it won't ever be switching the elements unattended. Beyond that it'll just be switching a small heater and fridge for fermentation.

Will have a proper look at BrewPiLess although I'm liking the idea of developing the thing myself.
 
Sounds interesting, I will be following closely.
I could probably put the components together but the software side would be a big stumbling point for me.
 
nice one, Very neat job too. fwiw even without any leds pulled from the gyro or d1 boards the 18650 battery should have ample juice for weeks n weeks of use logging every 30 minutes..

i cant see any weights yet? or is that still to come?
 
nice one, Very neat job too. fwiw even without any leds pulled from the gyro or d1 boards the 18650 battery should have ample juice for weeks n weeks of use logging every 30 minutes..

i cant see any weights yet? or is that still to come?

Pulled both LEDs off anyway. Added a nut and a small bearing that was lying around for ballast.

It's in with a lager now. Started at 1.044 yesterday and reading 1.042 today so it's looking promising. So far so good.
 
Back
Top