Vossy1
Landlord.
How to make a 100 ltr stainless steel boiler/hlt with Sight Tube
This is a quick 'how to' make a 100ltr stainless boiler for a very reasonable price. It's meant to be a guide, and should not be seen as the only way to make one. I have made 5 of these now, and they have served me, and others, without fault. This 'how to' can be used for any sized stock pot.
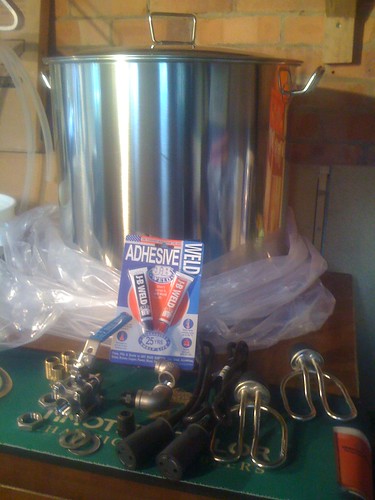
The bits

1 x 100ltr Stainless Steel Stock Pot (not shown in this pic)It cost £48 delivered from an E-bay retailer located in Germany
called nordic-optical. E-mail them if none are listed, they usually have some in stock.
1 x ½" stainless steel ball valve, part number 10397, £16.37
3 x ½" running nipples (brass) part number 6576, £2.16
2 x ½" 90 Deg elbow in 316 stainless steel, part number 14271, £3.05
2 x ½" 316 stainless steel lock nuts, part number 14547, £1.65
All from here
2 x 22mm ID stainless steel washers from a local BSA parts shop £0.90 (M22 washers form B from here here
2 x 2.75kw elements £22 from Baker Electrical (not those shown) £22.
2 x element leads, old round pin type £22, from Backer.
1 x brass female straight connector ½" female to 15mm compression (local plumbers) £1.00
2 x John Guest part number PM011014E, £4.20 from here
1 x length of polycarbonate tubing in 10mm outer diameter £7.50 (from a 2m length costing £30) from here here
TOTAL COST £128.83
Tools, a drill, 40mm & 20mm hole saw bits (QMAX cutters are easier to use than hole saws),
a dremmel (steel files can be used alternatively)
JB Weld (fibre or nylon washers can be as an alternative).
Tool and JB weld costs were not added to the boiler costs, as I already had them.
Marking the holes for elements/sight tube and ball valve
Firstly I placed the stock pot on a table and made sure the pot was level, using a spirit level.
I measured the distance between the handles and marked the central point with a pencil mark on some masking tape. I then put a piece of masking tape at the bottom of the stock pot, roughly under the pencil mark, to show where I wanted the ball valve to go. Using the spirit level vertically, I marked on the bottom piece of tape, a line to show the vertical location of the ball valve. I then offered the ½" lock nut to the line to make sure that it would be free to turn from the curved base of the pot, this was 35mm up from the base. I then crossed the line through the centre of the nut. I repeated this process for the rear of the stock pot to show where I wanted to mount the elements. I marked a position far enough apart (140mm) on the rear so I could place the elements as close to each other as possible, and 70mm up from the base. I also used the same process to mark the desired position of the sight tube, with the upper elbow as close to the rim of the stock pot as possible (30mm hole centre from rim), the bottom elbow being 35mm hole centre from the base. I used a 4mm titanium hss drill bit to make pilot holes at each of the points, before using the hole saw bits to make the final holes, using a constant supply of cold water to cool the stock pot and hole saw bits, whilst drilling the holes in the stainless steel. The hole saw bits left a burr on the interior of the pot which I ground down using a dremmel with a grinding disc fitted.
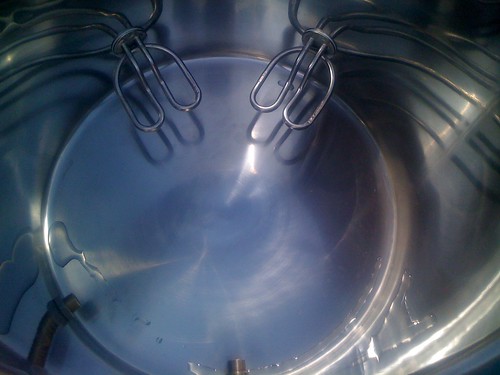
Pictures from left below show, holes for ball valve and sight tube (20mm), holes for elements (40mm), elements fitted


Simply pass the rear of the element through the hole inside the stock pot, and attach/tighten up the nut they come supplied with, from outside the stock pot.
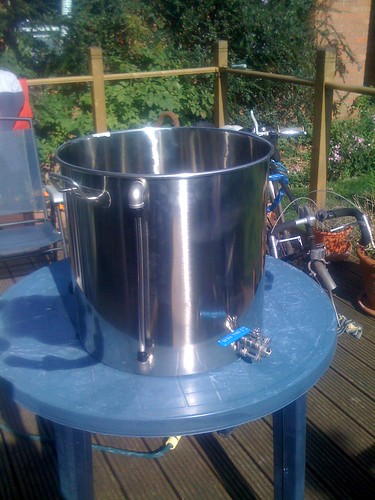
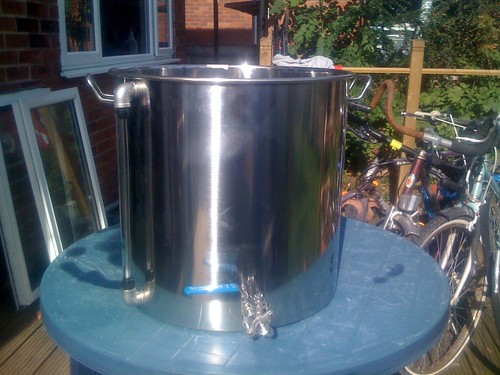
Pictures from left below show, ball valve and sight tube fitted.


Fitting the ball valve
I used plenty of wraps of PTFE tape on the nipple before screwing it into the ball valve as far as it would go. I placed a washer on the nipple before passing the rest of the nipple through the hole in the stockpot.
I smeared a small amount of JB Weld onto the entire circumference of the other washer (pot facing side) and also onto the nipple where it meets the pot on the inside. I put the washer over the nipple on the interior of the stock pot and tightened the brass female straight connector fitting onto the nipple, until it would turn no more, and cleared away any excess JB Weld that was squashed out from the washer. I have found that this is enough to create a water tight seal.
The reason for the washers is that the metal of the stock pot is quite thin and if you don't use washers to thicken the metal, there is too much movement in the ball valve so much so.. that if you place a non soldered, standard copper manifold, on the rear of the valve, the opening and closing of the ball valve will make the manifold come apart.
To make the build even easier why not use one of these 1/2" Stainless Steel bulk head fittings for the ball valve attachment, they're available exclusively only on this forum.
Fitting the sight tube
To fit the sight tube I first wrapped plenty of PTFE tape around the nipple before screwing it into the elbow as far as it would go. The John Guest fittings have an internal rubber seal that seals them to the mating surface on tightening so no PTFE tape was required. These fittings were screwed into the other end of the elbow. For the bottom elbow I smeared a small amount of JB Weld around where the nipple meets the elbow and then passed the nipple through the hole in the stock pot. I attached the ½"lock nut on the inside and tightened as far as possible. This forced excess JB Weld out from the sides of the elbow and the nut, which I cleaned away with cotton wool buds. I did the same for the top elbow however no JB Weld was used. Instead I used an o-ring on the inside of the stock pot. The reason for this is that, if I break the sight tube, I need to replace it, and I can't do that unless I can remove the upper elbow. As the liquid level never reaches the top elbow it doesn't need to be sealed. To cut the polycarbonate tube to length I first had to know how much of the tube goes inside the JG fitting. To do this, before I fitted the elbows I inserted the tube into one of the JG fittings. I then wrapped some masking tape around the tube, where it met the fitting. I then removed the tube and the masking tape showed me how much tube was inside the fitting. After I had fitted the bottom elbow to the stock pot, I inserted the tube into its JG fitting. I attached the upper elbow to the pot and used masking tape to show where the JG fitting met the tube on the upper elbow. I then removed the tube and added the extra length as measured earlier. I cut the tube to size, removed the top elbow from the stock pot, inserted the tube into the bottom elbow, then the top elbow, and screwed the nipple into the top elbow from within the stock pot, I then put an o-ring over the nipple and secured the elbow to the pot with a lock nut.
Testing
Before using the boiler on a brew day it first needs testing for leaks. Fill the boiler with water until the elements are covered, then bring the water to boiling for 10 minutes. If at any point water leaks from any joint, turn the elements off at the wall socket they are plugged into. Check and re tighten any joints as necessary.
The washers which seal the element to the pot will relax over the first few boils, check them and re tighten if there is any play in the securing nut.
Caring for your boiler
The elements will require cleaning on a regular basis, should they show signs of scale build up on their surface. If this build up is not removed, it may cause the elements thermo trip to activate, and this usually happens during a boil, meaning the boiler needs to be drained down and the element cleaned before continuing. To clean your elements of light build up a plastic scouring sponge may be used. It is best used immediately after a boil when the scale is still soft and wet. To clean the elements of heavy scale build up, it may be necessary to remove them from the boiler, and put them in a citric acid solution (lemon juice). When the scale has been removed refit the elements to the boiler. The sight tube rarely needs cleaning. If it does you can remove the top elbow from the boiler, remove the elbow from the tube, then use a long pipe cleaner clean the inside of the tube. The boiler itself can be cleaned using a metal scouring pad if needed, though usually a plastic scouring sponge will suffice.
EDIT, Comments regards JB Weld. At the time of making this item JB Weld was, and still is, my option for use as a sealant. It is classed as inert once cured, but has not been tested as food safe. The reason for me using it is that I wanted the smallest rigid seal I could get with minimal surface area exposed to the process. I could have used food grade silicone sealant, but in my experience I have yet to use a mould PROOF silicone sealant, so as the brewery is always wet, silicone sealant was not an option. Whilst plastic and rubber washers are available, I view their potential leaching properties in just the same light as JB Weld.
It's a personal choice as to what to use, I chose JB Weld.
Please use this as a guide only and check measurements for YOUR pot before cutting.
Further info
You can also secure standard kettle elements using a KM8 lock nut
Thanks to Rob Franklins dad for that piece of advice.
This is a quick 'how to' make a 100ltr stainless boiler for a very reasonable price. It's meant to be a guide, and should not be seen as the only way to make one. I have made 5 of these now, and they have served me, and others, without fault. This 'how to' can be used for any sized stock pot.
The bits

1 x 100ltr Stainless Steel Stock Pot (not shown in this pic)It cost £48 delivered from an E-bay retailer located in Germany
called nordic-optical. E-mail them if none are listed, they usually have some in stock.
1 x ½" stainless steel ball valve, part number 10397, £16.37
3 x ½" running nipples (brass) part number 6576, £2.16
2 x ½" 90 Deg elbow in 316 stainless steel, part number 14271, £3.05
2 x ½" 316 stainless steel lock nuts, part number 14547, £1.65
All from here
2 x 22mm ID stainless steel washers from a local BSA parts shop £0.90 (M22 washers form B from here here
2 x 2.75kw elements £22 from Baker Electrical (not those shown) £22.
2 x element leads, old round pin type £22, from Backer.
1 x brass female straight connector ½" female to 15mm compression (local plumbers) £1.00
2 x John Guest part number PM011014E, £4.20 from here
1 x length of polycarbonate tubing in 10mm outer diameter £7.50 (from a 2m length costing £30) from here here
TOTAL COST £128.83
Tools, a drill, 40mm & 20mm hole saw bits (QMAX cutters are easier to use than hole saws),
a dremmel (steel files can be used alternatively)
JB Weld (fibre or nylon washers can be as an alternative).
Tool and JB weld costs were not added to the boiler costs, as I already had them.
Marking the holes for elements/sight tube and ball valve
Firstly I placed the stock pot on a table and made sure the pot was level, using a spirit level.
I measured the distance between the handles and marked the central point with a pencil mark on some masking tape. I then put a piece of masking tape at the bottom of the stock pot, roughly under the pencil mark, to show where I wanted the ball valve to go. Using the spirit level vertically, I marked on the bottom piece of tape, a line to show the vertical location of the ball valve. I then offered the ½" lock nut to the line to make sure that it would be free to turn from the curved base of the pot, this was 35mm up from the base. I then crossed the line through the centre of the nut. I repeated this process for the rear of the stock pot to show where I wanted to mount the elements. I marked a position far enough apart (140mm) on the rear so I could place the elements as close to each other as possible, and 70mm up from the base. I also used the same process to mark the desired position of the sight tube, with the upper elbow as close to the rim of the stock pot as possible (30mm hole centre from rim), the bottom elbow being 35mm hole centre from the base. I used a 4mm titanium hss drill bit to make pilot holes at each of the points, before using the hole saw bits to make the final holes, using a constant supply of cold water to cool the stock pot and hole saw bits, whilst drilling the holes in the stainless steel. The hole saw bits left a burr on the interior of the pot which I ground down using a dremmel with a grinding disc fitted.
Pictures from left below show, holes for ball valve and sight tube (20mm), holes for elements (40mm), elements fitted


Simply pass the rear of the element through the hole inside the stock pot, and attach/tighten up the nut they come supplied with, from outside the stock pot.
Pictures from left below show, ball valve and sight tube fitted.


Fitting the ball valve
I used plenty of wraps of PTFE tape on the nipple before screwing it into the ball valve as far as it would go. I placed a washer on the nipple before passing the rest of the nipple through the hole in the stockpot.
I smeared a small amount of JB Weld onto the entire circumference of the other washer (pot facing side) and also onto the nipple where it meets the pot on the inside. I put the washer over the nipple on the interior of the stock pot and tightened the brass female straight connector fitting onto the nipple, until it would turn no more, and cleared away any excess JB Weld that was squashed out from the washer. I have found that this is enough to create a water tight seal.
The reason for the washers is that the metal of the stock pot is quite thin and if you don't use washers to thicken the metal, there is too much movement in the ball valve so much so.. that if you place a non soldered, standard copper manifold, on the rear of the valve, the opening and closing of the ball valve will make the manifold come apart.
To make the build even easier why not use one of these 1/2" Stainless Steel bulk head fittings for the ball valve attachment, they're available exclusively only on this forum.
Fitting the sight tube
To fit the sight tube I first wrapped plenty of PTFE tape around the nipple before screwing it into the elbow as far as it would go. The John Guest fittings have an internal rubber seal that seals them to the mating surface on tightening so no PTFE tape was required. These fittings were screwed into the other end of the elbow. For the bottom elbow I smeared a small amount of JB Weld around where the nipple meets the elbow and then passed the nipple through the hole in the stock pot. I attached the ½"lock nut on the inside and tightened as far as possible. This forced excess JB Weld out from the sides of the elbow and the nut, which I cleaned away with cotton wool buds. I did the same for the top elbow however no JB Weld was used. Instead I used an o-ring on the inside of the stock pot. The reason for this is that, if I break the sight tube, I need to replace it, and I can't do that unless I can remove the upper elbow. As the liquid level never reaches the top elbow it doesn't need to be sealed. To cut the polycarbonate tube to length I first had to know how much of the tube goes inside the JG fitting. To do this, before I fitted the elbows I inserted the tube into one of the JG fittings. I then wrapped some masking tape around the tube, where it met the fitting. I then removed the tube and the masking tape showed me how much tube was inside the fitting. After I had fitted the bottom elbow to the stock pot, I inserted the tube into its JG fitting. I attached the upper elbow to the pot and used masking tape to show where the JG fitting met the tube on the upper elbow. I then removed the tube and added the extra length as measured earlier. I cut the tube to size, removed the top elbow from the stock pot, inserted the tube into the bottom elbow, then the top elbow, and screwed the nipple into the top elbow from within the stock pot, I then put an o-ring over the nipple and secured the elbow to the pot with a lock nut.
Testing
Before using the boiler on a brew day it first needs testing for leaks. Fill the boiler with water until the elements are covered, then bring the water to boiling for 10 minutes. If at any point water leaks from any joint, turn the elements off at the wall socket they are plugged into. Check and re tighten any joints as necessary.
The washers which seal the element to the pot will relax over the first few boils, check them and re tighten if there is any play in the securing nut.
Caring for your boiler
The elements will require cleaning on a regular basis, should they show signs of scale build up on their surface. If this build up is not removed, it may cause the elements thermo trip to activate, and this usually happens during a boil, meaning the boiler needs to be drained down and the element cleaned before continuing. To clean your elements of light build up a plastic scouring sponge may be used. It is best used immediately after a boil when the scale is still soft and wet. To clean the elements of heavy scale build up, it may be necessary to remove them from the boiler, and put them in a citric acid solution (lemon juice). When the scale has been removed refit the elements to the boiler. The sight tube rarely needs cleaning. If it does you can remove the top elbow from the boiler, remove the elbow from the tube, then use a long pipe cleaner clean the inside of the tube. The boiler itself can be cleaned using a metal scouring pad if needed, though usually a plastic scouring sponge will suffice.
EDIT, Comments regards JB Weld. At the time of making this item JB Weld was, and still is, my option for use as a sealant. It is classed as inert once cured, but has not been tested as food safe. The reason for me using it is that I wanted the smallest rigid seal I could get with minimal surface area exposed to the process. I could have used food grade silicone sealant, but in my experience I have yet to use a mould PROOF silicone sealant, so as the brewery is always wet, silicone sealant was not an option. Whilst plastic and rubber washers are available, I view their potential leaching properties in just the same light as JB Weld.
It's a personal choice as to what to use, I chose JB Weld.
Please use this as a guide only and check measurements for YOUR pot before cutting.
Further info
You can also secure standard kettle elements using a KM8 lock nut
Thanks to Rob Franklins dad for that piece of advice.
Last edited by a moderator:


![BREWING THERMOMETER STICKERS ACCURATELY MONITOR FERMENTING BEER & WINE LIQUID TEMPERATURES 5PCS HOME BREW SPIRITS WINE LCD ADHESIVE [US]](https://m.media-amazon.com/images/I/311DDjo2X3L._SL500_.jpg)


