You are using an out of date browser. It may not display this or other websites correctly.
You should upgrade or use an alternative browser.
You should upgrade or use an alternative browser.
Effin femtobrewery construction
- Thread starter Aleman
- Start date

Help Support The Homebrew Forum:
This site may earn a commission from merchant affiliate
links, including eBay, Amazon, and others.
jamesb
Landlord.
Nice one.
We should try and get discounts from them for THBF and Jim's members. I've spent a fortunte there lately.
We should try and get discounts from them for THBF and Jim's members. I've spent a fortunte there lately.
Vossy1
Landlord.
Couriers have just dropped of £160 quids worth of Stainless fittings and copper tube from BES
:party:
Money dont go far at BES :lol:
Vossy, you provided me with the details of the supplier for the John Guest fittings for the sight gauges. . . . Unfortunately I can't find the post/PM with it in . . . With the BES Parts I'm getting close to being in a situation to start cutting and drilling . . . Could you send it again please
Vossy1
Landlord.
Could you send it again please
Yep, have you gone for 1/2" fittings?
Just for fun I went for both :)
The femtobrewery is going to be all 3/8" and 10mm , and the picobrewery is all 1/2" and 15mm
No particular reason apart from the fact that I have already cut the holes in the picobrewery kit (HLT, and FV) I just want to replace the plastic parts with shiny ones
I can remember the JG Part numbers its just the supplier details I need

£11.95
£14.99
Brew it Yourself: Make Your Own Beer, Wine, Cider and Other Concoctions
ST Bookstores

£11.81
Digital Temperature Watch Heating Thermometer Home Brewing Tools for Wine Bottle
B&D DIRECT STORE

£15.96
£16.99
The Brew Your Own Big Book of Clone Recipes: Featuring 300 Homebrew Recipes from Your Favorite Breweries
Amazon.co.uk

£7.99
£14.99
Craft Brew: 50 homebrew recipes from the world's best craft breweries
Sarahs Bookshop UK

£9.99 (£199.80 / kg)
Lalvin EC-1118 Wine Yeast (10 Pack) - Champagne Yeast - Make Wine Cider Mead Kombucha At Home - 5 g Sachets - Saccharomyces cerevisiae - Sold by CAPYBARA Distributors Inc.
CAPYBARA Distributors Inc. (UK)

£11.95
£14.99
WATER COMPREHENSIVE GUIDE (Brewing Elements): A Comprehensive Guide for Brewers
Amazon.co.uk

£7.00 (£70.00 / kg)
£7.25 (£72.50 / kg)
Youngs Multi Purpose Dried Active Yeast
TMJ.DISTRIBUTIONS

£14.25
£18.99
How to Brew: Everything You Need to Know to Brew Great Beer Every Time
Amazon.co.uk

£11.48
Banziaju Wine Making Supplies, 18" Auto Siphon Hose For Water Homebrew Siphon Pump With Tubing And Clamp Clear Wine Siphon For Beer Wine Making Kit
Jian Shi Xian Chao Mei Shang Mao You Xian Gong Si

£6.99
Stevenson Reeves Triple Scale Hydrometer (S1011) For Home Brewing and Winemaking
Medi Exchange

£63.25
Sanitary clamp 1.5" (38mm) OD50.5mm Sanitary Tri-Clamp 90-Degree Pipe With Nipple And Electronic Thermometer, Stainless Steel 304 Home brewing(Without Thermometer)
DAN CHENG XIAN PENG SHI DA SHANG MAO DIAN

£17.95
£24.95
DIAH DO IT AT HOME Fermenter 30l Fermentation Bucket with Tap, Airlock, Lid, and Bung, Homebrew Wine Making
do-it-at-home

£8.99 (£158.55 / kg)
Fermaid O Yeast Nutrient - 2 oz (56.7 g) - Make Wine Cider Mead Kombucha at Home - Sold by CAPYBARA Distributors Inc.
CAPYBARA Distributors Inc. (UK)

£38.63 (£0.39 / 100 ml)
Cider Making Kit - Full Starter - 10L/2 Gallon/20 Pints Home brew Beer Ale Lager
247 Homebrew

£11.95
£14.99
FOR THE LOVE OF HOPS (Brewing Elements): The Practical Guide to Aroma, Bitterness and the Culture of Hops
Amazon.co.uk
Vossy1
Landlord.
I can remember the JG Part numbers its just the supplier details I need
Airflow Compressors and Pneumatics LTD
100 Lord Street
Leigh
Lancashire
WN7 1BY
Tel 01942 673 529
Fax 01942 604 672
www.airflow-compressors.co.uk
Enquire by phone, order by fax :thumb:
Airflow compressors have just dropped off the JG Fittings for the 12 Sight Tubes :shock: Yes 12!! . . . can recommend this place . . . just a strange way of ordering, but it works. Ordered Tuesday delivered today . . . Great.
Need to order the PRTD's from Watch Hill (Another 50 quid :evil: ), and I'm waiting delivery of the thermometers for the Mash Tuns (one at 24.5L and one at 80L ) From Thermometers Direct
And get some hole saws :hmm: not sure about that . . .
Femtobrewery constrcution soon to commence :party: :party:
Need to order the PRTD's from Watch Hill (Another 50 quid :evil: ), and I'm waiting delivery of the thermometers for the Mash Tuns (one at 24.5L and one at 80L
And get some hole saws :hmm: not sure about that . . .
Femtobrewery constrcution soon to commence :party: :party:
Vossy1
Landlord.
Looking forward to it 
Talisman
Active Member
Bring on the piccies :pray:
So you'll be needing a couple of encapsulated PHE's soon, then...... :whistle:
Unfortunately other commitments always seem to be cropping up at NCB meeting dates - I was travelling back from Cornwall last weekend!
I'm going to be heading over for a weekend on the lash in the Warrington area sometime in May if that's any use.....
Unfortunately other commitments always seem to be cropping up at NCB meeting dates - I was travelling back from Cornwall last weekend!
I'm going to be heading over for a weekend on the lash in the Warrington area sometime in May if that's any use.....
No worries Ian . . . I'm looking at all sorts of cooling options anyway and the PHE's are just one of them.
However courtesy of Chandlery World I now have the worlds biggest nipple (That's a 38.5L Thermobox in the background)

Its a 1m length of 3/8 BSPP tube, which I will be able to cut to length to make my custom nipples, and then at a later date find someone with a CNC lathe to custom machine me some in stainless . . . . It's a bit of a cop out and compromise, but I want to get this brewery built, and used
However courtesy of Chandlery World I now have the worlds biggest nipple (That's a 38.5L Thermobox in the background)

Its a 1m length of 3/8 BSPP tube, which I will be able to cut to length to make my custom nipples, and then at a later date find someone with a CNC lathe to custom machine me some in stainless . . . . It's a bit of a cop out and compromise, but I want to get this brewery built, and used
Vossy1
Landlord.
A T
Regular.
Nice nipples guys :thumb: 
I can't believe that I started this thread back in March  and have only now got around to actually drilling holes in the Thermoboxes. Anyway the first task was to fit this 3KW Swan boiler element (15 quid from a Blackpool based eBay seller - No longer registered) into the base of the thermobox (38.5L From Nordic Optical)
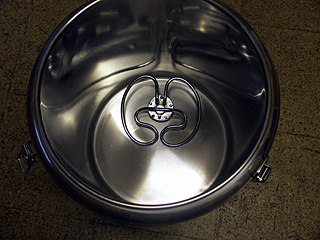
The first step was to measure the distance from the inner wall to where I wanted the element to fit . . . which was deliberately off centre to try and encourage currents to form. After adding the thickness of the wall it was time to measure and drill a 6mm pilot hole.
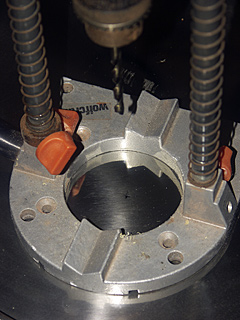
Oh and can I say if you are drilling holes in stainless go out and buy yourselves some cobalt drill bits . . . I use the eBay Seller UK Drills, and it is difficult to beat the Bosch Cobalt Hole saws from eBay Seller Hendroid
After drilling a 6mm pilot hole all the way through the outer and inner skins of the thermobox . . . time to break out the hole saws.
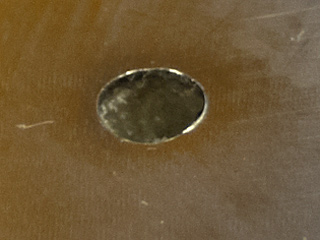
On the outer skin I needed some room to work so decided to break out the big 64mm hole saw. Despite taking it slowly, using cutting/broaching oil, and using a lot of pressure, I still managed to work harden the stainless . . . and burn out my old black and decker drill (which I'd had for 21 years!! . . . excuse to buy a new one :party: ) . . .and decided to resort to my new Makita Cordless . . . Which quite surprisingly made short work of the rest of the drilling.
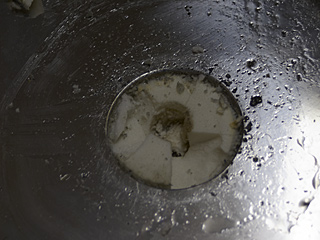
And the thing cleaned up really easily . . I cut out the foam with an xacto knife, to remove it
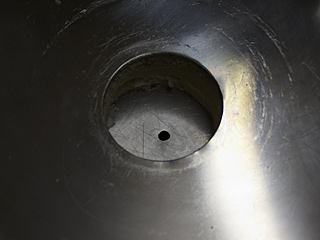
For neatness I prefer to use Q Max punches to make bigger holes (From Rapidonline), here I am using a 16mm punch to make a larger hole for the bolt for the 40mm punch I need to pass the element bits through . . . Oh and a simple piece of advice . . . get the thrust race for the larger punches it makes life so much easier.
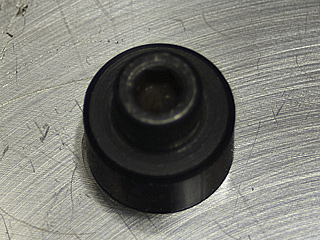
The element is held in place by five metal studs spaced around the circumference of the main hole (This also secures a rubber washer to make the thing waterproof.) After hearing about all the problems Vossy had when he was drilling this sort of hole for the drain in his mash tun I was somewhat apprehensive . . . still Fors juvat audentes
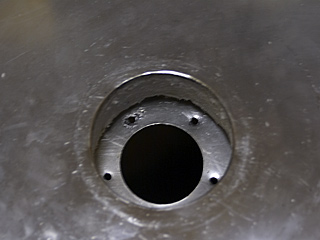
I had marked the position of the holes using the rubber washer, punched them with a centre punch and then drilled them using the 4mm cobalt drills . . . hot knife . . . butter, and here is the element fitted into place.
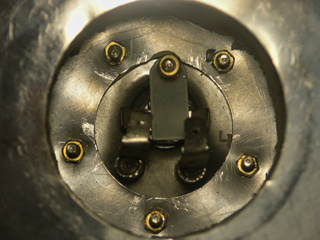
Still it is a tight fit to the connections in there . . . :hmm: do I want to use the boil dry cut out :hmm: Of course I do, so fitted the straddle wire between one terminal of the element and the live of the cut out.
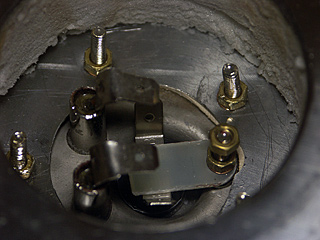
And then made all the connections . . . The cable comes in from the side, via a cable gland, which stops a lot of water ingress, and is 2.5mm cable rated for 'hot' environments . . . I would suggest rubber cored instead of plastic, if you can get it use immersion element cable.
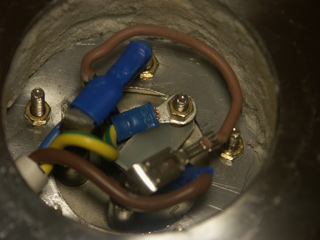
I will once full testing has been completed be securing a stainless plate over this hole probably with pop rivets, and a silicone sealant as a gasket . . . for the time being it is left exposed. I mentioned earlier in the thread that I had obtained some PT 100 sensors and glands from the sadly no longer with us Watch hill, and these were the next thing to be fitted.
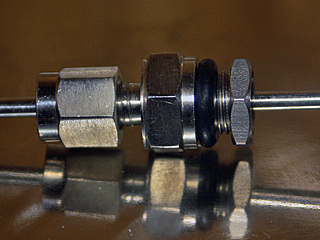
After drilling a 6mm pilot hole about a third of the way up from the base of the inner skin . . .I then switched to a 25mm cobalt hole saw and made a working hole in the outer skin.
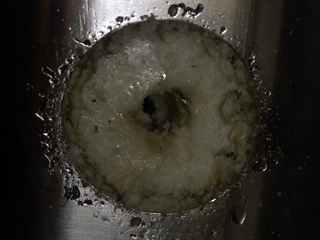
ANd again quick work with the xacto knife soon had the inner skin revealed . . . where I had to drill a 10mm hole for the thread of the gland
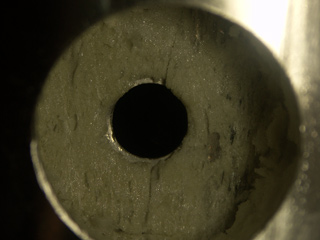
And with a short bit of filing to clean up rough edges here it is.
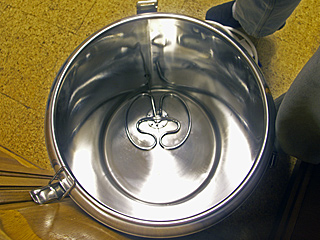
I have a sight gauge to fit, but that shouldn't be too hard . . . and a tap to do . . . but a test using the original tap at least proved that the element worked :lol: and the seal around the element didn't leak . . . . The same couldn't be said for the stainless gland, But I had cut the O ring doing the securing nut up too tight . . . I'll add an M10 stainless washer on the inside with a smear of food grade silicone sealant, and will then not need to do it up as tightly.
Next up a 38.5L thermobox boiler

The first step was to measure the distance from the inner wall to where I wanted the element to fit . . . which was deliberately off centre to try and encourage currents to form. After adding the thickness of the wall it was time to measure and drill a 6mm pilot hole.

Oh and can I say if you are drilling holes in stainless go out and buy yourselves some cobalt drill bits . . . I use the eBay Seller UK Drills, and it is difficult to beat the Bosch Cobalt Hole saws from eBay Seller Hendroid
After drilling a 6mm pilot hole all the way through the outer and inner skins of the thermobox . . . time to break out the hole saws.

On the outer skin I needed some room to work so decided to break out the big 64mm hole saw. Despite taking it slowly, using cutting/broaching oil, and using a lot of pressure, I still managed to work harden the stainless . . . and burn out my old black and decker drill (which I'd had for 21 years!! . . . excuse to buy a new one :party: ) . . .and decided to resort to my new Makita Cordless . . . Which quite surprisingly made short work of the rest of the drilling.

And the thing cleaned up really easily . . I cut out the foam with an xacto knife, to remove it

For neatness I prefer to use Q Max punches to make bigger holes (From Rapidonline), here I am using a 16mm punch to make a larger hole for the bolt for the 40mm punch I need to pass the element bits through . . . Oh and a simple piece of advice . . . get the thrust race for the larger punches it makes life so much easier.

The element is held in place by five metal studs spaced around the circumference of the main hole (This also secures a rubber washer to make the thing waterproof.) After hearing about all the problems Vossy had when he was drilling this sort of hole for the drain in his mash tun I was somewhat apprehensive . . . still Fors juvat audentes

I had marked the position of the holes using the rubber washer, punched them with a centre punch and then drilled them using the 4mm cobalt drills . . . hot knife . . . butter, and here is the element fitted into place.

Still it is a tight fit to the connections in there . . . :hmm: do I want to use the boil dry cut out :hmm: Of course I do, so fitted the straddle wire between one terminal of the element and the live of the cut out.

And then made all the connections . . . The cable comes in from the side, via a cable gland, which stops a lot of water ingress, and is 2.5mm cable rated for 'hot' environments . . . I would suggest rubber cored instead of plastic, if you can get it use immersion element cable.

I will once full testing has been completed be securing a stainless plate over this hole probably with pop rivets, and a silicone sealant as a gasket . . . for the time being it is left exposed. I mentioned earlier in the thread that I had obtained some PT 100 sensors and glands from the sadly no longer with us Watch hill, and these were the next thing to be fitted.

After drilling a 6mm pilot hole about a third of the way up from the base of the inner skin . . .I then switched to a 25mm cobalt hole saw and made a working hole in the outer skin.

ANd again quick work with the xacto knife soon had the inner skin revealed . . . where I had to drill a 10mm hole for the thread of the gland

And with a short bit of filing to clean up rough edges here it is.

I have a sight gauge to fit, but that shouldn't be too hard . . . and a tap to do . . . but a test using the original tap at least proved that the element worked :lol: and the seal around the element didn't leak . . . . The same couldn't be said for the stainless gland, But I had cut the O ring doing the securing nut up too tight . . . I'll add an M10 stainless washer on the inside with a smear of food grade silicone sealant, and will then not need to do it up as tightly.
Next up a 38.5L thermobox boiler
tubby_shaw
Regular.
- Joined
- Feb 7, 2009
- Messages
- 387
- Reaction score
- 15
Nice 
jamesb
Landlord.
How about pics of the bottom on the thermobox?
Vossy1
Landlord.
Very tidy work A, looking great :clap:
Would make for a nice 'how to' also :thumb:
Would make for a nice 'how to' also :thumb:
Similar threads
Equipment For Sale
For Sale: Bumper Lot! (Peterborough, Cambs)
- Replies
- 0
- Views
- 538
Equipment For Sale
RIMS System
- Replies
- 2
- Views
- 363
Equipment For Sale
All my brewing stuff. 50Lsystem and 40L BIAB plus kegs
- Replies
- 10
- Views
- 2K
- Replies
- 6
- Views
- 1K


![BREWING THERMOMETER STICKERS ACCURATELY MONITOR FERMENTING BEER & WINE LIQUID TEMPERATURES 5PCS HOME BREW SPIRITS WINE LCD ADHESIVE [US]](https://m.media-amazon.com/images/I/311DDjo2X3L._SL500_.jpg)


