Effin Brewery Upgrade - Pico brewery to Nano brewery

The Homebrew Forum

Help Support The Homebrew Forum:

This site may earn a commission from merchant affiliate links, including eBay, Amazon, and others.

Aleman

Regular.
Joined
Aug 15, 2008
Messages
257
Reaction score
31
Well it's now happening, finally decided to put things together . . . you remember this
NanoCopper00.jpg


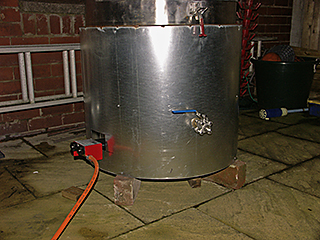
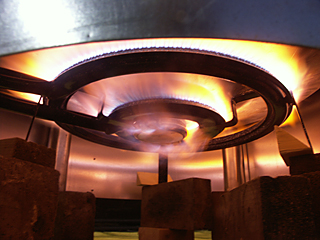
Well this is it in the dark with the shroud fitted and the burner doing it's stuff
NanoCopper01.jpg
NanoBurner01.jpg


And the good news is that at 37mBar . . . it took 40L or water from 25C to 78C in 25 minutes . . . which is pretty much better than the picocopper could manage (I have an email from Hamilton gas that says it will take hours to get a large volume of water to boiling) so I'm quite pleased . . .as it means that I will be saving gas.


Bidding on some big casters that will screw into the legs so that I can move it about.

As there is not really any way to put an immersion chiller inside (well a very skinny one perhaps) I am going to have to get the plate chiller sorted as well. . . . And I suppose I'll need the spinney sparger as well . . . too much to do and not enough time to do it
Can't wait for the first brewing session now :party: :party:
 
Aleman said:
Well it's now happening, finally decided to put things together . . . you remember this

NanoCopper00.jpg


Well this is it in the dark with the shroud fitted and the burner doing it's stuff
NanoCopper01.jpg
NanoBurner01.jpg


And the good news is that at 37mBar . . . it took 40L or water from 25C to 78C in 25 minutes . . . which is pretty much better than the picocopper could manage (I have an email from Hamilton gas that says it will take hours to get a large volume of water to boiling) so I'm quite pleased . . .as it means that I will be saving gas.

Can't wait for the first brewing session now :party: :party:

That looks the B*llocks Tony, I need go and change my undies now, and come up with an excuse for the wife that does not include its because "Aleman showed me his thing on the net" :shock:

£110 how far from me is your fabrication friend please?

UP
 
Those burners are great!

I used to get them from a Spanish company for around £140.00

I think they went bump when the recession hit.

There is one of My old systems going for £600.00 on Ebay which has one with a thermocouple.

Have a good brewday!

BZ
 
Looks good Tony, but why "pico and nano"?
One being 10 to the power -12 and the other 10 to the power -9!! :whistle:
 
Nice one AM! Happy with the burner then?

I'm still waiting firmly brother to get back from oktoberfest so he can fabricate/modify my stand/burner!

What will you be using as a mash run? Same from the previous set up or have you something else up your sleeve?
 
ericstd said:
Why "pico and nano"?
One being 10 to the power -12 and the other 10 to the power -9!! :whistle:

Well can't really call anything less than 1BBL (164L) a Microbrewery . . . My previous setup could safely produce 60L so I called it a pico brewery . . . . this is bigger (probably max boil of 150L . . . still not 1BBL so still not a micro) . . . and so Nano . . . not strictly SI :lol:

And the 20L plant is a femtobrewery . . . . . I'm waiting for someone to produce a 1L all grain system to claim the yocto prefix :lol: :lol:
 
Looking good Aleman.

It must be something in the water as I was gonna get mine up and running soon, which is the same as yours, but have done my back in so am laid up at the moment putting the build on hold. Hoping to be fit enough by the weekend, but will have to see.

I like the idea of the heat shield but was considering fitting it internal to the legs, I may change my mind on this now....still this, I suppose, is not essential to getting it boiling, just will take longer, and more gas. I expect it helps when you are having to boil outside due to wind etc. (I have assumed even in an open garage it might be safer to boil outside....not sure about the gas poisoning side of things).

I too have looked at those feet, it's great having the M8/10/12 (?) thread on the bottom of the legs....but was unsure about melting them being so close to the heat source. Machine mart also do them in case you haven't looked there. Although as always a little expensive.

Also, I was considering putting an electric 11Kw element in one, so I could boil indoors....what do you think...(Yep have dedicated supply for garage, which can be increased easily and planted 6mm^2 armoured when I had it put in...should be good for a few amps ;)). What do you think?

Looking forward to seeing yours in action.
 
Aleman said:
too much to do and not enough time to do it
Can't wait for the first brewing session now :party: :party:

I know how you feel, my new set-up is taking all my time.... :shock:
 
homers brew said:
Also, I was considering putting an electric 11Kw element in one, so I could boil indoors....what do you think...(Yep have dedicated supply for garage, which can be increased easily and planted 6mm^2 armoured when I had it put in...should be good for a few amps ;)). What do you think?

11kW :shock:

I don't use far off that in a 4bbl copper!

And we only need 6kw for the rolling boil.
 
jamesb said:
11kW :shock:

I don't use far off that in a 4bbl copper!

And we only need 6kw for the rolling boil.

Houston, we have lift off. May be a bit overkill then :lol: .... it was the next size up from common immersion types that I could find easily....they seem to be used in other industries quite widely and are similar to the pigtail elements in shape -so smaller holes to drill. Can't find a 6Kw one anywhere - but maybe they are out there. Just goes to show then that electric is more efficient than gas going by the power ratings.
 
Was bored yesterday so made this
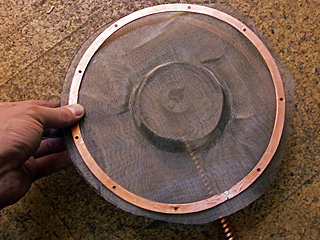
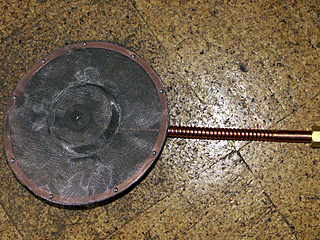
First take a couple of circles of 6mm copper tube, solder the ends together to make circles, then flatten them to give a couple of flat discs through which you drill a bunch of 3mm holes through both discs

HopStopper01.jpg
HopStopper02.jpg


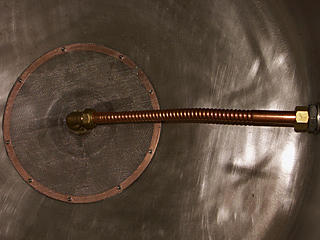
Take a couple of pieces of #30 Stainless mesh and cut a couple of discs from it that are about 1cm bigger than the copper discs. You can see I have a 'dimple' in one of the discs, that I made to fit the 3" bottom drain in the NanoCopper. By putting the mesh in the copper and pushing a whisky bottle tube of the appropriate diameter into it . . . If you don't have an appropriately sized single malt tin . .. go and buy one :D

HopStopper03.jpg
HopStopper04.jpg


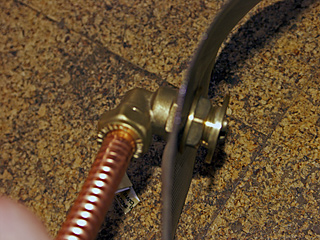
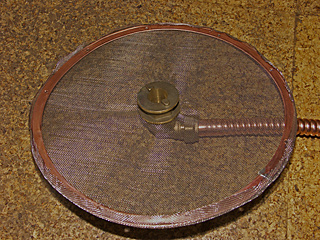
In the top piece I found the centre, by folding it in half twice, then cut a cross in the middle so that a standard 15mm tank connector would fit. I reversed the Flange nut of the tank connector and used that as a sealing surface for the 12" Female right angled 15mm compression fitting to fit the easy bend copper tube into. . . . Using the flange nut I can adjust the height of the pick up and put the tank connector right to the bottom of the well if required.

HopStopper06.jpg
HopStopper07.jpg


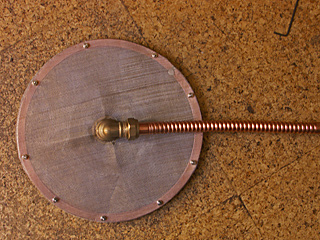
AS you can see from the last image you fit the stainless mesh to the copper disc by just folding over the edge . . try not to cut yourself . . . Once you have attached each piece of mesh to its own disc you then fit them together using 3mm button headed bolts and washers.

HopStopper08.jpg
HopStopper09.jpg


And finally fit it in place . . . and use the easy bend tube to get the hop stopper right down on the base of the boiler.

HopStopper10.jpg


The benefit of this one over my older hop stopper where the mesh was folded over and crimped together is that this can be taken apart to clean if anything gets stuck inside.
 

Latest posts

Back
Top