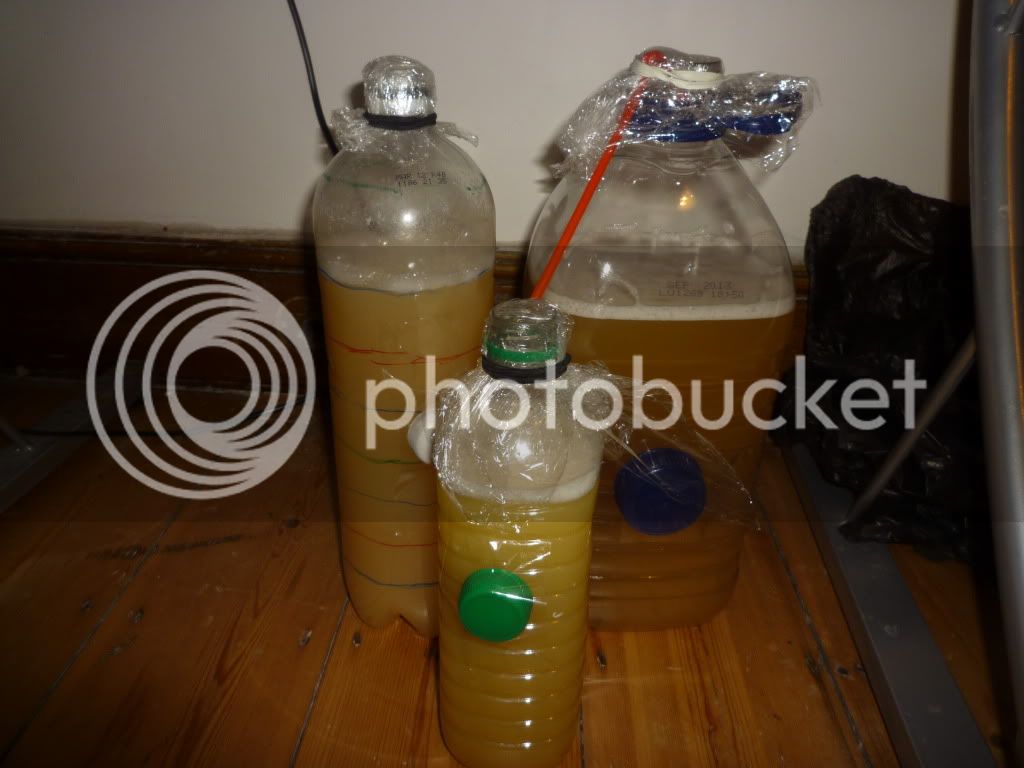
I made up something similar to help out a friend, who wanted to get into the hobby, that didn't have any of the normal equipment. Thinking that it might be a useful thing to try for people who haven't yet spent any money on buying proper equipment, and want to try it out to see if it's for them.
There's nothing worse than going and spending £100s on things for them to gather dust in a loft so here goes.
Home brew Equipment Required:
None
Supermarket "equipment" & Ingredients Required:
2x 5L Bottles of water (approx £1.10ea in Asda)
4L Apple Juice (Smart price AJ is 62p per litre in Asda)
1L Juice of your choice (Ranges from 62p to £2, I would recommend pomegranate, £1 in Asda, for your first go)
Splenda (for back sweetening)
Sugar (for priming)
1 small funnel (£1 in Asda)
9x 500ml screw cap PET bottles (Any used fizzy juice bottle will work fine:- coke, fanta, sprite, irn bru, etc.. all ideal)
2x teabags
1 sachet of cider yeast (Ebay £1.60 delivered)
1 tsp of bovril or tomato paste (this is optional, if you don't have it don't worry)
You can switch out the 9 PET bottles for glass fizzy juice bottles if that's what you have. Larger PET bottles can also be used but if you want fizzy cider then pouring out the contents without ending up with yeasty cider is going to be difficult.
Instructions:
Store your juice at room temp (Important for your yeast).
Make a strong cup of tea 20 minutes before you start, use 2 teabags and just allow them to steep until ready for them.
Drink/Ditch the 5L of water from your first bottle (Leave the other one as is for now)
Pour the "your choice" juice into the newly emptied bottle (use funnel)
Pour in 3L of the apple juice (Keep the last carton for later)
Pour in your tea (the hot tea will bring the temp up a few degrees, ideal for pitching. The 20 minute wait is to be sure it isn't TOO hot)
If you have it add in a tsp of your nutrient (bovril or tomato paste)
Take out the funnel, put your very clean hand over the end and give everything a right good slosh around
Open up your packet of yeast and sprinkle it in (just ditch the lot in there, don't bother keeping any for later... that will come with experience)
Watch the yeast re-hydrate and fall into your newly mixed juice.
Once it's all under the surface and sufficiently hydrated put your, very clean, hand over the end and give it all a good slosh around
Put it somewhere that's out of direct sunlight and going to be as close to room temp as you can find (20 degrees is ideal, no more than 23 and no less than 18)
Place the lid on top but do not tighten it on at all, not even 1/4 turn, it must be able to lift off at will. These bottles are notorious for expanding and they "seal" very easily (been there, wiped up the mess).
Leave for 5 days, you can look at it.... but don't touch it. Just let it do its thing. You will see bubbles, and foam and things happening. You can even have a sniff around the lid to see what smells are being made.
After 5 days top it up with your last carton of apple juice and then leave it for a further 5.
After your 10 days are up it's time to move to secondary:
Empty your second water bottle
Put, clean & cold tap water rinsed funnel in it
Decant the newly made cider into your clean bottle. Do so as carefully as possible and leave as much of the sediment as you can behind (the murky stuff in the bottom).
Place back where you had it with the cap sitting on top again
Forget about it for 5 days
After 5 days move it to somewhere cool and allow it to clear (could take a couple of weeks, just leave it if you can).
After your cider is clear it's time to bottle, back sweeten and prime (if required):
Thoroughly clean and rinse your bottles out with cold tap water (caps too)
Rinse again, with tap water, immediately before use and try to store them as close to inverted as you can (draining board or something) prior to use.
Add 1 very slightly heaped tsp of sugar and 1 very slightly heaped tsp of splenda to each bottle*
Using your funnel gently decant from your 5L bottle into each bottle until approx 1.5" from the top.
Your first few bottles should be spotless, the later may not be so clean (a bit murky) but don't worry... it'll fall out during conditioning.
Put the lids on all the bottles and give them a gentle shake to mix in the sugar and splenda
Store at room temp (around 20 degrees) for 2 weeks then move to somewhere cool for at least the same again (keep them upright)
Move to your fridge for a day or so (again, upright)
Open, pour (leaving the sediment behind, careful here) and see what you think
* I'm assuming that you want a fizzy cider, you want it medium/dry (Strongbow ish) and that you are using 500ml bottles. Sugar and Splenda quantities will need to be adjusted to meet your needs. If you need any help just ask.


![BREWING THERMOMETER STICKERS ACCURATELY MONITOR FERMENTING BEER & WINE LIQUID TEMPERATURES 5PCS HOME BREW SPIRITS WINE LCD ADHESIVE [US]](https://m.media-amazon.com/images/I/311DDjo2X3L._SL500_.jpg)


