Recoiling an immersion chiller? Is it possible?

The Homebrew Forum

Help Support The Homebrew Forum:

This site may earn a commission from merchant affiliate links, including eBay, Amazon, and others.

Yabezag

Active Member
Supporting Member
Joined
Dec 15, 2013
Messages
46
Reaction score
5
Hi guys, am finding my feet with BIAB, but I keep having problems with my immersion chiller. First time the hose popped off and blasted into my wort and I abandoned the wort in disgust! Second batch, even with modified connectors, the junction leaked but outside the vessel. So, I was wondering if it would be worth it to uncoil the thing and recoil around a bucket or something. My Stockpot diameter is Forty centimetres. Is this possible or will I just end up with a kinked mess...better to buy more copper pipe and start afresh? Any ideas welcome, thanks!


Sent from my iPad using Tapatalk
 
You can do it but it would mean annealing the copper again as it work hardens, better off selling it an making a new one. Braze or silver solder connections on the ends for fitting a garden hose.
 
imho standard lead free plumbing solder and flux is more than adiquate for elements of an ic chiller, no need to braze or silver solder, Just ensure the residual flux is well washed off.

if your current IC size n shape is hampering an effective stir to keep the hot wort moving over the cooler coils you could consider employing a pump to recirculate and move the brew for the optimum chill.

while re-bending the coil wouldnt be too problematic the tighter leg bends wouldnt be so easy to normalise and rebend without forms n tools and probably result in kinked tube. Can you afford to loose the length of the legs in the new version or is it worth the expense to replace bends with bent end feed or compression fittings?

if you do re-bend, do it bit by bit open up the coil with small bends working along the length back n forth till open enough..
 
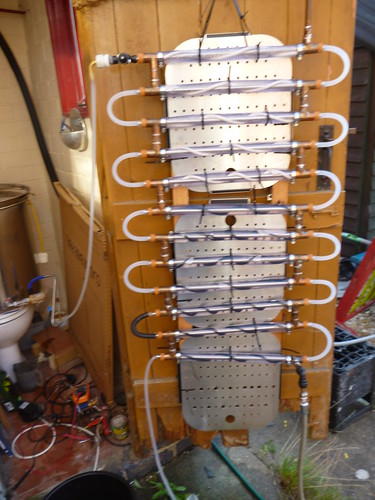
Why bother wrestling with small diameter copper tubing when you can do this and have a greater heat transfer surface? :whistle:

New Cooler MK2.jpg
 
Thanks folks. Am a newbie plumber as well as aspiring brewer! Will try to expand the coils gently and will go to you-tube school for plumbing solder and flux. I have lost faith in the seals and will try to get all joins outside the pot. I was moving the coil around I the pot to get a faster chill- this probably stressed the joints. Will try the stir method in future after a couple of pressure tests!! Thanks.


Sent from my iPad using Tapatalk
 
Blinking heck dutto that's a fine piece of work did you do a build thread
 
I have seen someone uncoil one of these on youtube if thats of any help. Mine leaked so i cut a small piece of hose and put that underneath ebfore tightening the crap out of it.
Dutto yours is really cool. Always wondered how you arfe meant to whirlpool with one of those in the pot though?
 
First time I used mine it leaked around the hose-chiller connections. The solution wasn't so radical as you are proposing. I slide a pair of rubber o-rings onto the two chiller ends then slide the hose over the top of the o-rings. Then a pair of jubilee clips clamp it all down. I just need to remember to tighten up the clips again once the hot water starts flowing and the rubber hose softens. No drips since then.
 
Why bother wrestling with small diameter copper tubing when you can do this and have a greater heat transfer surface? :whistle:

I know nothing about this kind of thing, so please excuse my ignorance but why does it have a greater heat transfer surface if it's square. And if square chillers are better why arent all chillers square?
 
What Dutto is suggesting is that it has a greater heat transfer because the dia of the tube is bigger, but it still comes down to the surface area.I made mine from 20 mm tube in a coil but there wouldn't be much difference in heat transfer to the OP's cos he has a lot more coils. As for silver solder or soft solder preference the soft solder joints are more likely to break with any rough handling.
 
Suppose you could you use compression fitting s I'm guessing it's various 90 degree elbows and and t pieces and 15mm pipes. I'm gonna study the pic sum more
 
Suppose you could you use compression fitting s I'm guessing it's various 90 degree elbows and and t pieces and 15mm pipes. I'm gonna study the pic sum more

Brass compression fittings cost an absolute fortune, brass also can contain trace elements of lead. Using lead free solder, joints can be prone to cracking if heavily abused. The more joints you have either compression or solder then the more places for dirt to gather up. The larger diameter pipe whilst having a larger surface area also requires more water, a 22mm pipe will allow 4-6 times more water thru it than a 10mm however if you apply that to having for instance 5x10mm chillers in your brew then the surface area of the 10mm pipes becomes a lot more effective.

If i was wanting to make one from scratch i would look at making either a double coiled 10mm or a counterflow. For a double coiled chiller you would only have to solder on one tee for the supply in connecting a tight wound inner (wound round something like a 4" drain pipe) and a looser wound outer coil.
 
Or do what someone did on YouTube for a double coil chiller
Tight wind around a 4 inch drain pipe then pack it out with bath towels then wrap again this means no joins
 
Well, here are my versions. I wish I'd fed a small diameter copper tube inside the the large one, but I couldn't work out how to terminate it, so I just did this. I did the large one first, and realised it was a bit tall for a Burco boiler, so I made the small one as well. The tall one is used in a 50l Braumeister:
IMG_0488-M.jpg


These were coiled around something about the same diameter as a 5l mini keg. I can't quite remember what I used. You need to make sure you leave sufficient length for the upright coming off the bottom, all the way up and out the vessel to be used, with a suitable bend.
This is how they were terminated:
IMG_0491-M.jpg


And these are the fittings I use to attach the tubing:
IMG_0492-M.jpg


If you are in the habit of putting the chiller in the boiling wort to sterilise it, it is useful to have a tap as shown. You should close this tap and attach the other fitting to the tubing that runs to drain or fills your sink with hot water. The reason for this is if there is any residual water left in the chiller coils, it will boil and spit out of the fittings shortly after you put it in the wort. Don't install two taps, unless you want to make a bomb!
 
#1 a wee critique of the original IC coil, - way too tight, you want some gap between the coils so the Hot beer can flow easily through the structure.. aim for circa 5mm gap minimum between the coils..

Also a double continuous coil 1 inside the other isnt the best suited design for this particular purpose, I know cos thats the route i took ;) and even with an highly active stir to move the beer over the coils it was a 35minute+ job to chill a 5 gallon batch down to below 30C..
The water heats up on its travel thru the first coil and has little input to apply by the time its running thru the 2nd.. feed both independently and its a different game tho..
8453914714_97c7d47008.jpg
15mm hard copper legs attached with end feed solder fittings.. i also used the core from some 4mmsq twin n earth flex and tube off cuts to form separating and rigidity structures i also soldered into place.


However where folk have made multiple small coil IC chillers with branched feeds, the efficiency has risen to big plate chiller levels, if tempted to go elaborate, be mindful of the need to keep the hot wort moving over the coils ;)

straight tube cfc however is the way to go imho ;)

testing the concept
9839192236_6148b1dce2.jpg


and its first run (outside the brewshed just in case..)
10369702414_2ed37c5907.jpg


70l chilled to pitching in circa 15 minutes and no stirring required
 
Yes Fil, I think you are right over the lack of gap. I'm sure that would improve things, although it is quite quick as long as the mains water temperature is low enough. Recently, with the hot weather we have had over here the water temperature was about 22*, so that didn't help matters.

I have just bought some fittings so I can attach the beer chiller to the wort chiller, once it has dropped to about 30*. That should speed things up considerably, as it is always slow to drop, the closer the two temperatures get to each other.

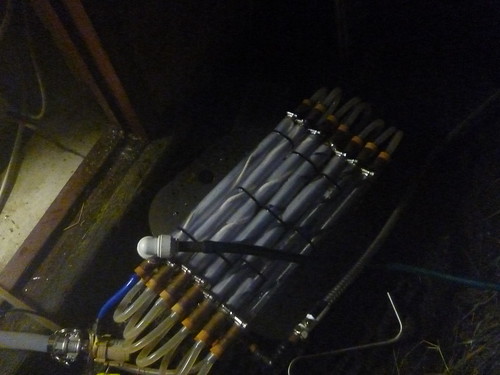
I quite fancy trying to make up something like the Jaded Brewing creations, but again I am not sure how to go about terminating 3 smaller diameter tubes into one larger one.

I am a little dubious about CFC's and plate chillers with respect to the cleaning requirements, even if they are more efficient. Maybe my concerns have no real foundation, but that is how I currently feel.
 
Just thinking out loud having not seen the jaded one but terminating 3 into one you could make a flute type arrangement.
Where you use 10mm to 15 mm converters then two t pieces and the end one being a 90 degree elbows ran in series and out
I can see this in my mind but your probs going what the hell this way you can technically have 3 separate water feeds into the coils ?
 
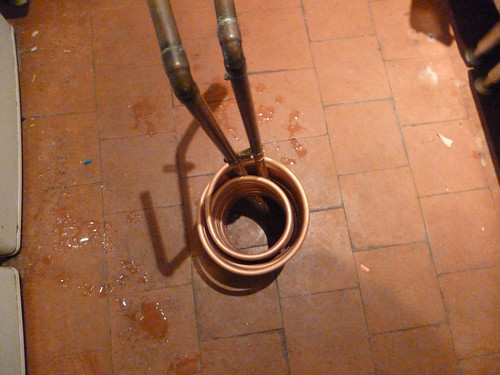
Thanks for the inputs folks. I now have modified chiller. I wound it around a paint can as best I could. Not as pretty looking, but I expect it will be more efficient with better surface area exposed to hot wort. Will addd PTFE tape to the compressions threads and move the wort over the coils rather than try to move the coils in the wort. I will then connect to my rainwater butt pump and recirculate through a 1000 litre Unitank so now water wasted. Using this rainwater as coolant explains why I am dreading any leaks!

IMG_0278.jpg
 
Back
Top